Installation and Update of the Connector
- After successfully downloading the Amazon Odoo Connector App from the Odoo App Store, you need to place it on the Odoo Add-ons or any other desired path.
- Now, navigate to Apps in the dashboard. Click on Update Apps List from the menu. Once it is completely loaded successfully, the Amazon Odoo Connector App will be visible in the Apps section
- Click on the Install button. Now, you are ready to use the Amazon Odoo Connector App.
To upgrade the latest module of our apps for the same Odoo version, Please follow the steps below.
- log in to apps.odoo.com (from the account you purchased the app)
- Download the latest version of your purchased app.
- Extract the zip and replace the folder with existing add-ons (amazon_ept)
- 3.1 For Odoo.sh, Push the changes to the GitHub repository.
- Restart the Odoo service. (Only for Odoo On-Premise)
- Go to Apps ↣ Amazon Odoo Connector ↣ Upgrade
User Access
The system will set Amazon Manager rights to admin and Odoobot as a user once the connector is installed.
There are two types of users:
- Amazon Manager
- Amazon User
- Amazon Manager: Amazon manager has full access to rights of configuration and all processes.
- Amazon User: Amazon users can not change any configuration and are not allowed to delete any details of Amazon.
SP API Re-Authorisation
SP-API Re-Authorisation is a simple process. This process is only applicable once you complete the migration of SP-API.
Navigate to Amazon ↣ Configurations ↣ Sellers
Click the SP-API Re-Authorisation button and you’re done.
SP-API Re-Authorisation:
After clicking on the button SP-API Re-Authorisation You will receive an email with an authentication link that helps you to redirect to Amazon Seller Central and re-authenticate your seller account. This link will expire in 1 hour.
You simply need to click on the Authenticate SP-API button in the email, which will take you to Amazon’s Seller Central login page.
You must then log into your Seller Central account.
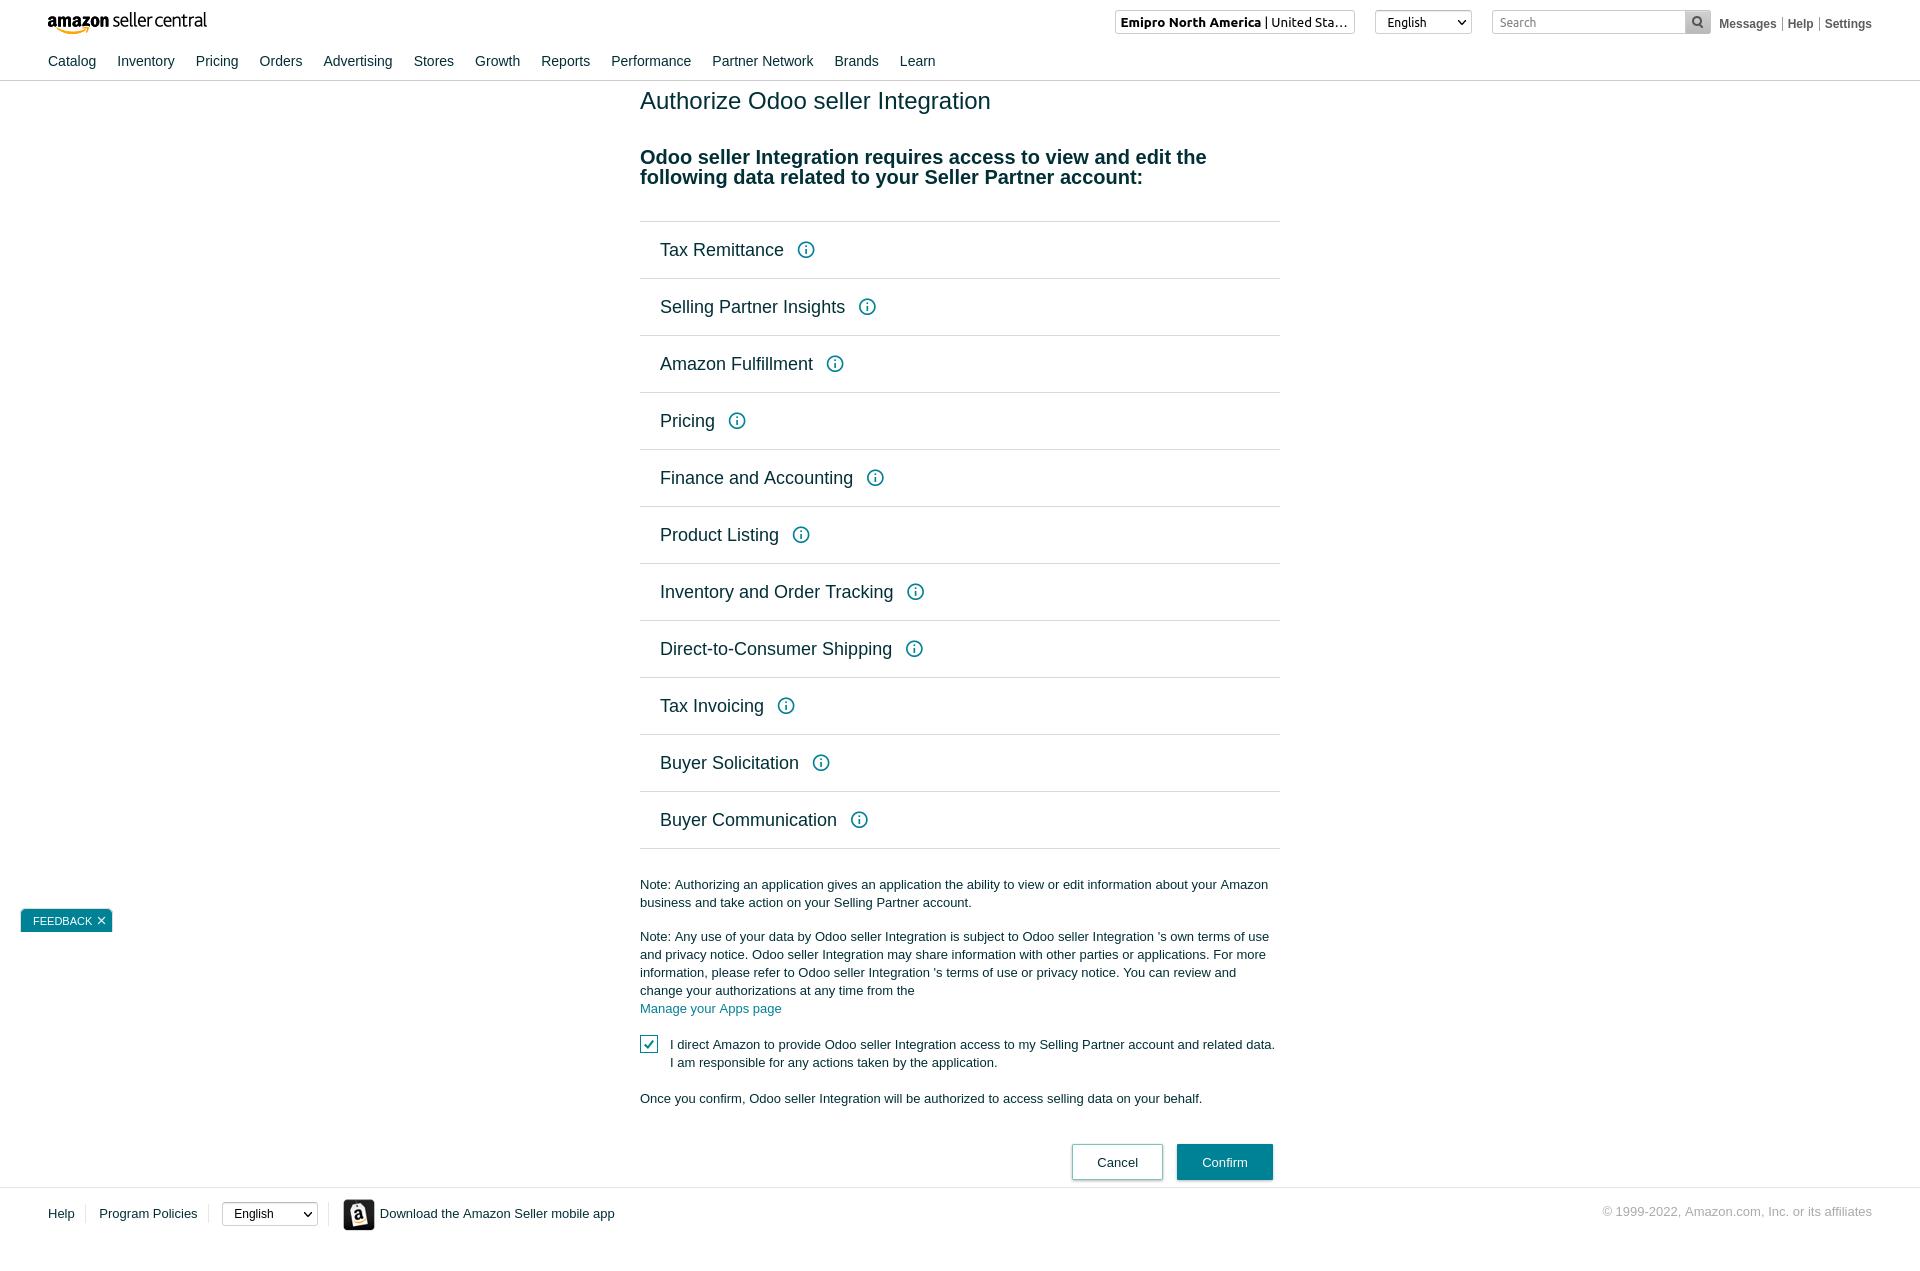
SP-API data consent:
When you log into the seller account, Amazon will ask for your consent to access data using the SP API.
Simply click the Confirm button.
With this, you have successfully completed the registration process.
Amazon Seller Registration and Configuration
Here users can find detailed information about how to register a seller ID/Merchant token, connect a seller central account, connect all the active marketplaces, choose or switch fulfillment by FBA or FBM or FBA FBM, and also an overview of the Amazon connector dashboard.
1st Go to Amazon ↣ Configuration ↣ Settings
TABLE OF CONTENTS
- Register Your Seller ID
- Connect Your Seller Central Account
- Add More Marketplace to Integrate
- Switch Amazon Fulfillment By
- Amazon Navigation Dashboard
Register Your Seller ID
As per Amazon’s Acceptable Use Policy and Data Protection Policy, the seller has to authorize Inwizards’s Seller Application in their Seller Central account, in order to use the connector.
Go to Amazon ↣ Configuration ↣ Settings
Click on Register Your Seller ID
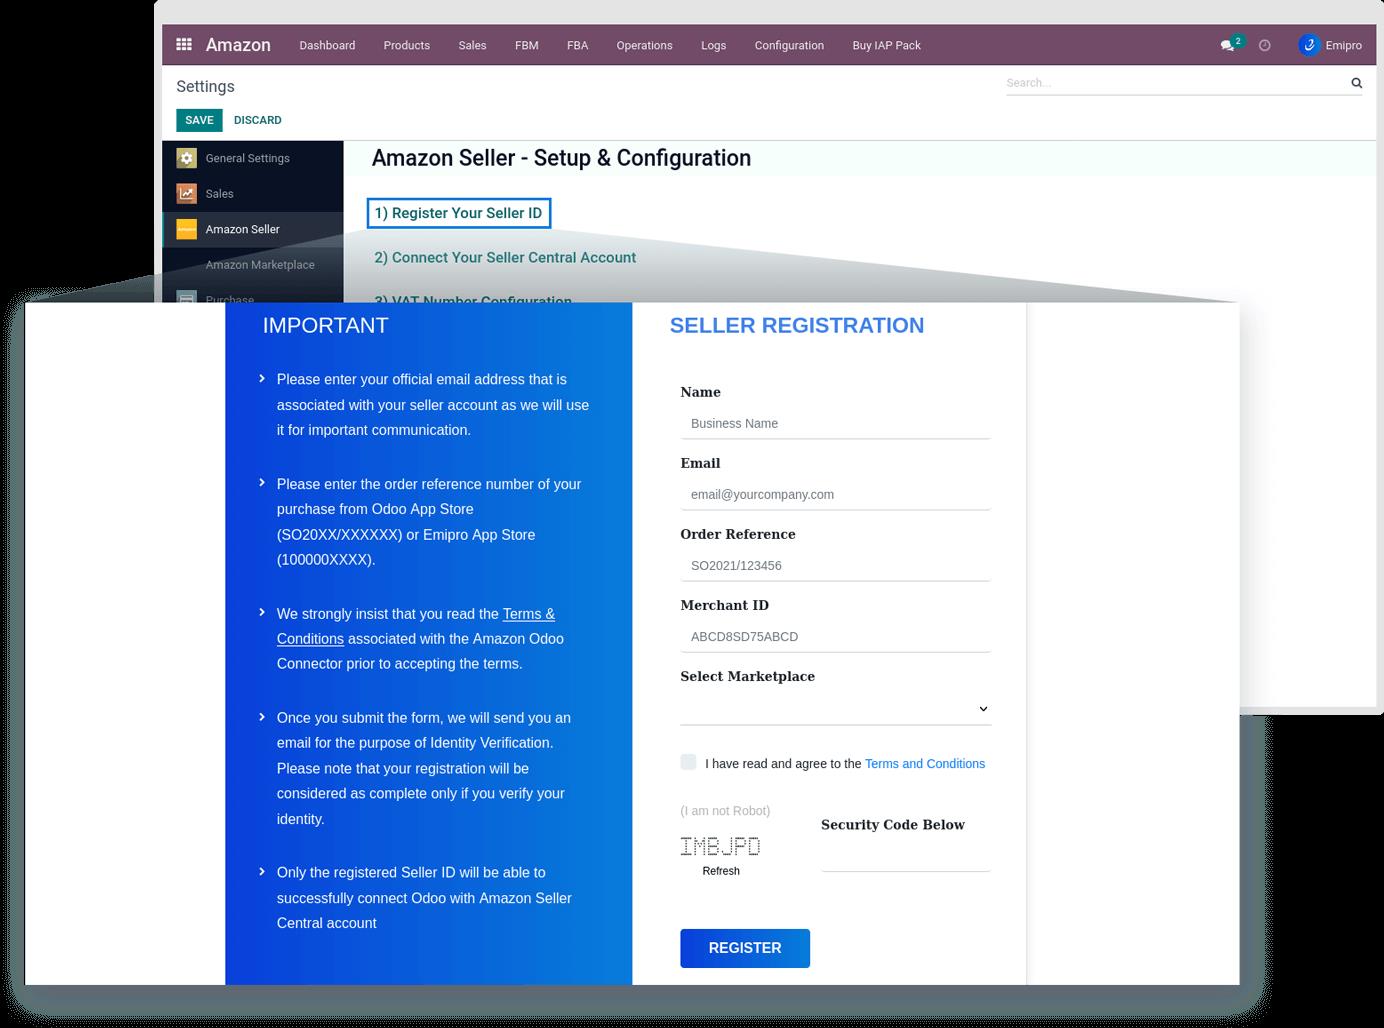
Step-1: Seller Registration Form
A registration form will open after you click on the Register Your Seller ID button. This form requires a few fields to be filled in.
- Name: The user needs to fill in the name of your business here.
- Email: The user needs to fill in his/her email ID which is registered with your seller central account as it needs to be verified later on.
- Order Reference: The User needs to enter the purchase order reference for the Amazon odoo connector from the Odoo App Store here (Example: SO2022/XXXXXXX). The User will find it in the email he/she received regarding the purchase of Inwizards Amazon Odoo connector.
- Merchant ID/Seller ID: The User needs to fill in your Merchant ID/Seller ID here.
- Select Marketplace: The user needs to select the marketplace/s that the user has configured in your Seller Central.
Step-2: Email Verification:
Once the user clicks the Register button on the form. An email verification link will be sent to the email address the user provided in the form. You simply need to click on the Verify button in the email to complete the email verification process.
Step-3: SP API Authentication:
As soon as the email has been verified, the user will receive another email with an authentication link that helps us synchronize with the user’s Seller Central account.
The user simply needs to click on the Authenticate SP-API button in the email, which will take the user to Amazon’s Seller Central login page.
The user must log into his/her Seller Central account.
Step-4: SP-API data consent:
When the user logs in to the seller account, Amazon will ask for the user’s consent to access data using the SP API.
Simply click the Confirm button.
With this, the User has successfully completed the registration process.

1.1 How to Get Merchant Token/Id:
- Go to Amazon Seller Central ↣ Settings
- Click on the Account Information
- You can see the Business Information Tab
- Click on the Merchant Token field
- Great Job, The user will get successfully his/her Merchant token.
2.Connect Your Seller Central Account
Go to Amazon ↣ Configuration ↣ Settings
Click on Connect Your Seller Central Account
A pop-up window will open and you need to fill in the required details here.
- Seller Name: Enter the Name of Amazon Seller. It can be anything depending on the user.
- Country: The User needs to select your country here.
- Merchant ID/Token: The User needs to add Merchant ID/Seller ID here.
- Company: The user needs to select his/her company of seller. Make sure it is correct because all transactions will be carried out by Odoo on the basis of the configuration of the company.
- Fulfilment by: In this step, the user needs to choose either FBA (fulfillment by Amazon) or FBM (fulfillment by merchants) or FBA FBM.
After filling in the all required details click on the Create button.
Good job, the User has successfully connected your seller account to the Amazon Odoo Connector.
Add More Marketplace to Integrate
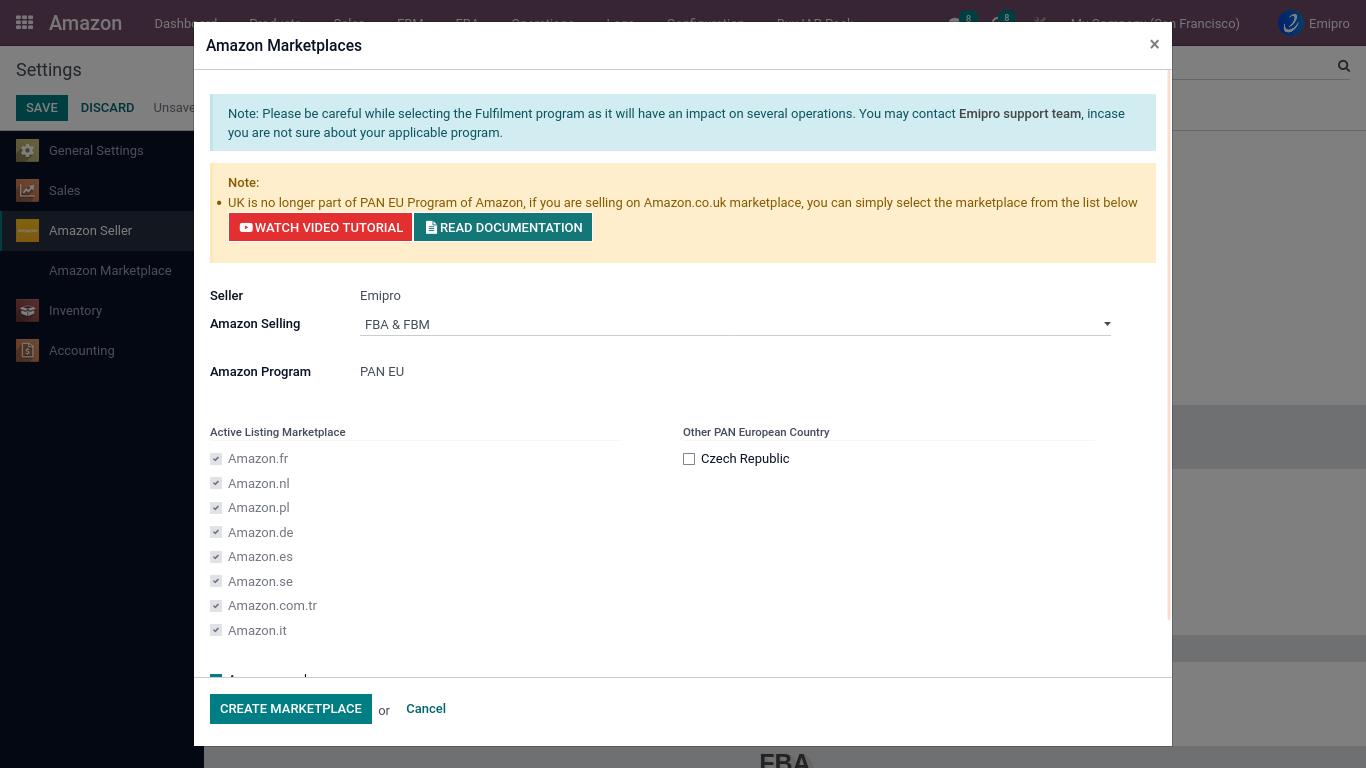
3. Add More Marketplace to Integrate:
Once the Amazon seller account is created, the next step is to create marketplaces for the seller.
- Navigate to Amazon ↣ Configuration ↣ Settings and select one of the Seller.
- The user needs to click on the option Add More Marketplace to Integrate once you have selected the respective seller, and then you get a list of all the marketplaces based on the seller you have chosen.
- Our connector provides the below-mentioned region and its respective program.
1.Europe region:
- PAN EU Program
- EFN (European Fulfillment Network)Program
- MCI(Multi Country Inventory)Program
- CEP (Central Europe Program)
- EFN+MCI
2.USA region:
- NARF
- Non NARF
- Let’s say a seller comes from Europe then the user only be able to see European marketplace options.
- After selecting the seller user can select the respective fulfillment program on which the user has enrolled.
- Here after selecting the program user has the option to select the country in which the user is storing the FBA inventory.
- At the time of integrating the marketplaces, the connector will create warehouses automatically based on the selected Amazon program in your odoo system.
- To get detailed knowledge about how to choose a fulfillment program, users can refer to the videos that are attached at the end of the page.
Switch Amazon Fulfillment By
5.Switch Amazon Fulfillment By:
Once the user has completed Amazon’s setup and configuration with FBM, FBA, or FBM FBA fulfillment If the seller wants to change their fulfillment network, Inwizards Amazon connector allows the user to change it as per the need.
- Navigate to Amazon ↣ Configuration ↣ Settings and select one of the Seller
- Click on the Switch Amazon Fulfillment By button and a popup will be opened as per below.
- Amazon Selling: The user can select the fulfillment network based on the need.
- Active listing Marketplace: The user is also allowed to change the marketplace only in the FBM network.
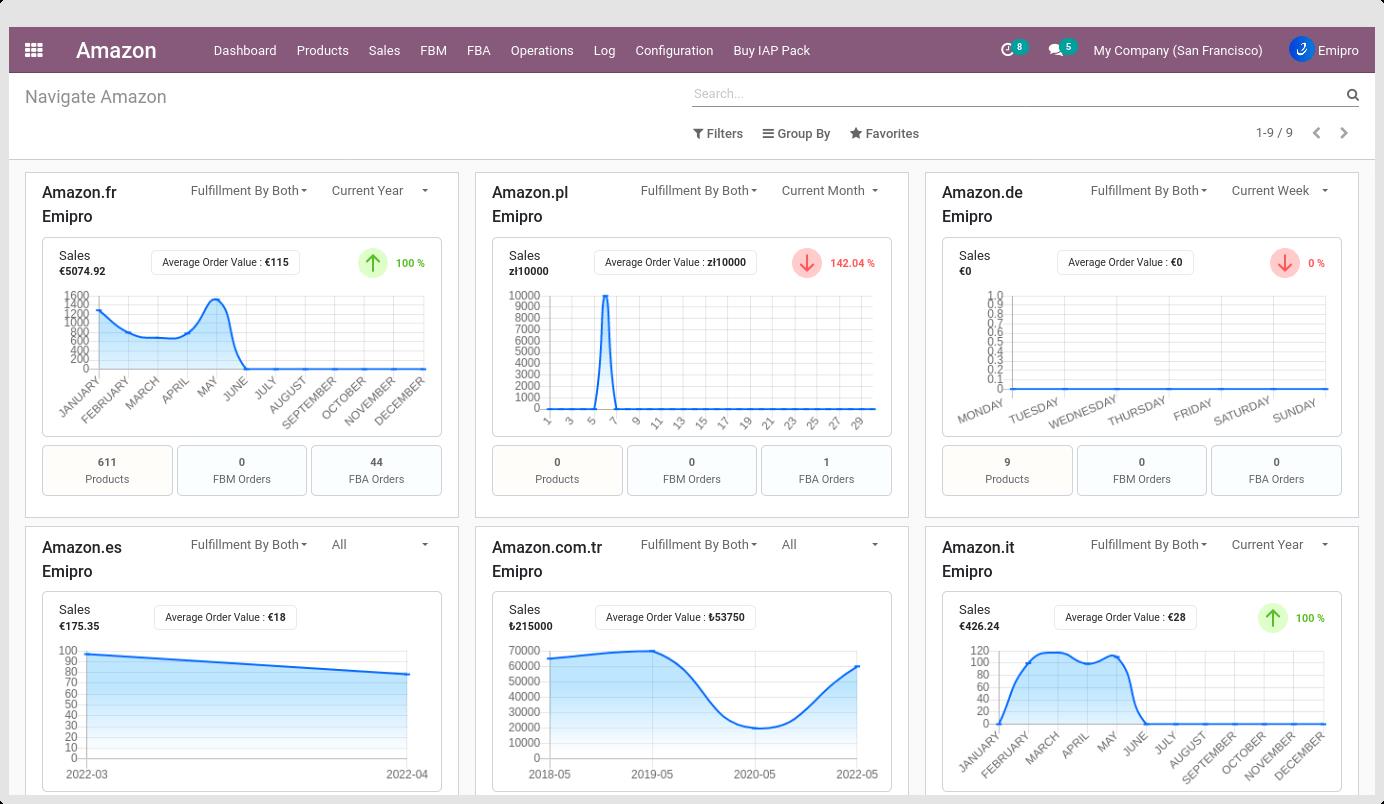
Amazon Navigation Dashboard
Connector’s dashboard will be helpful for users to analyze different marketplaces. Inwizards Amazon connector dashboard will be the user’s single page to monitor all the Amazon marketplace’s orders as well as products. Based on graphical analyses of orders the user can get an idea about current sales volume.
FBA FBM common configuration
After completing the Amazon registration and marketplace integration process, the user can now go with the common configurations that will apply to both FBA and FBM.
- Go to Amazon ↣ Configuration ↣ Settings
- User can see brief information about common configurations next section
TABLE OF CONTENTS
- Settlement Report
- Shipment and Other Fees
- Products and Other Configurations
- Invoice Upload to Amazon
- US Seller Tax Configuration
- Marketplace Configuration (FBM FBA)
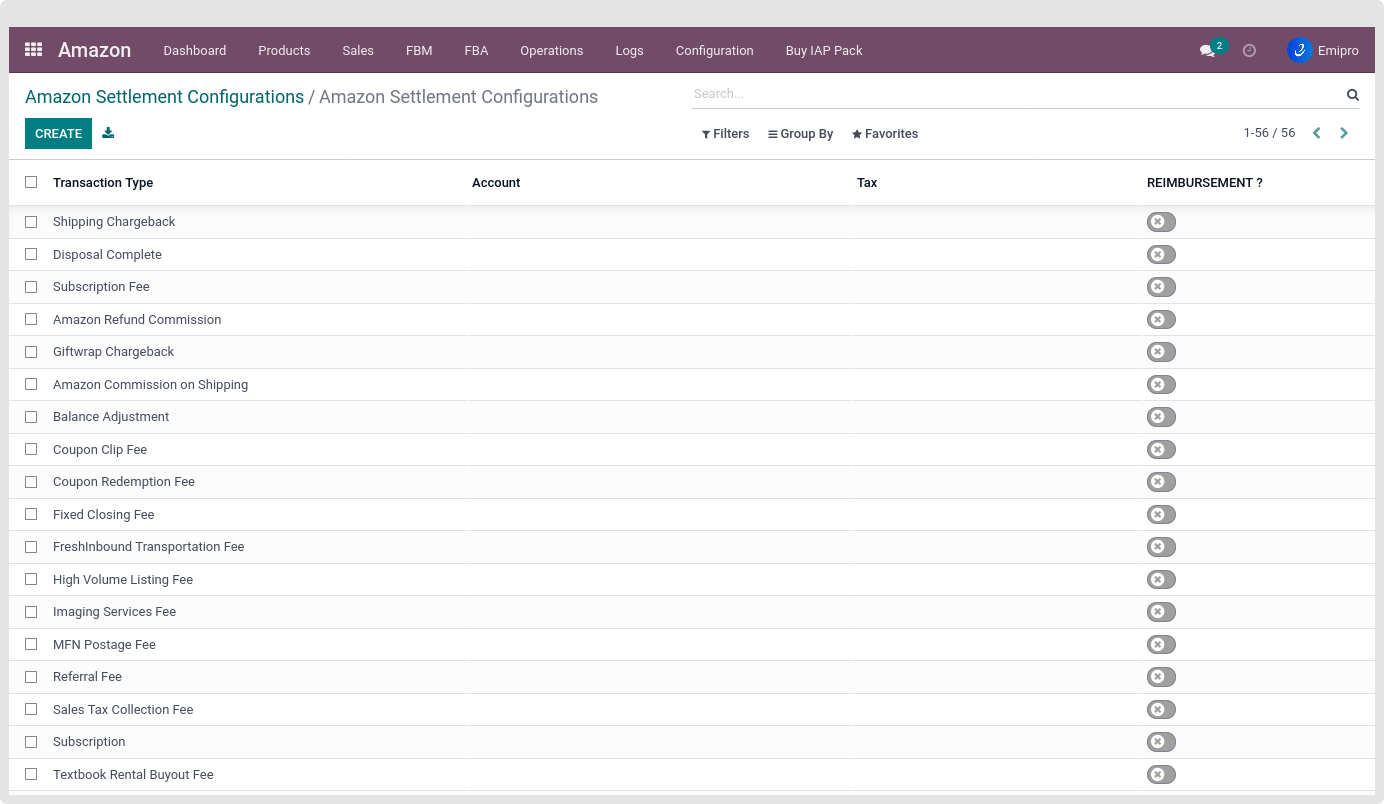
Settlement Report
1.Settlement Report:
- Navigate to Amazon ↣ Configuration ↣ Settings and select one of the Seller.
\
- The user will see the image below.
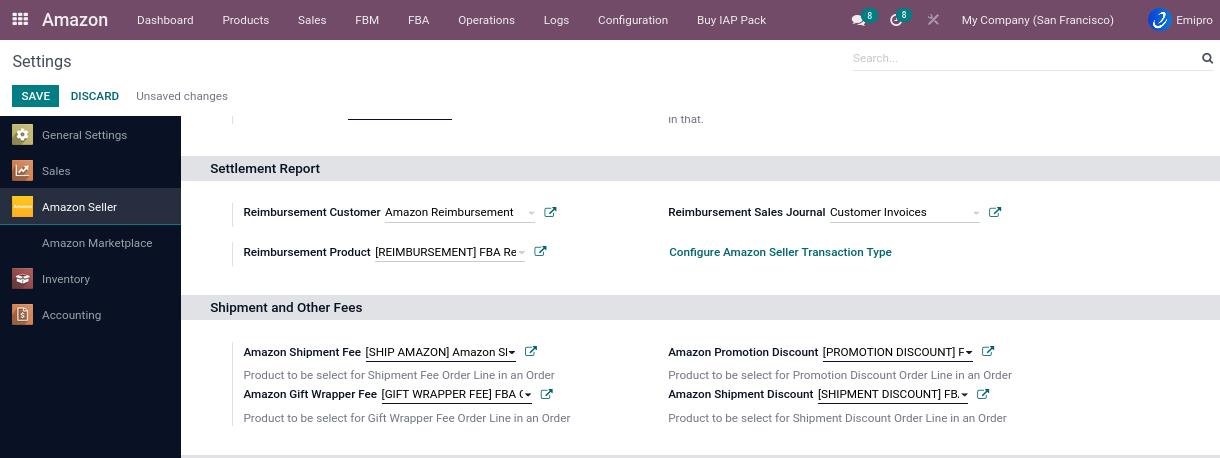
Reimbursement Customer:
- In case of reimbursement, this will be the customer referenced over here.
- The system will create an invoice for the configured customer.
Reimbursement Sales Journal
- Sales journal information will be taken while performing reimbursement.
- This sales journal is used for reimbursement of customer invoices.
Reimbursement Product:
- Here, There will be a default reimbursement product created by the connector.
- Also, the user can set the reimbursement product.
Configure Amazon Seller Transaction Type:
- Click on the button Configure Amazon Seller Transaction, the user will see the below screen
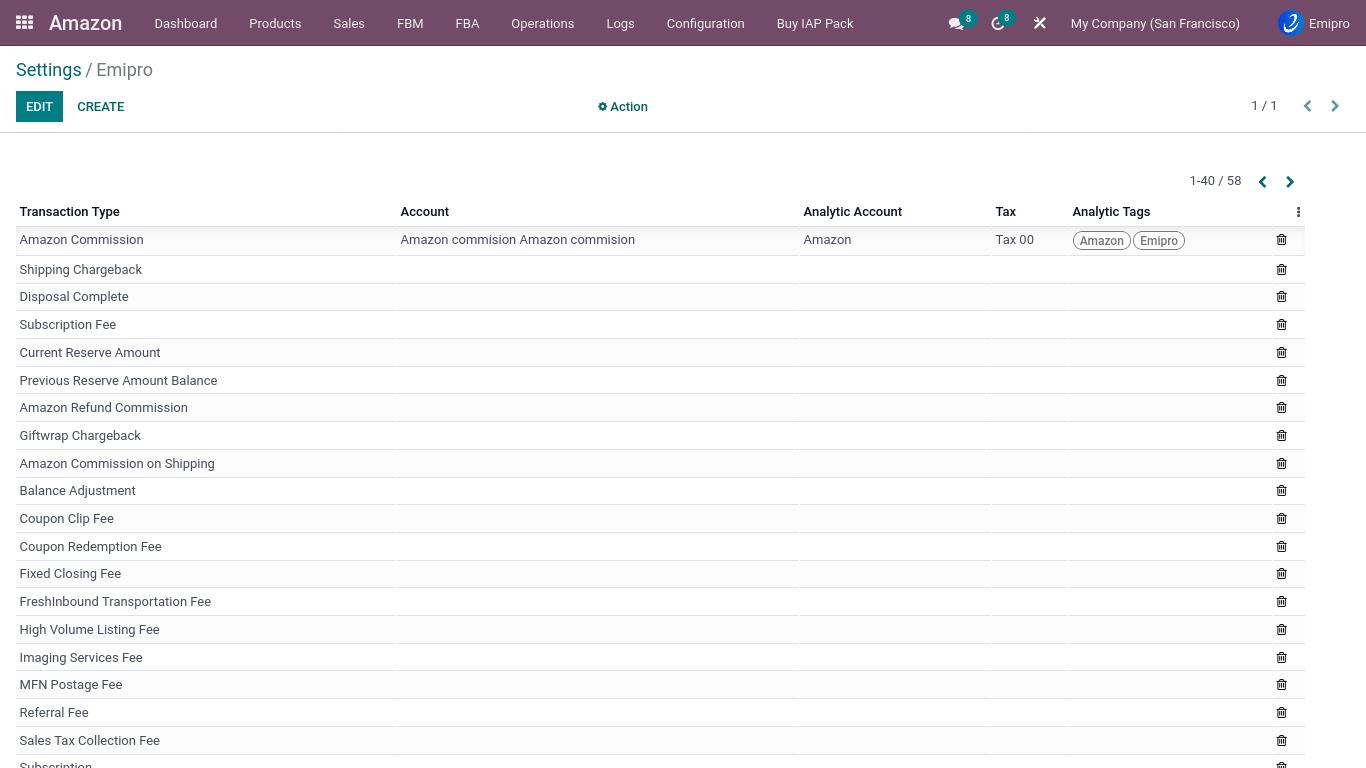
Transaction Types:
- By default, the system creates transaction types that will help to process the settlement reports.
- The user can also create transaction types.
Account
- System allows you to set accounts according to transaction type. This account configuration is used during the processing of settlement reports and their reconciliation.
Analytical account Tags
- The User can also set the analytical account and tag specific transaction types that the user wants to track.
Tax
- The user can set tax according to transaction types.
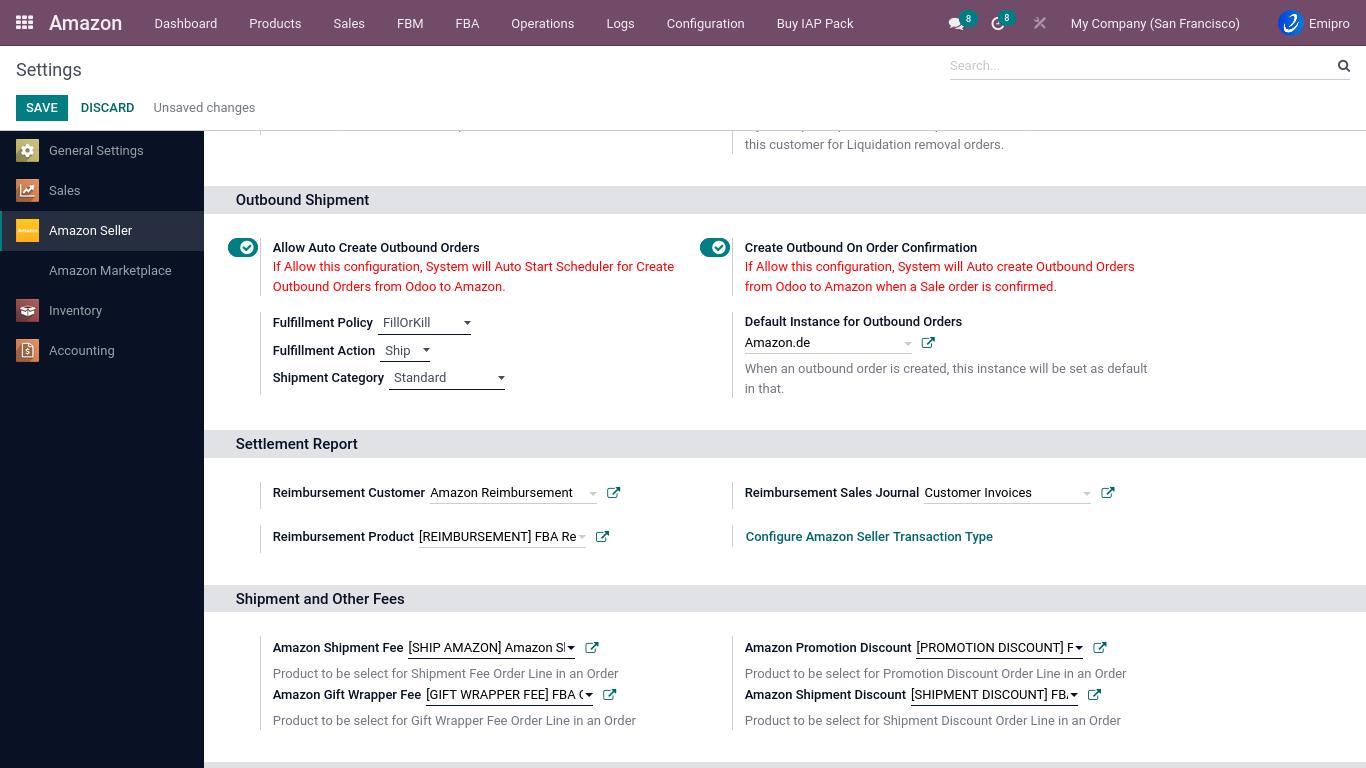
Shipments and Other Fees
3.Shipments and Other Fees:
- Navigate to Amazon ↣ Configuration ↣ Settings and select one of the Seller.
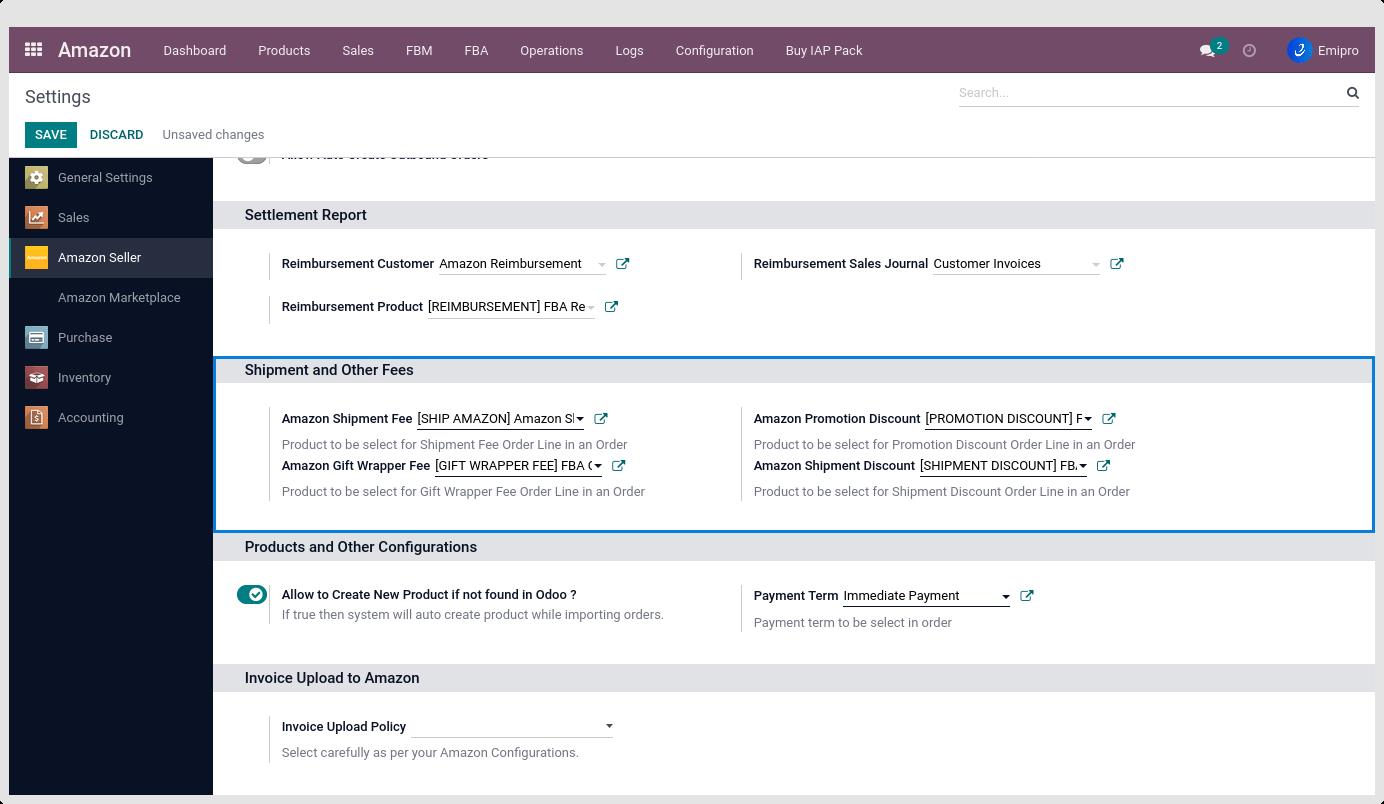
Upon installing the connector, the below-mentioned fees will be automatically created. Later on, The user can change it if the user needs to.
- Amazon Shipment Fee: Product to be selected for shipment fee order line in an order
- Amazon Gift Wrapper Fee: Product to be selected for the gift wrapper fee order line in an order
- Amazon Promotion Discount: Product to be selected for promotion discount order line in an order
- Amazon Shipment Discount: Product to be selected for shipment discount order line in an order
Products and Other Configurations
- Go to Amazon ↣ Configuration ↣ Settings and select one of the Seller.
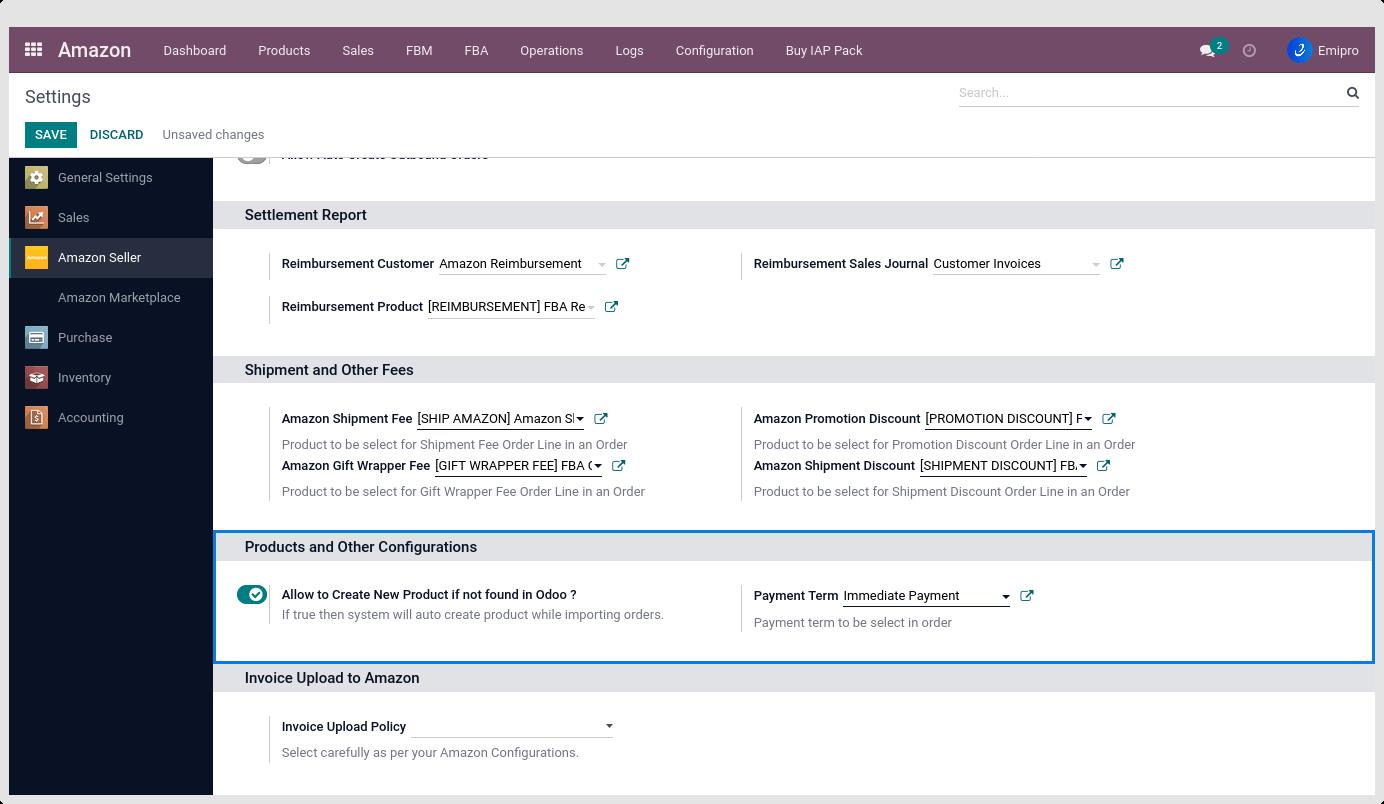
Allow to create new product if not found in Odoo?
- If this option is selected, the system will create a new product at the time of importing orders from Amazon to Odoo, and if products are not found there.
- It will create completely new products in Odoo and map them to Amazon products.
Payment Term:
- When The user installs the app, it will configure the immediate payment term by default. But later on, users can change it as per requirements.
Invoice Upload Policy
4.Invoice Upload to Amazon:
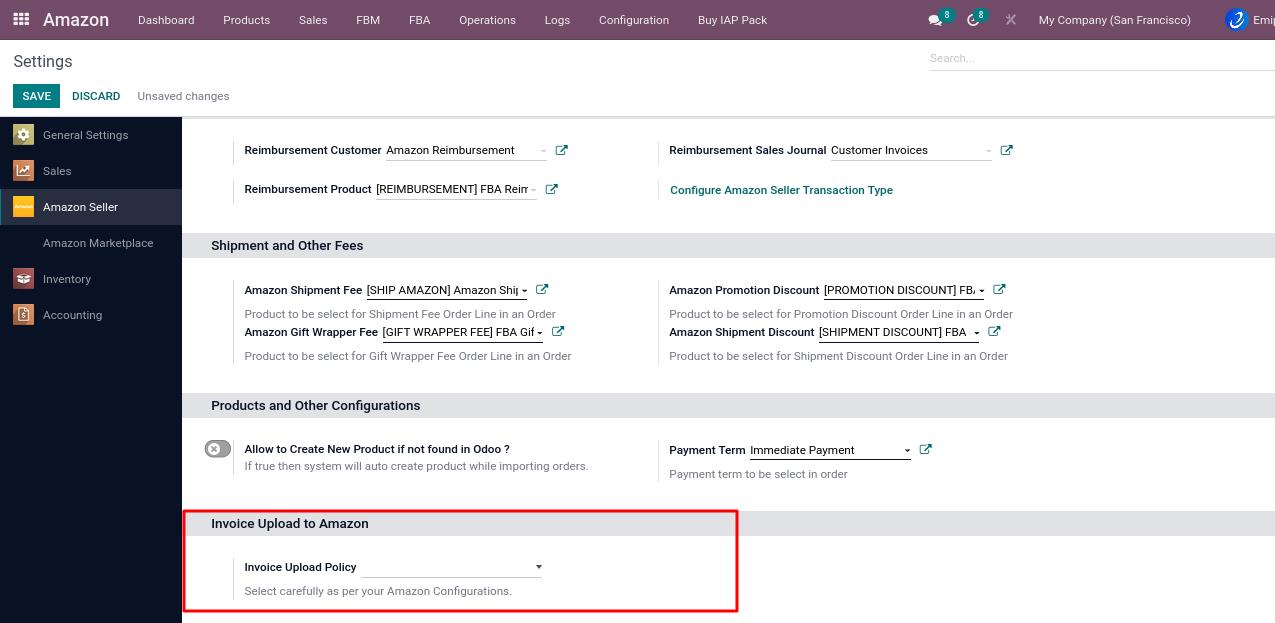
Invoice Upload Policy:
Based on this configuration, users can choose to either upload their invoices to Amazon or download their Amazon-generated invoices.
1) Amazon creates invoices: If the seller has opted for VCS (VAT calculation service) at Seller Central then to enable this feature in odoo, the seller just needs to select Amazon creates invoices in the configuration.
NOTE
*If this configuration is missing in the connector, the seller may get an incorrect tax calculation and order amount.
2) Upload invoices from Odoo: All sellers who have not chosen VCS need to set this invoice policy.
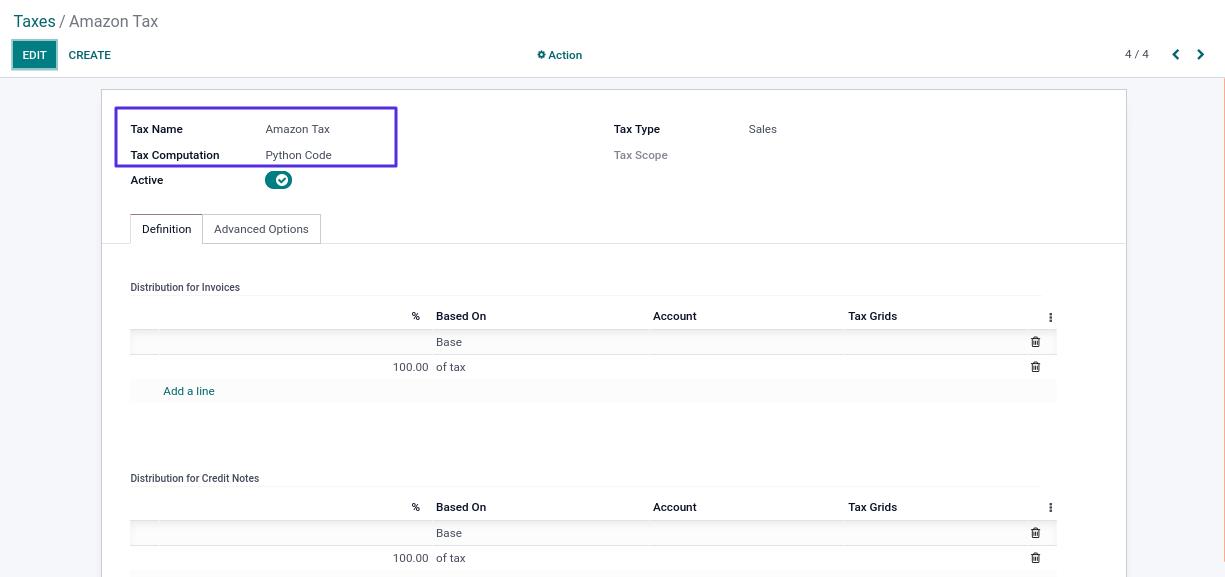
US Seller Tax Configuration
This tax configuration is only for the sellers who belong to the US (United States) region. Here the connector gives support for Python Code for the tax computation. With the help of this feature system will set the product price and its tax based on the configuration
- Navigate to Amazon ↣ Configuration ↣ Settings
- Click on the Amazon Marketplace
- Select Amazon Seller
- Select Amazon.com Marketplace The user will see the below image
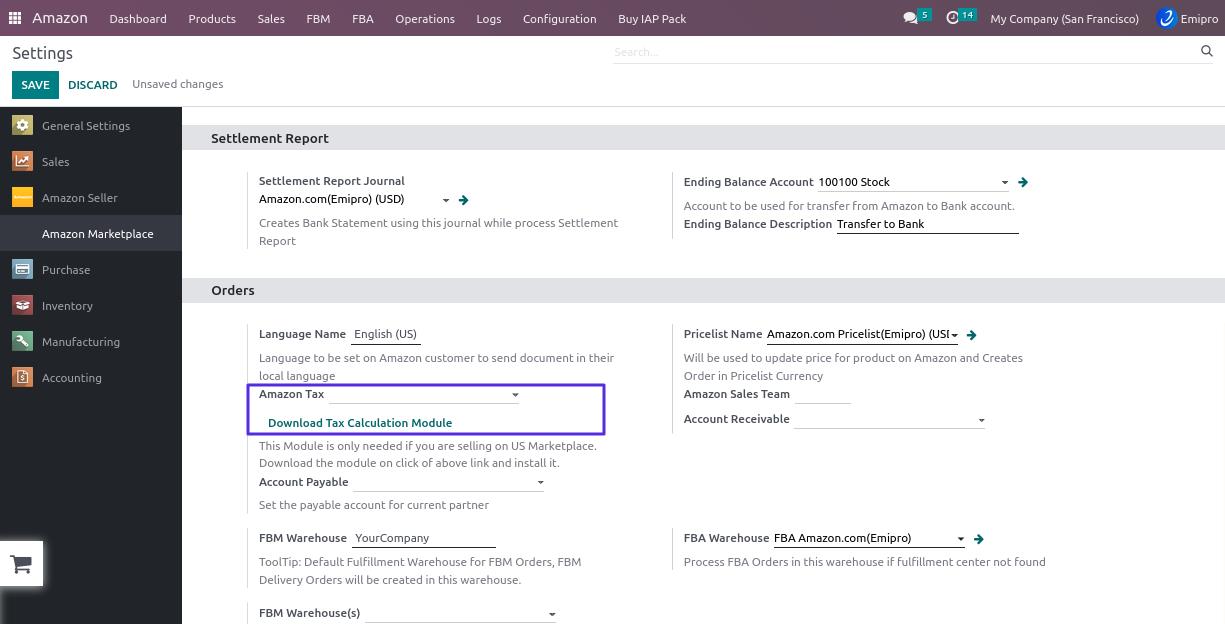
- First, The user has to download the tax calculation module and click on the Download Tax Calculation Module button. *Here the system auto-created the tax name as Amazon Tax. The seller can modify it based on the business needs.
- Click on the Amazon Tax external link for the modified configurations. There the user can see the Python Code in the below image..
- The system calculated the taxes and product/item price based on the Python code formula according to the included price or excluded price configuration.
- Before Importing any orders, the user must have to configure the correct tax account.
Let’s understand with an example.
- Amazon gives product/item price and tax amount in the shipment report but never gives a tax in %.
- Using Formula-based tax configuration, the system will automatically convert tax amount to tax %.
- The benefit of this configuration is to not create multiple taxes in the Odoo.
- If The user ticks Included in price the system will set the product/item price with including tax in the invoice.
- If The user is not ticked with Included in price it means the system by default is considered as Excluded in price. When orders are imported from the Amazon connector, the system will set the product/item price excluding tax and also add the tax amount in total.
NOTE
- In the case of orders imported in Odoo and in Auto Workflow Create Validate Invoice is not set, If users modify the configuration of Tax Inclusive Exclusive then the system will calculate the wrong tax. It is advisable for the user to make a configuration for Amazon tax based on included in the price.
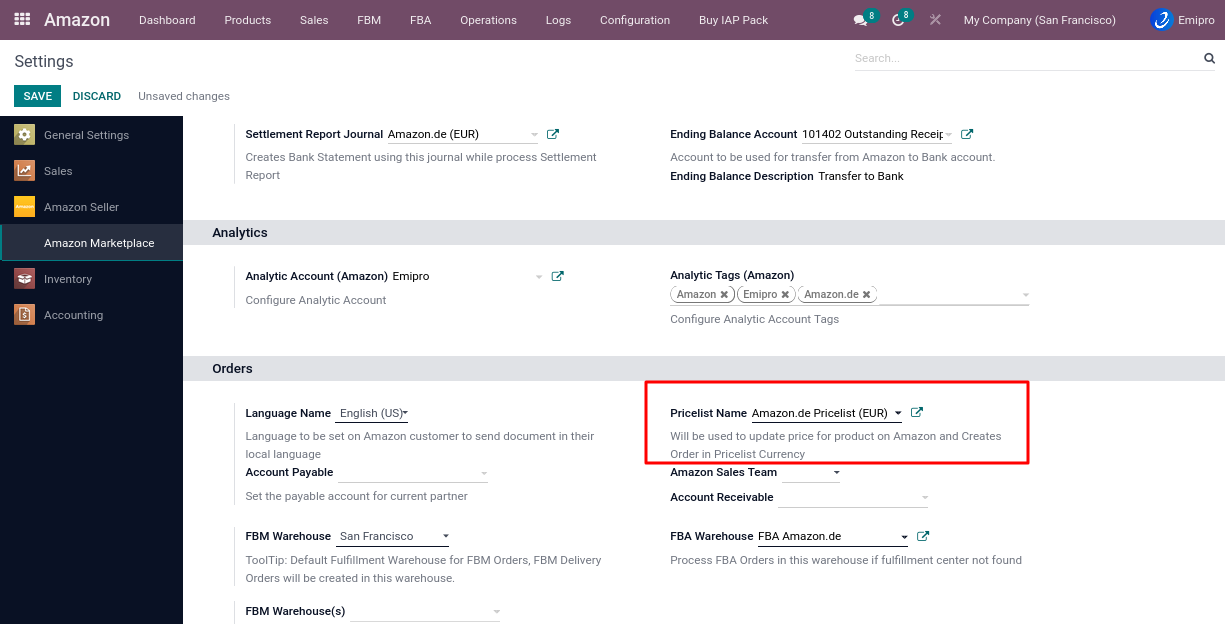
Marketplace Configuration(FBM FBA)
- Go to Amazon ↣ Configuration ↣ Settings
- Click on Amazon Marketplace Select Seller and select Marketplace

Configurations:
Stock Type: Here the user has 2 options. The user can update the stock based on Free quantity or based on forecasting quantity. As per the business requirement, the user can choose the option.
- Forecast Quantity = Quantity On Hand - Outgoing + Incoming
- Free To Use Quantity = Quantity On Hand - Reserved quantity
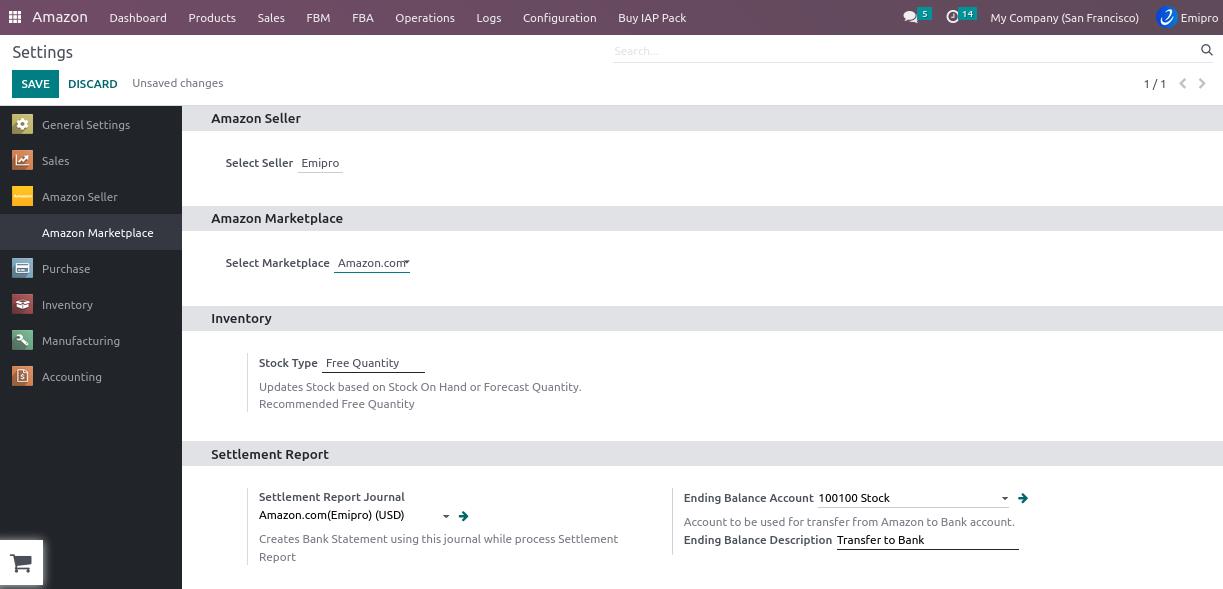
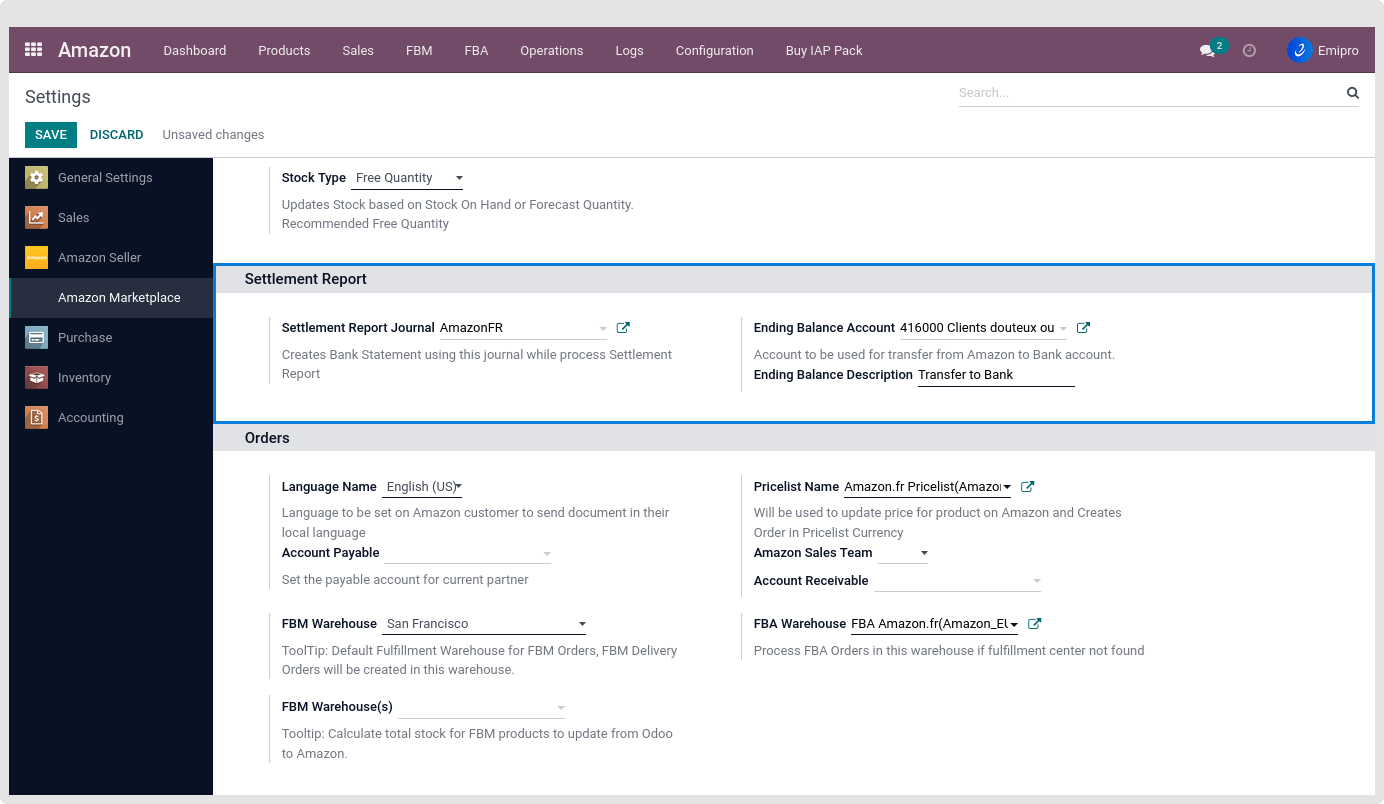
Settlement Report Journal: The journal set over here will be used to create a bank statement while processing the settlement report
Ending Balance Account Description: Using this account will allow The user to transfer funds from Amazon to a liquidity or transit account with a given ending balance description.
Analytical Account(Amazon): If your analytical account configuration is enabled from Accounting ↣ Configuration ↣ Settings
- The system will create an Amazon analytical account. This account will be used in Amazon orders and invoices
Analytic Tags(Amazon): If your analytical tags configuration is enabled from Accounting ↣ Configuration ↣ Settings
- Thus, Amazon analytic tags will be created for each marketplace. There will be three analytic tags created: 1. With Amazon name, 2.With the seller’s name, and 3.With marketplace name. These analytical tags will be used in Amazon orders and invoices
Language Name: The user can set the language for the marketplace. Languages can be set differently for different marketplaces. Marketplace-configured Language will be set in Amazon contacts.
Pricelist Name: By default, the connector will create a different price list for each instance. When an Amazon order is created, the system sets the price list according to marketplace configuration. Also when the user updates the price of the product on Amazon at that time, the price will be considered based on the marketplace price list.
Account Payable: Select a payables account while creating a new customer, if it is set the account will be assigned to the customer. If it is not configured, the system will set an account based on Odoo flow.
Amazon Sales Team: The user can configure different Sales teams for each instance. This Sales team is set in FBM FBA Orders when orders are imported.
Amazon Receivable: When creating a new customer, The user can select a specific receivable account. If it is selected, then the account will be set in the customer. If it is not configured, the system will set an account based on the Odoo flow.
FBM Warehouse: It is a fulfillment warehouse for FBM orders. It calculates stock for FBM Products. The stock will also be updated on Amazon from this warehouse.
FBM Warehouse(s): The user can select multiple FBM warehouses to update the total inventory of FBM products from Odoo to Amazon.
FBA Warehouse: This is an Amazon fulfillment warehouse with a different Fulfillment center. When a fulfillment center cannot be found, FBA orders are shipped from this warehouse to the customer.
FBM Seller Configurations
Here we will discuss the FBM Seller Configurations
- Go to Amazon ↣ Configuration ↣ Settings and select one of the Seller.
- After selecting the seller, The user will see the following image.
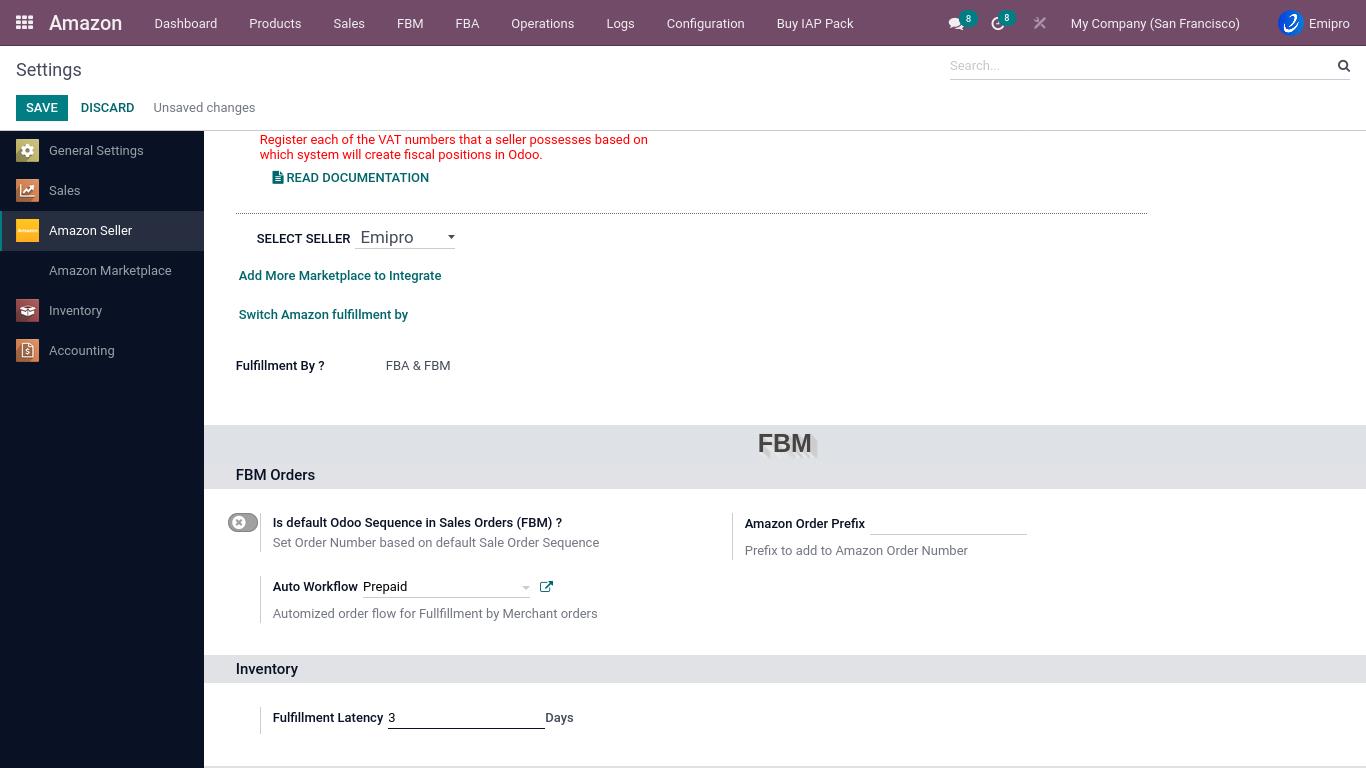
1. FBM Orders :
Go to Amazon ↣ Configuration ↣ Settings and select one of the Seller.

Is default Odoo Sequence in Sales Orders (FBM)?
- At the time of importing orders into Odoo, The user has the option of selecting whether the user wants to set Odoo’s SO number or Amazon’s SO number in the order.
- If this option is selected then by default Odoo’s SO number will be applied to that Sales Order.
Amazon Order Prefix
- When the user has multiple seller codes, it becomes difficult to identify which order belongs to which marketplace. So using this feature the user can set a unique prefix value to identify Amazon orders for each seller ID.
Auto Workflow
- Go to Amazon ↣ Configuration ↣ Auto Sales workflow click on the Create button.
- After clicking the Create button, the user will see the below image.

Inwizards Amazon connector has the facility to configure auto sales workflow to import orders in different stages. Such as in draft state or to import as confirmed sales orders or import as confirmed sales order along with auto invoice creation or import as confirmed sales order along with auto invoice creation and mark invoice as “in payment” with bank journal.
Options to be filled while creating workflow are:
- Confirm Quotation: If selected, it will automatically create and confirm the Delivery Order (Pickup).
- Create Validate Invoice: If selected, it will automatically create and post customer invoices.
- Register Payment: If selected, Payments will be automatically registered, and you need to select the payment journal and debit method to facilitate payment registration.
NOTE
- Enterprise Edition: If the Accounting module is installed, the invoice will be in the “in payment” state, and the payment must be registered by using the Bank Statement Reconciliation process.
- In all other cases it will be registered by default.
- Force Accounting Date: If ticked, it’s the default behavior of the system to take the current date as the invoice date upon validating the invoice. In this case, the invoice number will be generated based on the invoice date. This field is used when you want to generate account entries based on the order date instead of the current date. In this case, the invoice date will be the same as the current date and the journal entry date will be the same as the order date.
- Payment Journal: The payment journal must be set for the registered payment.
- Debit method: The user can set the debit method of the payment. It can be anything. The user can also create debit methods with either Inbound or Outbound payment types.
- Shipping Policy: The user needs to set a shipping policy for FBM orders.
- Sales Journal:: The user needs to set your Sales Journal for the Customer Invoices.
2.Inventory
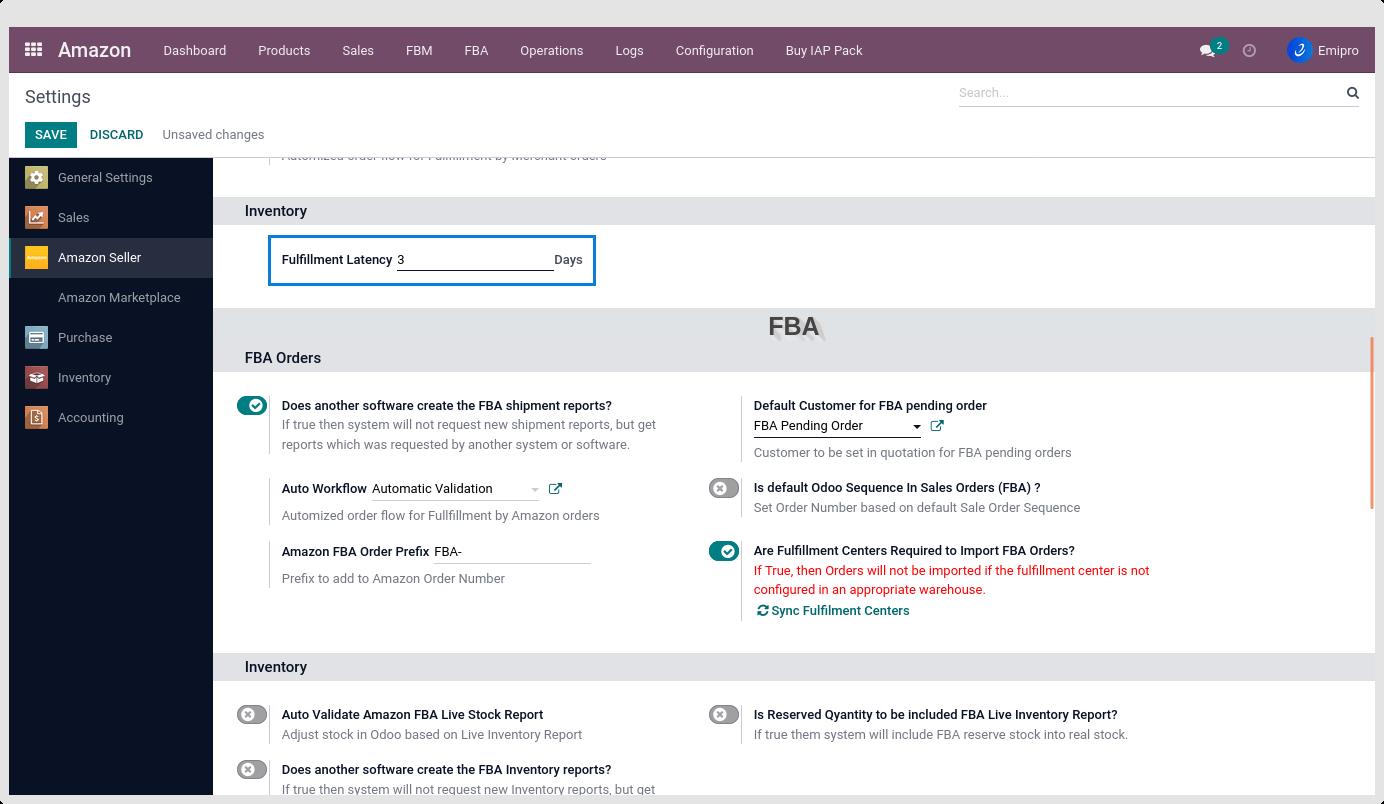
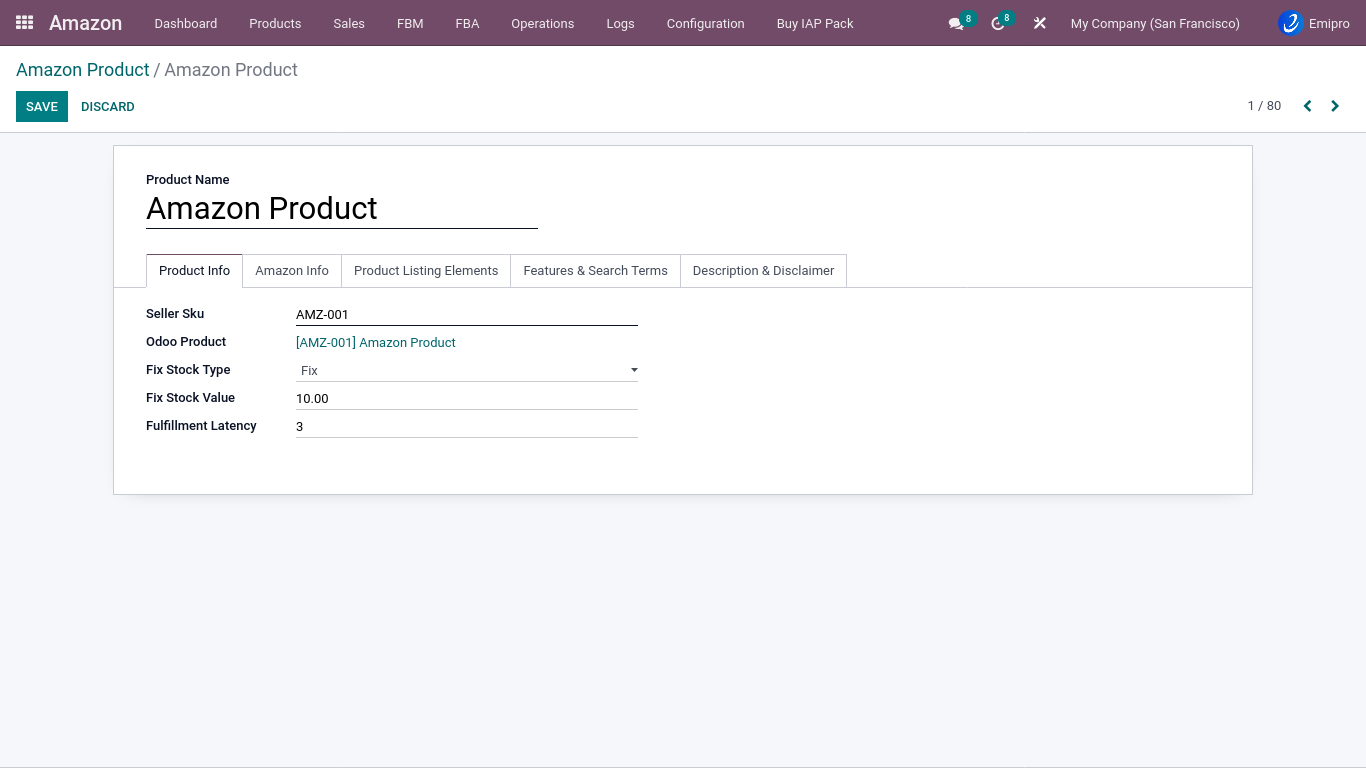
Fulfillment Latency:
In Odoo, fulfillment latency is known as the delivery lead time, which is useful when exporting inventory to Amazon.
The user can configure it by following below steps:
- Go to Amazon ↣ Configuration ↣ Settings and select one of the Seller.
- In the process of exporting stock, the system first checks the delivery lead time in Odoo products, if not set in Odoo products, then it checks Amazon products, if not set in Amazon products, then it selects the default configuration of the seller.
FBA Seller Configurations
- Here we will discuss about the FBA Seller Configurations
- Go to Amazon ↣ Configuration ↣ Settings select one of the Seller
- The user will see more details in next section.
1.FBA Orders
- Go to Amazon ↣ Configuration ↣ Settings and select one of the Seller.
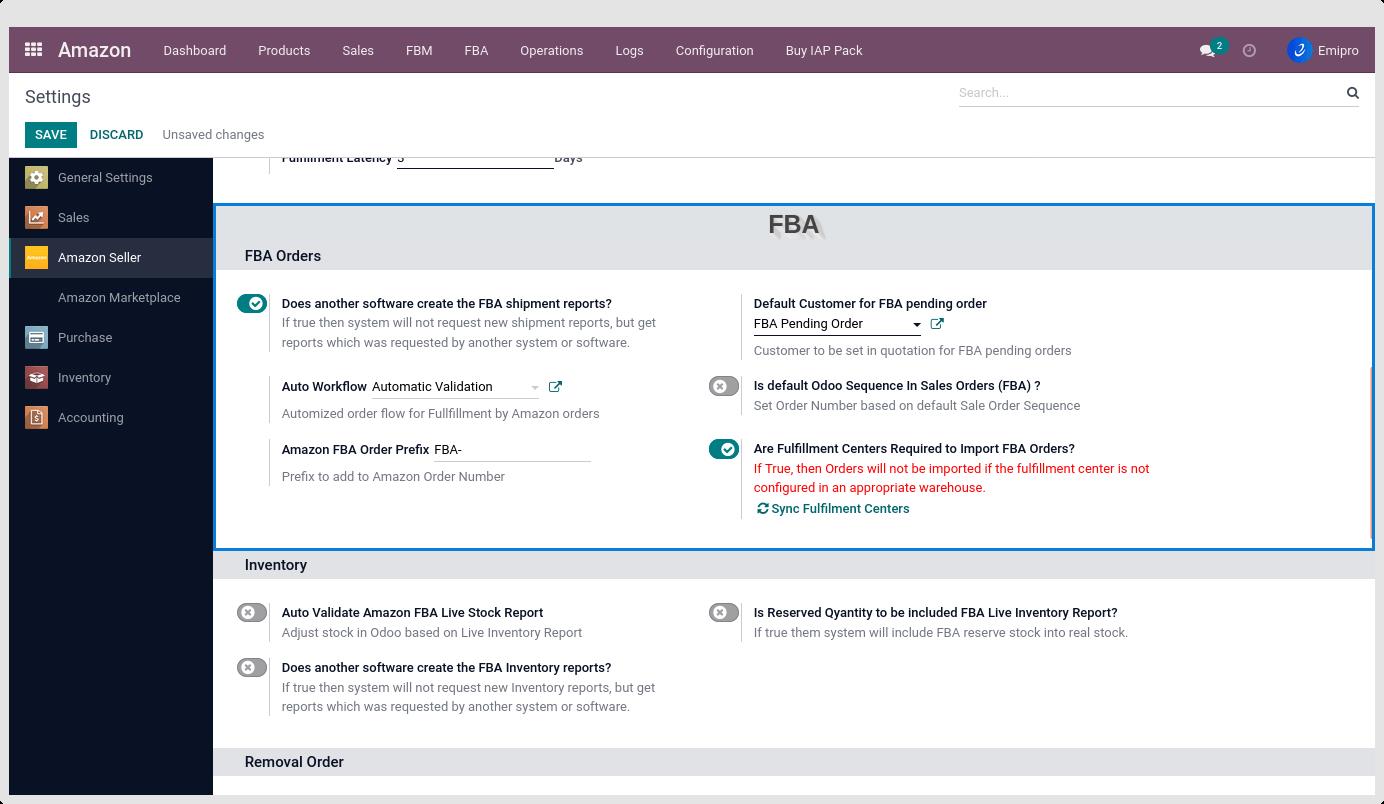 Does Another Software Create the FBA Shipment Reports?
If The user is using any third-party integration other than this connector and those tools also request shipment reports for the same time range for which the user requested this shipment report then in such case Amazon will cancel one request, so if this option is selected then the system will not ask for the new shipment report instead, it will download the report already generated by another software.
Default Customer for FBA Pending order
Customer to be set in a quotation for FBA pending order.
Is Default Odoo Sequence in Sales Orders (FBA) ?
At the time of importing orders into Odoo, you have the option of selecting whether you want to set Odoo’s SO number or Amazon’s SO number in the order. If this option is selected then by default Odoo’s SO number will be applied to that Sales Order.
Amazon FBA Order Prefix
The user can set the prefix to add before the order reference so as to identify the orders that have come from Amazon.
Are Fulfillment Centers Required to Import FBA Orders?
- When importing orders into Odoo, The user has the option to import orders specific to the fulfillment center. If True, the fulfillment center must be configured in an appropriate warehouse for orders to be imported.
- The system will automatically sync new fulfillment centers every week and configure them in Amazon’s FBA warehouse
Note
You can sync the latest fulfillment centers to your warehouses by clicking on the sync fulfillment centers button visible only when the Are fulfillment centers required to import FBA orders the toggle is active.
- Go to Amazon ↣ Configuration ↣ Auto Sales workflow click on the Create button
- The following screen appears after clicking the Create button.
- Inwizards Amazon connector has the facility to configure auto sales workflow to import the orders in different stages. Such as in draft state or to import as confirm sales orders or import as confirm sales order along with auto invoice creation or import as confirm sales order along with auto invoice creation and mark invoice as “in payment” with bank journal.
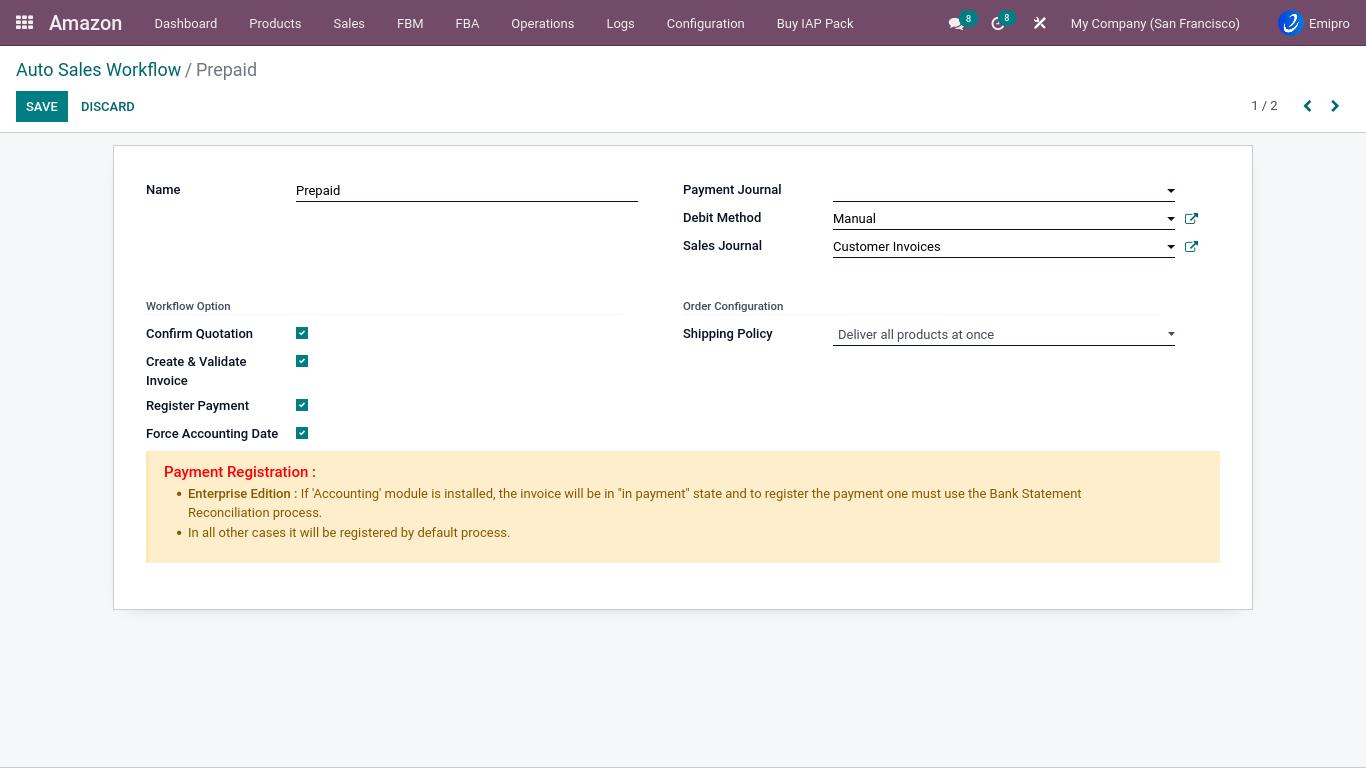
Options to be filled while creating workflow are:
- Confirm Quotation: If ticked, It will create and confirm the delivery order (picking).
- Create Validate Invoice: If ticked, it will create and post the invoice.
- Register Payment: If ticked, It will register payment and The user will be asked to select a payment journal and debit method to facilitate payment registration.
NOTE
- Enterprise Edition: If the ‘accounting’ module is installed, the invoice will be in “in payment” status and the payment must be registered via the Bank Statement Reconciliation process.
- In all other cases it will be registered by the default method.
Force Accounting Date:
If ticked, it’s the default behaviour of the system to take the current date as the invoice date upon validating the invoice. In this case, the invoice number will be generated based on the invoice date. This field is used when the user wants to generate account entry based on order date instead of the current date. In this case, the invoice date will be the same as the current date and the journal entry date will be same as order date.
Payment Journal:
The user needs to set the Payment Journal to register payment.
Debit method:
The user can set the debit method of the payment. Alternatively, The user can create a debit method using either an inbound or outbound payment type.
Shipping Policy:
The user needs to set a shipping policy for FBM orders.
Sales Journal:
The Invoices for Customers must be set up in the Sales journal.
2.Inventory
- Go to Amazon ↣ Configuration ↣ Settings and select one of the Seller.
- The user will see the image below.
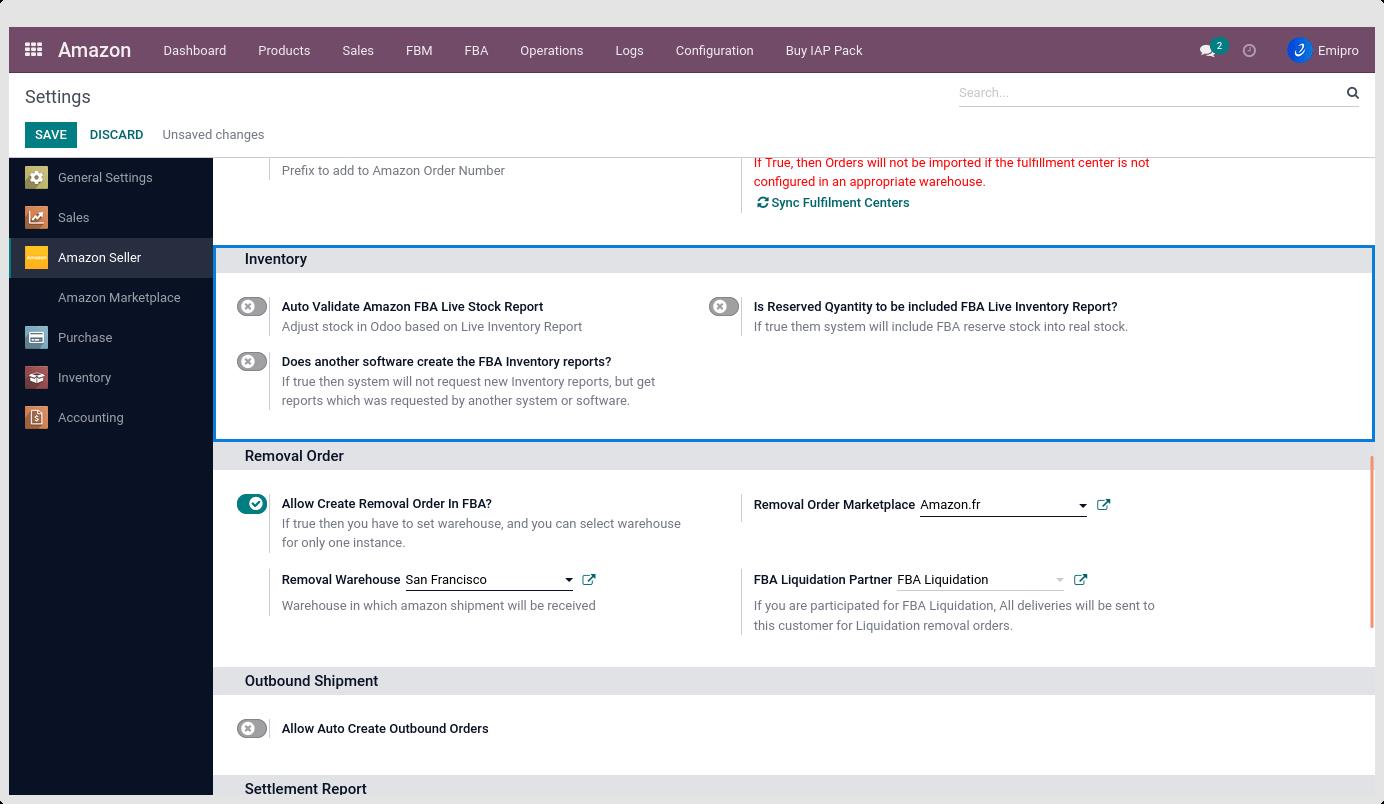
Auto Validate Amazon FBA Live Stock Report
If true, the system will automatically validate and adjust the stock based on the FBA Live inventory report.
Is Reserved Quantity to be Included FBA Live Inventory Report?
If the user wants the reserved quantity to be included in the FBA Live inventory page then the user needs to set this value true.
Does Other Software Create the FBA Inventory Reports?
If users are using any third-party integration other than this connector tool and those tools also request inventory reports for the same time for which we requested this inventory report then in such case Amazon will cancel one request, so if this option is selected then the system will not ask for the new inventory report instead, it will download the report already generated by another software.
3.Removal Orders
- Go to Amazon ↣ Configuration ↣ Settings and select one of the Seller.
- The user will see the image below.
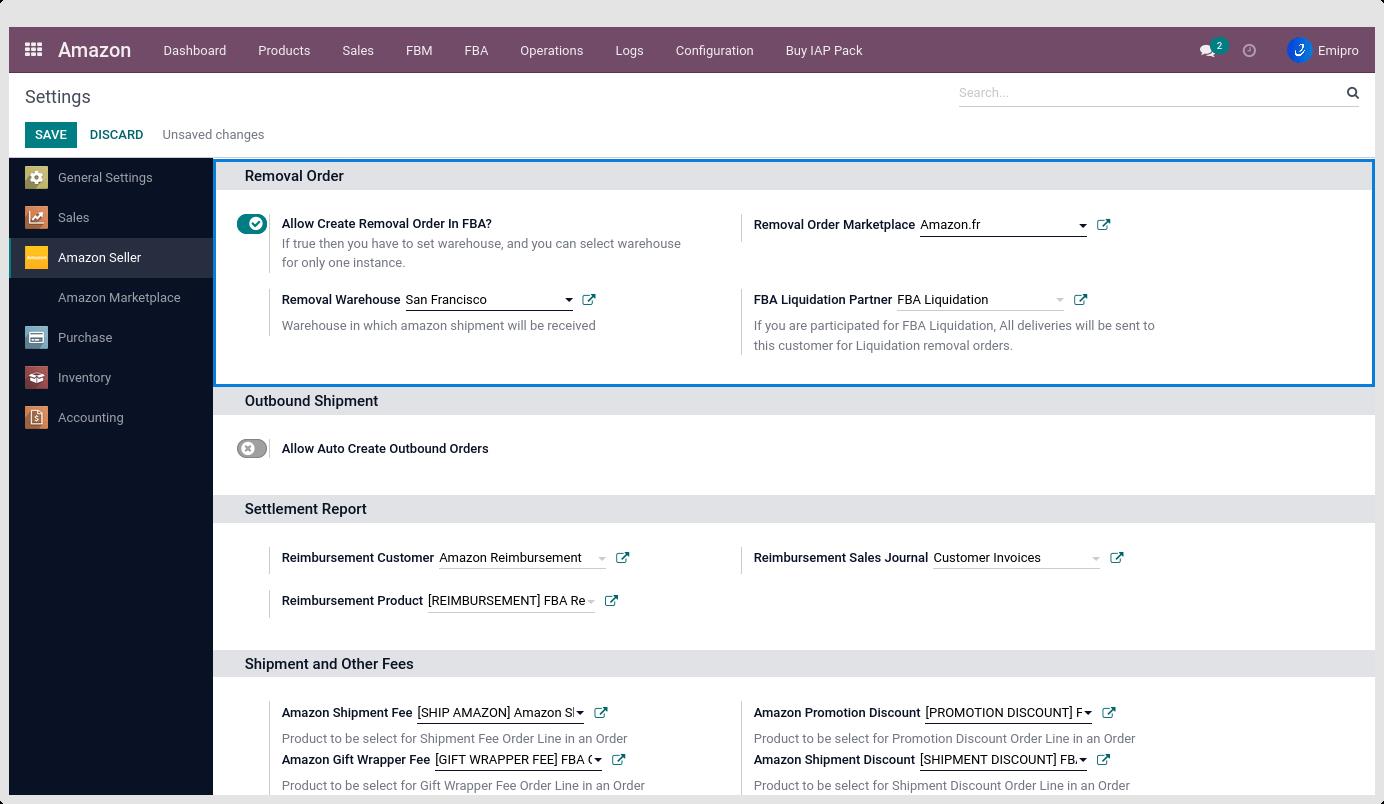
Allow Create Removal Order In FBA ?
A removal order will be created by the system for the configured marketplace.
Removal Order Marketplace
- After clicking Allow Create Removal Orders in FBA, the system asks which marketplace the user wants to remove orders from.
- Here The user can set up a marketplace for removal orders. The system will allow the user to create removal orders based on the configured marketplace.
Removal Warehouse
After clicking on Allow Create Removal Orders in FBA, the system asks the user to set up a removal warehouse.
- Here The user can set up the warehouse for the removal orders process. When a removal order is processed, inventory will be received in a removal warehouse.
FBA Liquidation Partner: Clicking on Allow Create Removal Orders in FBA prompts the system to set an FBA liquidation partner.
- If the user has opted for FBA Liquidation, All deliveries will be sent to this customer for liquidation removal orders.
- All the liquidation products delivered to this selected partner.
4.Outbound Shipment
This connector provides functionality to create outbound orders (Orders other than Amazon marketplace). Outbound orders refer to orders that come from another marketplace or other e-commerce platform.
- Go to Amazon ↣ Configuration ↣ Settings and select one of the Seller.
- The user will see the image below.
Allow Auto Create Outbound Orders: If this configuration is enabled, the system will automatically start the scheduler to create outbound orders from Odoo to Amazon.
Fulfillment Policy:
There are three fulfillment policies for outbound orders.
- FillOrKill
- FillAll
- FillAllAvailable
- FillOrKill:
- This means either the entire order is to be fulfilled or the entire order is to be canceled. Partial fulfillment is not allowed.
- If an item in a fulfillment order is determined to be unfulfillable before any shipment, the order moves to the Pending status (here, the process of picking units from inventory has begun), then the entire order is considered unfulfilled.
- However, if an item in a fulfillment order is determined to be unfulfillable after a shipment, the order moves to pending status and Amazon cancels to fulfill as much of the order as possible.
FillAll:
All fulfillable items in the fulfillment order are shipped. The fulfillment order remains in a processing state until all items are either shipped by Amazon or canceled by the seller.
FillAllAvailable:
All fulfillable items in the fulfillment order will be shipped. All unfulfillable items in the order are canceled by Amazon.
- Fulfillment Action:There are two fulfillment actions for Outbound orders.
- Ship
- Hold
- Ship:The fulfillment order ships now.
- Hold:An order hold is put on the fulfillment order.
- Shipment Category:There are four shipment categories for Outbound orders
- Standard
- Expedited
- Priority
- Scheduled Delivery
- Standard:Standard shipping method.
- Expedited:Expedited shipping method.
- Priority:Priority shipping method.
- Scheduled Delivery:Scheduled Delivery shipping method.
NOTE
Shipping method service level agreements vary depending on the marketplace. See the Amazon Seller Central website for shipping methods service level agreements and fulfillment fees on the marketplace.
Create Outbound on Order Confirmation: If this configuration is enabled, the system will automatically create outbound orders from Odoo to Amazon when a Sales order is confirmed.
Default Instance for Outbound Orders: When outbound sales orders are created in the system, this instance will be set as default.
FBA FBM Operations
Here we will discuss some operations of Connector.
These operations are common whether The seller is enrolled with FBA or FBM or both.
TABLE OF CONTENTS
- Import/Map Products
- Export/Update Products
- Update Products price in Amazon
- Seller Ratings
- Settlement Report Process
Import/Map Products
The connector doesn’t directly sync products between Amazon and Odoo, instead, it creates a layer above odoo products called Amazon products. It will sync Amazon products with existing odoo products and if the product is not found, then the system will create a product in odoo based on configuration.
Sync process: The user can sync the products in 2 ways:
- Import Products → Odoo’s internal reference number = Amazon seller SKU
- Map Products → Odoo’s internal reference number ≠ Amazon seller SKU
1. Import Products
- When the odoo product’s internal reference is the same as the Amazon product’s SKU then to connect or sync the products, the user can use this operation.
- When there is a product in Amazon, but not present in Odoo, and the user wants to create the same product in odoo automatically then the user also does this operation.
How To Process this operation:
- Step-1: Go to Amazon ↣ Operations
- Step-2: Select Amazon Seller
- Step-3: Select Operations for FBFBM
- Step-4: Select Marketplace
- Step-5: Select FBA FBM Operation for Import Products
-
Step-6: Auto-create product?: With the help of this feature system will auto-create Products if not found in Odoo. while synchronizing active product reports.
-
Step-7: Updated price in the price list? : By using the help of this feature, The user can bring Amazon prices in Odoo price lists for each marketplace while synchronizing active product reports.
- Step-8: Click on Execute

-
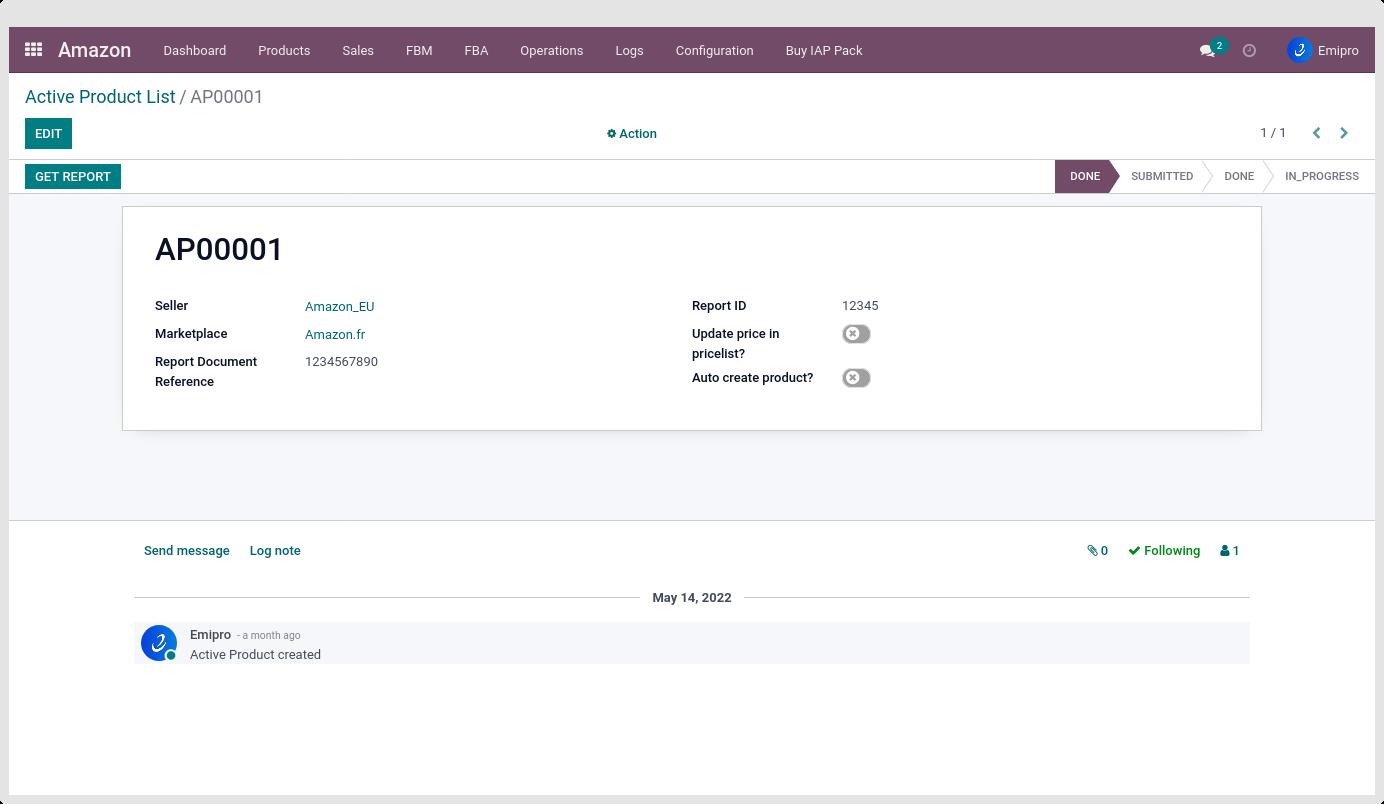
Step-9: After that connector will create a product report like below mentioned image. Here on primary stage report will be in the draft stage.
-
Step-10: Here users need to manually process these reports by clicking on check status. Then after report will transfer from draft to submitted, submitted to done, and done to in progress and from in-progress to processed or partially processed.
The sync process will search for SKUs in Amazon products. If SKU is found, it will update with the latest data received from the report and move that report to the processed stage.
- Users will see the mismatch button for the processed report but here it is only for the information purpose.
- In any case, if SKU/Internal Reference cannot be found in Odoo products and the auto-create product option was not enabled at the time of importing the products, Connector will create mismatched details and create log lines.
- Here this report will be in the partially processed stage until the user resolves the mismatch and re-process the report.
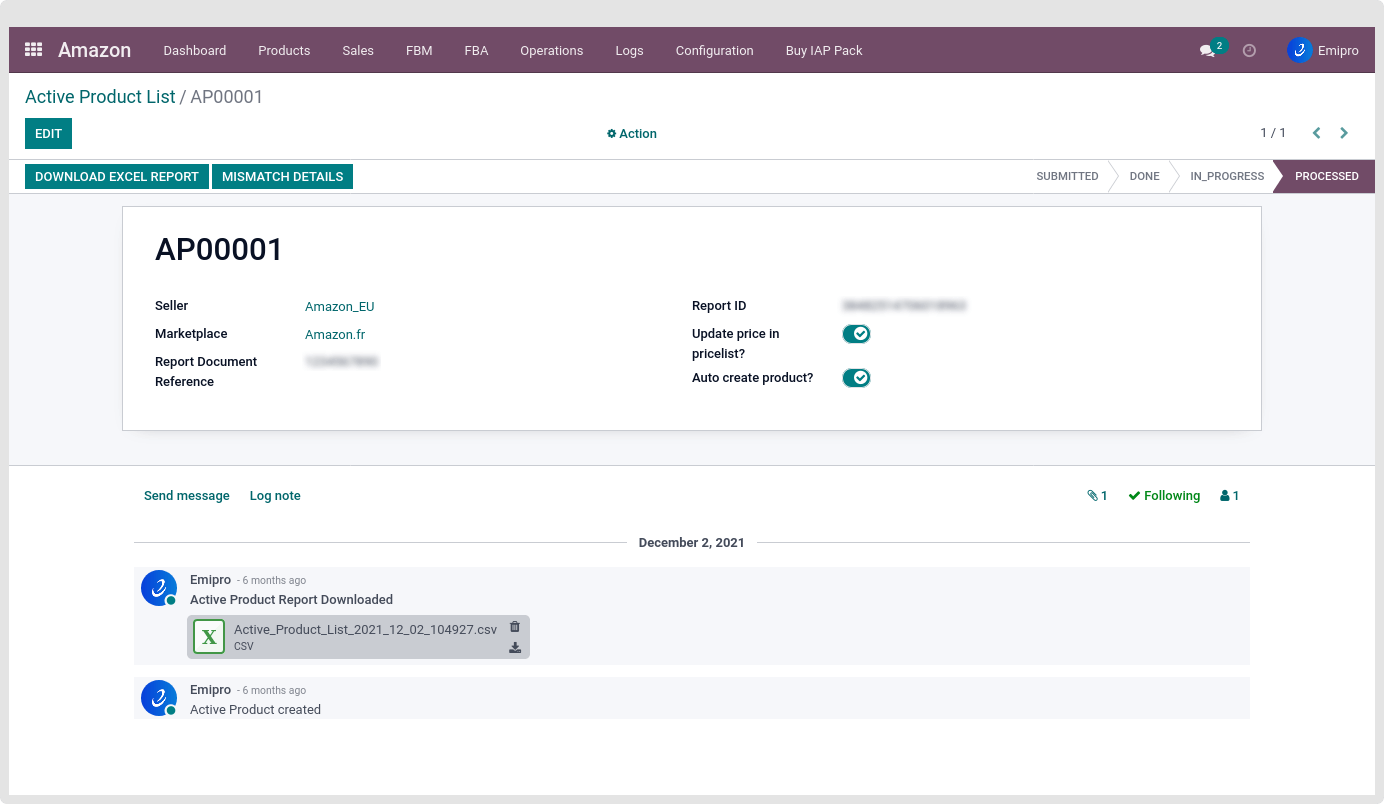
If the system does not sync the report correctly, a screen like the following is displayed:
To view mismatch details, click on the Mismatch Details button.
- After clicking on this button the user will see the Log Line
- Click on any Log Line, and there user will see the message and a reason for the mismatch and why the product is not synced.
2. Map Products
- This feature is useful when the Amazon SKU and Odoo internal reference numbers do not match. As well as if the user wants to map Odoo’s single product with different Amazon marketplaces
- Users can prepare files and Import them Manually from Amazon Operations.
How To Process this operation:
- >Step-1: go to Amazon ↣ Operations
- >Step-2: Select Amazon Seller
- >Step-3: Select Operations for FBFBM
- >Step-4: Select FBA FBM operation for Map Products
- >Step-5: Download Sample Attachment
Here the user can download a sample format to map the products. click on the Download sample attachment to download a sample file with the required format.
The sample file will have 5 columns viz. - Title, Internal Reference, Seller SKU, Marketplace, Fulfilment.
- Title:This will be the Seller’s Amazon product title.
- Internal Reference:The user will find internal references in the odoo products. The user can also manage with barcodes when the odoo internal reference is empty.
- Seller SKU:It is the seller’s Amazon seller SKU which is active in the marketplace(s).
- Fulfillment:It is either the FBA (fulfillment by Amazon) or FBM (Fulfillment by Merchant)
- Marketplace:It will be the country in which sellers sell the products, such as amazon.com or amazon.co.uk etc.
NOTE
Tip Multiple Amazon products can be managed under the same Odoo product. In this case, Internal Reference will be the same and the Seller SKU will vary.
- Step-6: File Upload: The user can upload the file as. CSV, .xlsx, and .xls files.
- Step-7: Click on Execute

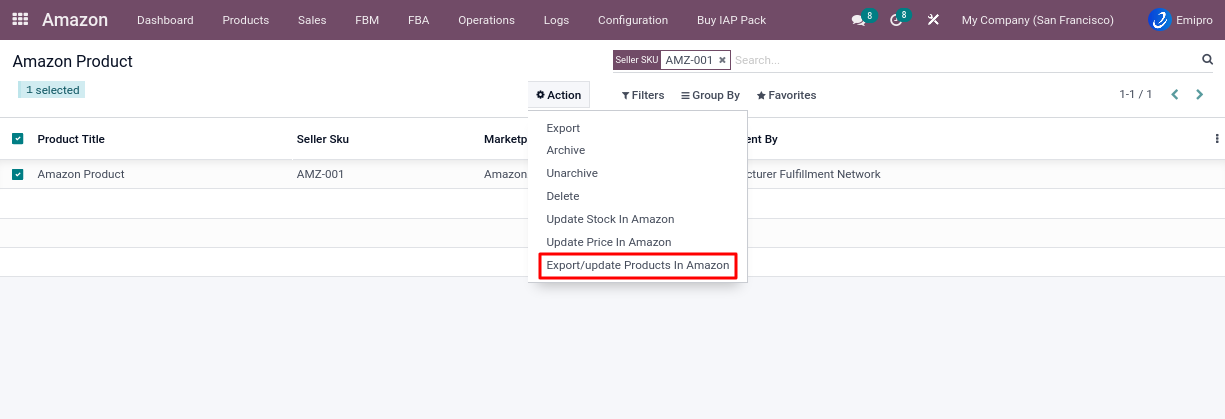
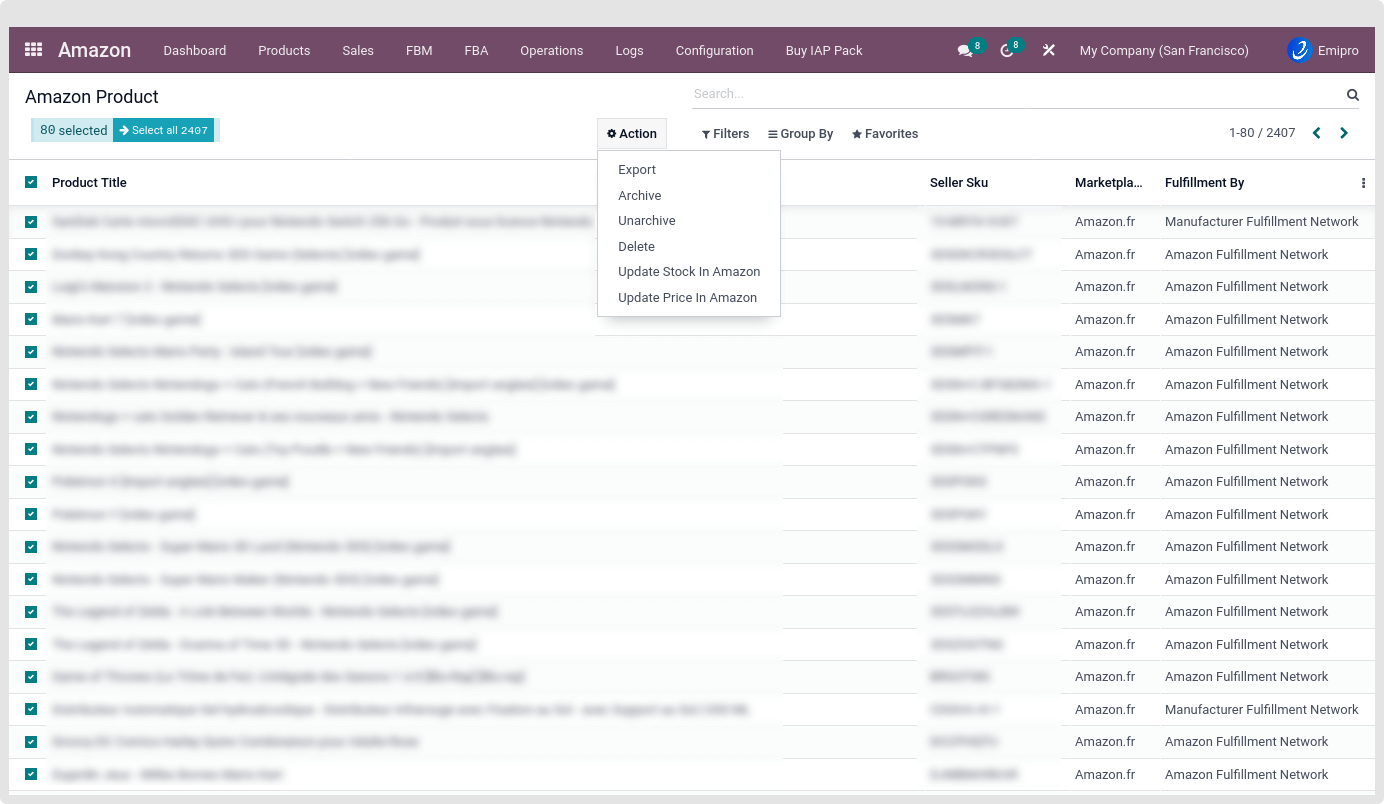
Export/Update Products
Export products to Amazon (This way will export products from amazon products layer to amazon marletplace)
After importing the CSV , .xlsx or .xls files the user must configure the required fields.
- Navigate toAamzon app ↣ Products ↣ Products Variants
- Select the Product you wish to update.
- Before updating amazon you can configure or set the following points.
1.Product Info
- By default the system will take the product name as the product title.
- Connector does not update/export the product images.
- If you have a different title, you can set it in the Amazon product listing.
- Odoo product names and amazon product names might be different, but they should be mapped with seller SKUs and internal reference numbers.
- Seller SKU : You can enter your Seller SKU from the Amazon marketplace or uploading a CSV file.
- Odoo Product :Odoo products mapped with Seller SKU
- Fulfillment latency : You can set the Amazon Product fulfillment latency from here.(For more details please refer FBM seller configuration > >Inventory configuration)
2.Amazon Info

- By default, the system will set product description on Amazon products, but users can change this to suit their needs.
- Here you can see which products are active on which marketplace with fulfillment by network.
- We can also add the products launch date, release date, and discontinuation date.
3.Product listing and elements
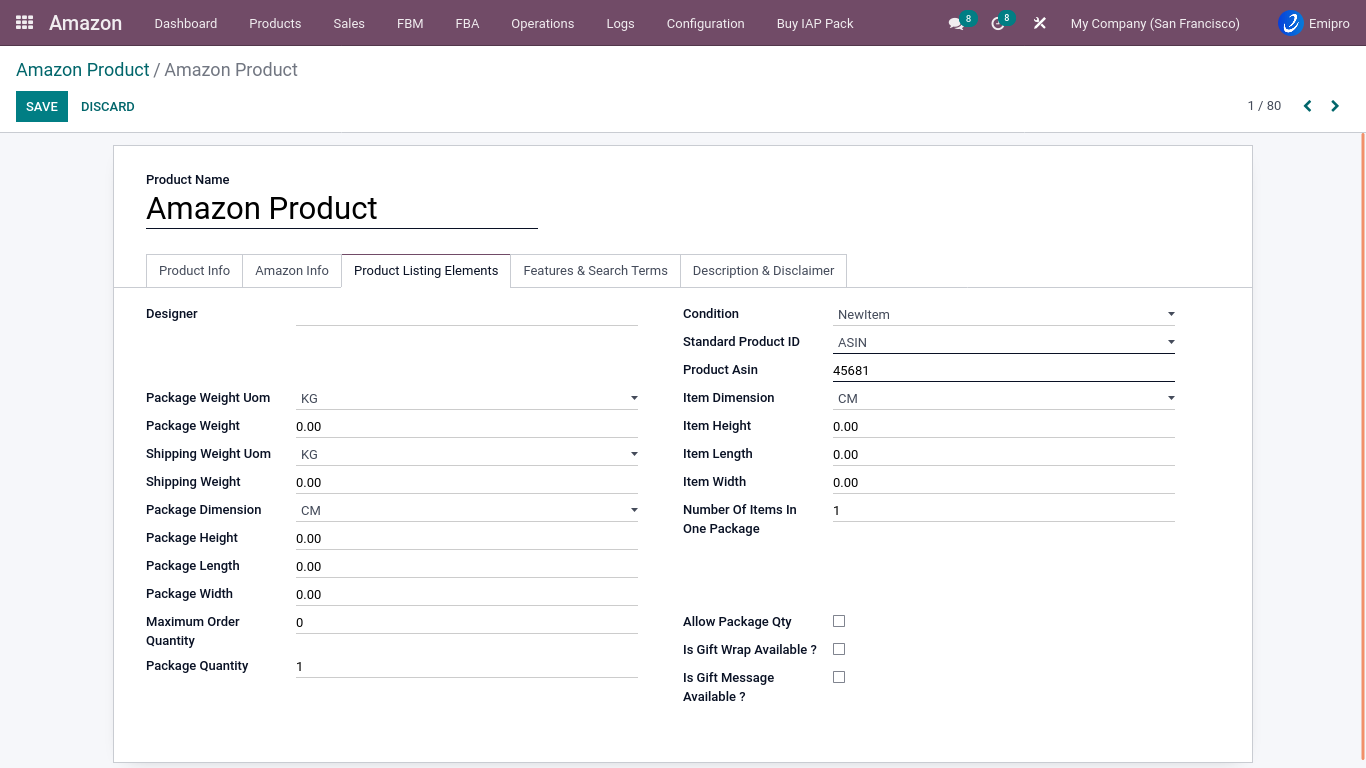
Based on this system, this is the main field that exports products from Odoo to Amazon. Here you can manage your products’ dimensions and weights that update in Amazon.
- Condition : Select the condition of the product, such as brand-new, used, etc.
- Standard Product ID You can select the ASIN, EAN, UPC , GTIN number.
- Product ASIN : You must fill out the product ASIN or the Amazon marketplace will not allow you to update your product.
- Also, you can manage your packaging, gift wrapping, and gift message configurations based on your needs.
4.Features Search terms
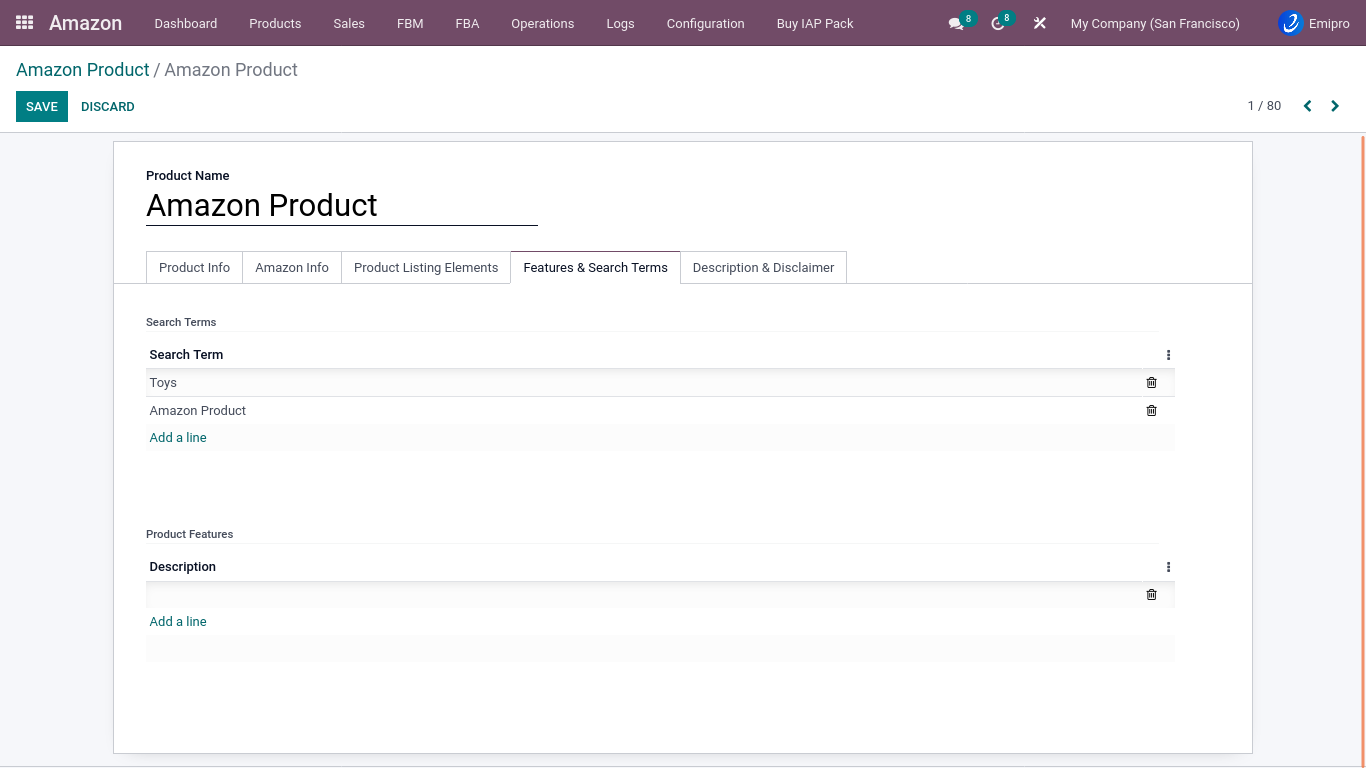
Those fields are not required, but the seller can configure them if they wish to use different features and search terms.
5.Description Disclaimer
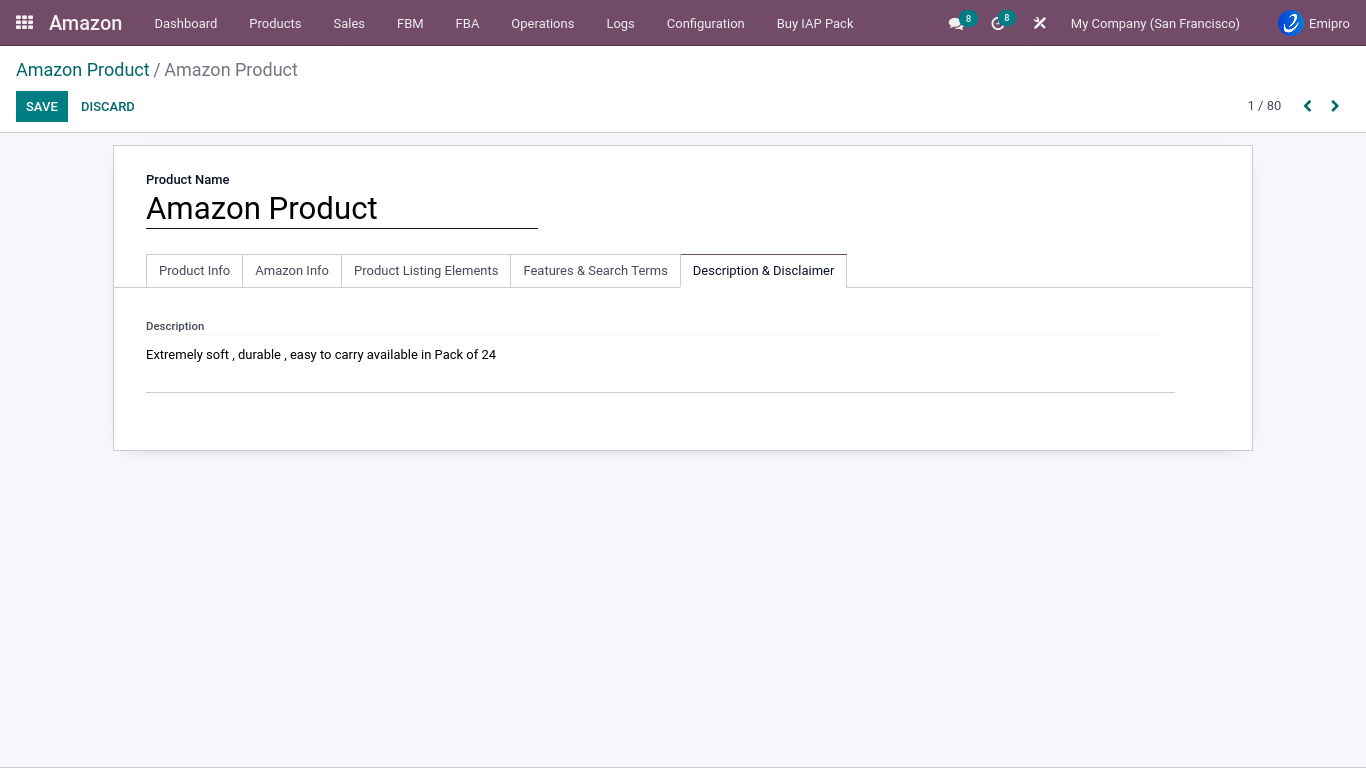
Here you can add the product description that is updated on the Amazon marketplace.
Export to Amazon :
- The system will not export price or stock information with products, so first it will create an inactive listing on Amazon.
- After the export operation, the seller can update price and stock for selected products on Amazon. After exporting the price and stock, the listing will be live on Amazon.
- Prepared products for Amazon will be visible under Amazon ↣ Products ↣ Products variants from where you can export products to the Amazon.
TIP
- If the product already exists in the Amazon catalogue then the user can simply export the products by clicking on “Export/update Products in Amazon.
- You can’t create new products directly from here if the product is not available in Amazon’s product catalogue.
NOTE
- Connector does not allow to product variants update.
Update Products Price and Stock in Amazon
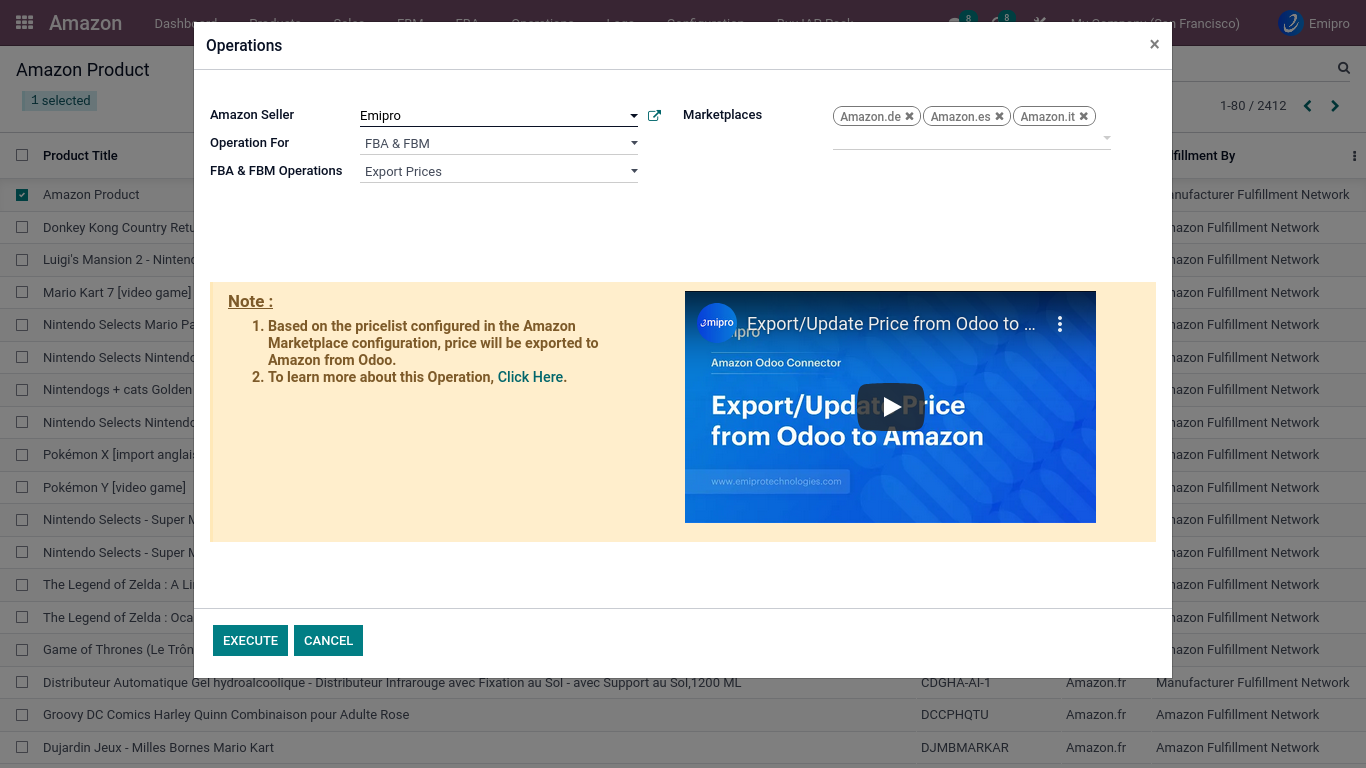
1. Update Product Price in Amazon
- To update the price from odoo to Amazon Seller Central, 1stly seller needs to configure the pricelist at the marketplace level in the Odoo environment.
- The seller can select pricelist for marketplace using Amazon ↣ Configuration ↣ Settings ↣ Amazon Marketplace ↣ Pricelist Name.
Once The user sets the price list then after the user can update the price by
- Step-1: Go to Amazon ↣ Products ↣ Product Variants
- Step-2: Select the Product in which the user wishes to update the price on Amazon
- Step-3: Click on Action ↣ Update Price On Amazon.
- Optionally, The user can also update the price by following the steps below from the operation menu
- Step-1: Go to Amazon ↣ Operations.
- Step-2: Select the respective Amazon Seller
- Step-3: Select FBA FBM Operation for Export Prices
- Step-4: Select Marketplace: the user can select multiple marketplaces.
TIP
When a user exports a product from Odoo to Amazon, the system will first create a listing as incomplete.
After exporting price and stock, the listing will become active on Amazon.
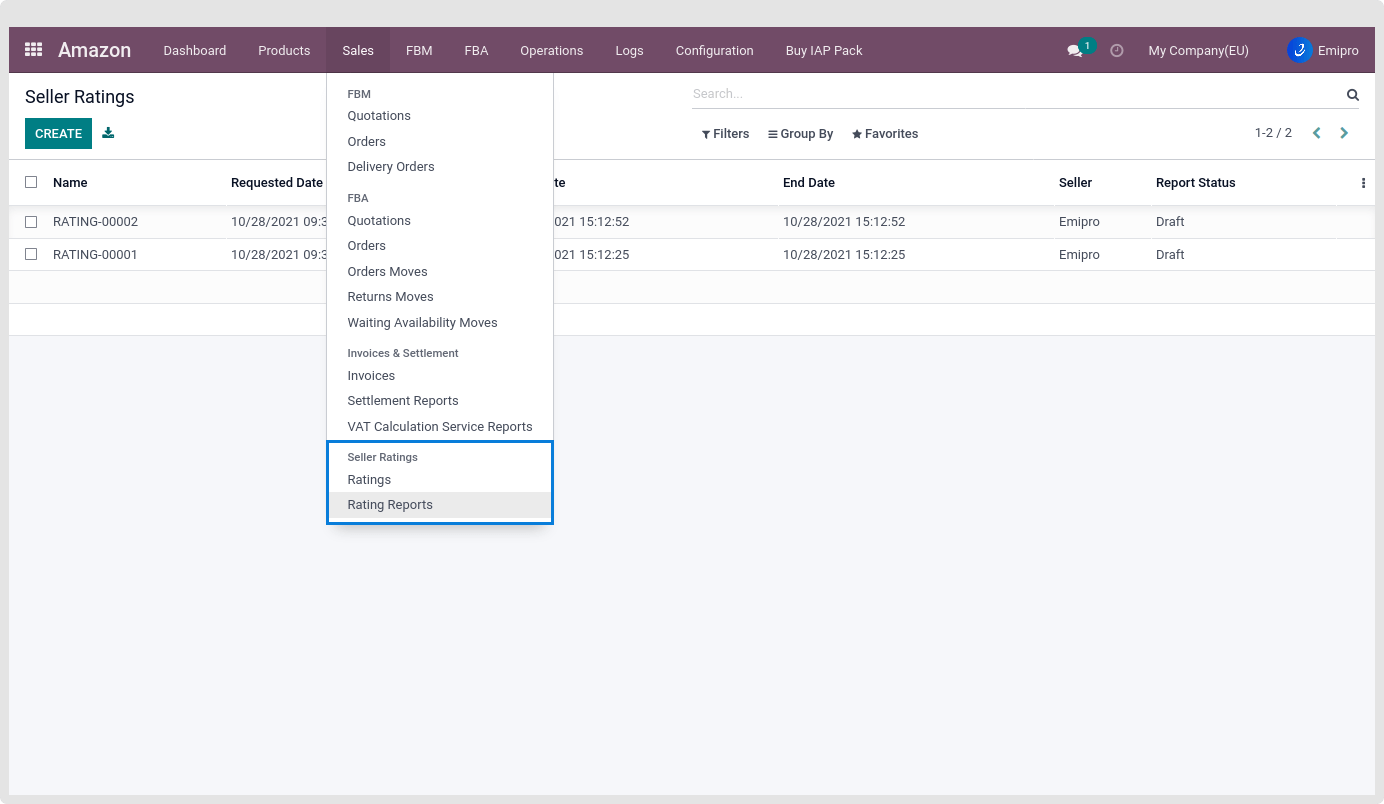
Seller Rating
- With this operation, the user can import seller ratings for all the orders which are having ratings equal to 3 or less. There are 2 ways to import seller ratings in Odoo from Amazon:
Manual through Operations:
- Step-1: Go to Amazon ↣ Operations.
- Step-2: Select the respective Amazon Seller
- Step-3: Select FBA FBM Operation
- Step-4: Select FBA FBM Operation for Import Rating Report
- Step-5: The user can set a date range.
- Step-6: Click on the Execute button
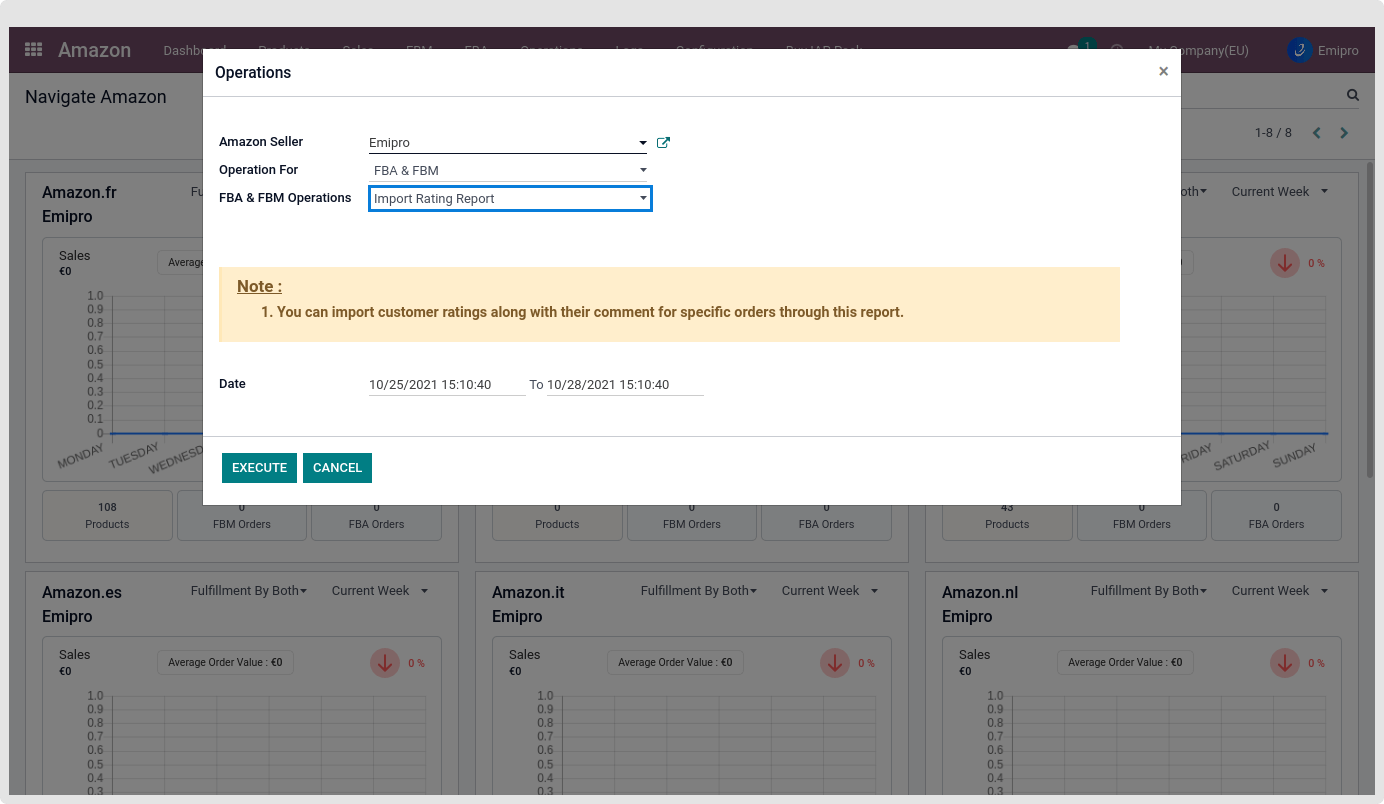
- Once, the report is generated it will be visible under the menu
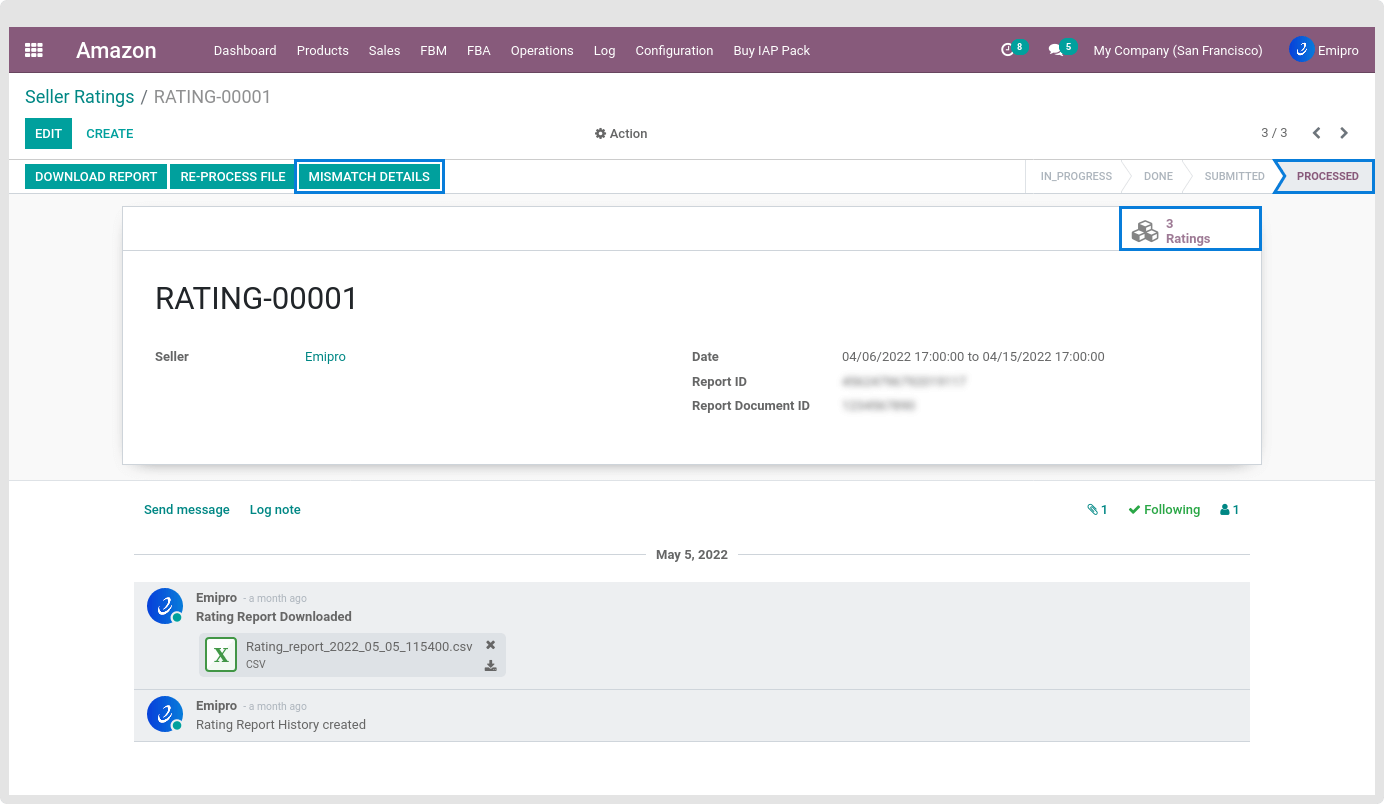
- Amazon ↣ Sales ↣ Seller Ratings ↣ Rating Reports.

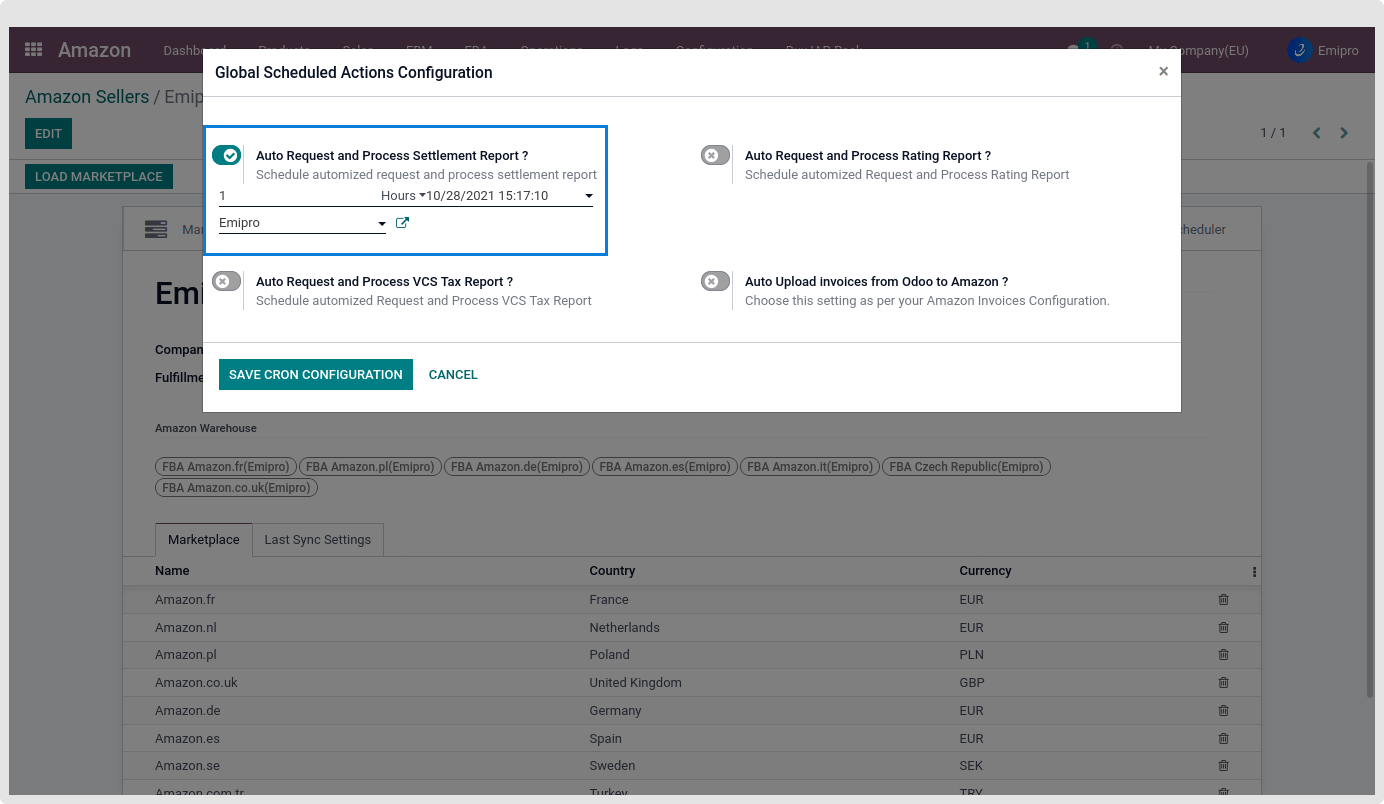
Automatically through Scheduler:
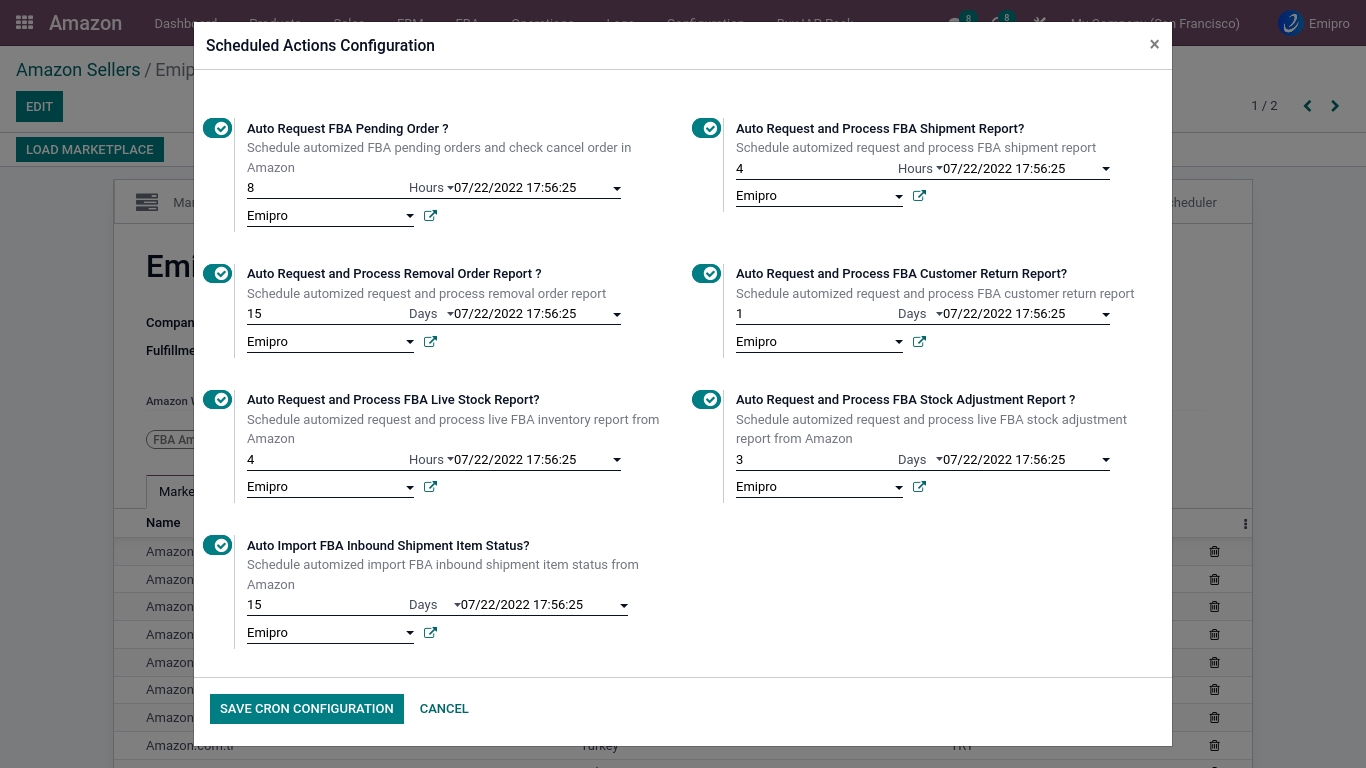
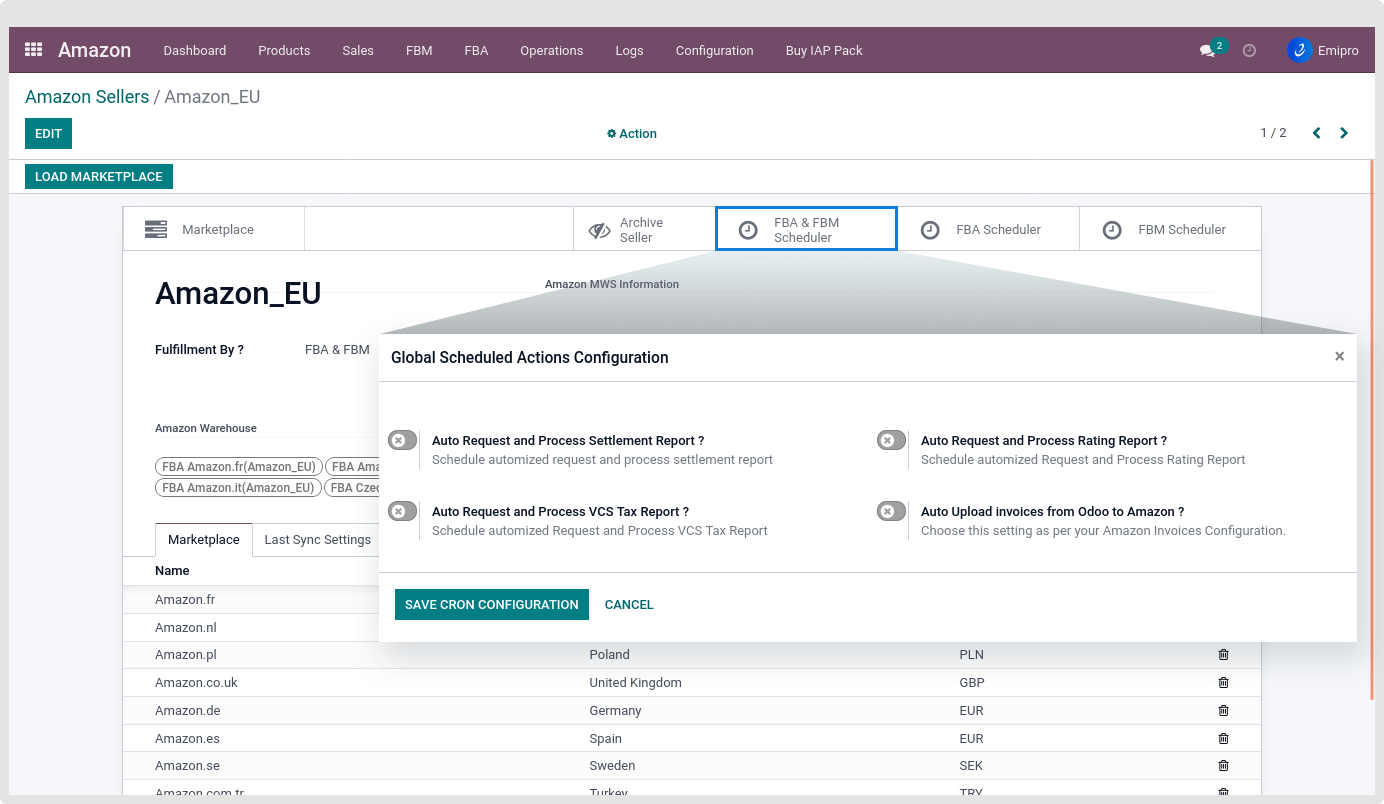
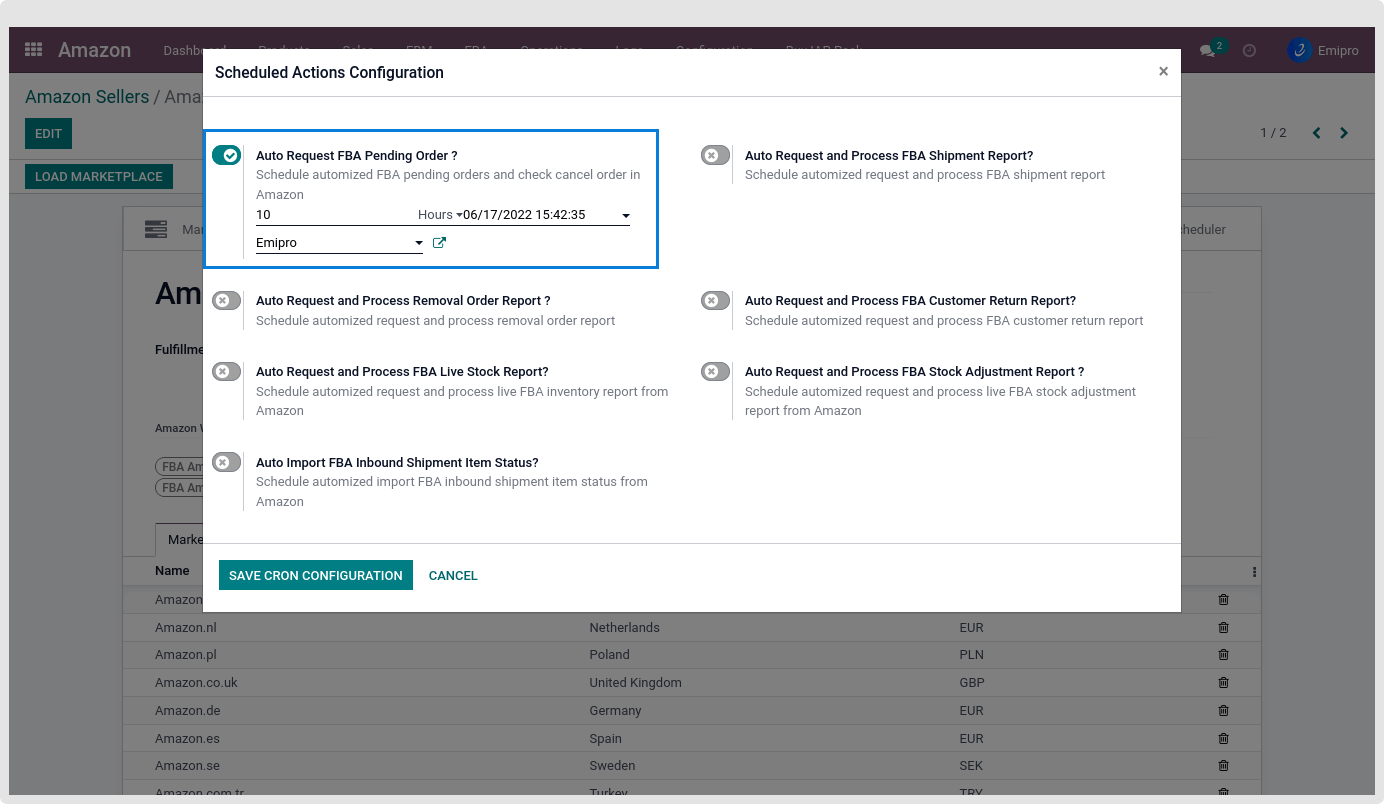
To make this process automated you can navigate to Amazon ↣ Configuration ↣ Sellers ↣ FBA FBM Schedulers.
Settlement Report Process
- Amazon provides the Settlement/Payment Reports to view information about the seller’s payments related to sales and operational activity for your Amazon account.
- Settlement reports can provide a detailed breakdown of the seller’s account activity for a given settlement period like orders, refunds, reimbursements Amazon fees, etc.
- In the connector, the user can fetch their Amazon settlement report from Amazon and process that report in their books of accounts.
NOTE
Amazon provides settlement reports in 3 formats. viz. XML, Flat file Flat file V2, out of which the module supports Flat file V2 format only. So before proceeding with settlement report processing in Odoo please check Amazon seller central settings and make necessary changes if required.
How this process works:
- Whenever the user imports orders and refunds from Amazon to Odoo, the system creates invoices and credit notes but those are not marked as paid.
- When the user imports a settlement report and processes it, the invoices and credit notes will be marked as Paid. Sometimes it happens that some of the orders are not imported in Odoo so at the time of processing settlement reports these order lines will not get reconciled and the user will be able to identify such order lines.
- In case of reimbursement which has been performed by Amazon, the system will create an invoice and Amazon will be set as a customer.
Configurations to be ensured Before processing Settlement Report:
- Before processing a settlement report, the user has to set below 2 fields. These fields are Settlement report journal and ending balance account.
- To set fields Go to Amazon ↣ Configuration ↣ Settings ↣ Amazon Marketplace ↣ Select Seller ↣ then Select Marketplace ↣ Settlement Report.
All the Amazon fees such as Amazon subscription, commission fees, or other transaction types will be reconciled automatically with the accounts you have configured under Amazon ↣ Configuration ↣ Settings ↣ Settlement Report ↣ Click on Configure Amazon seller transactions type.
- Once all the statement lines are properly reconciled, all of the related Amazon invoices will be automatically marked as Paid.
Settlement Report Process
The user can process the settlement report in 2 ways.
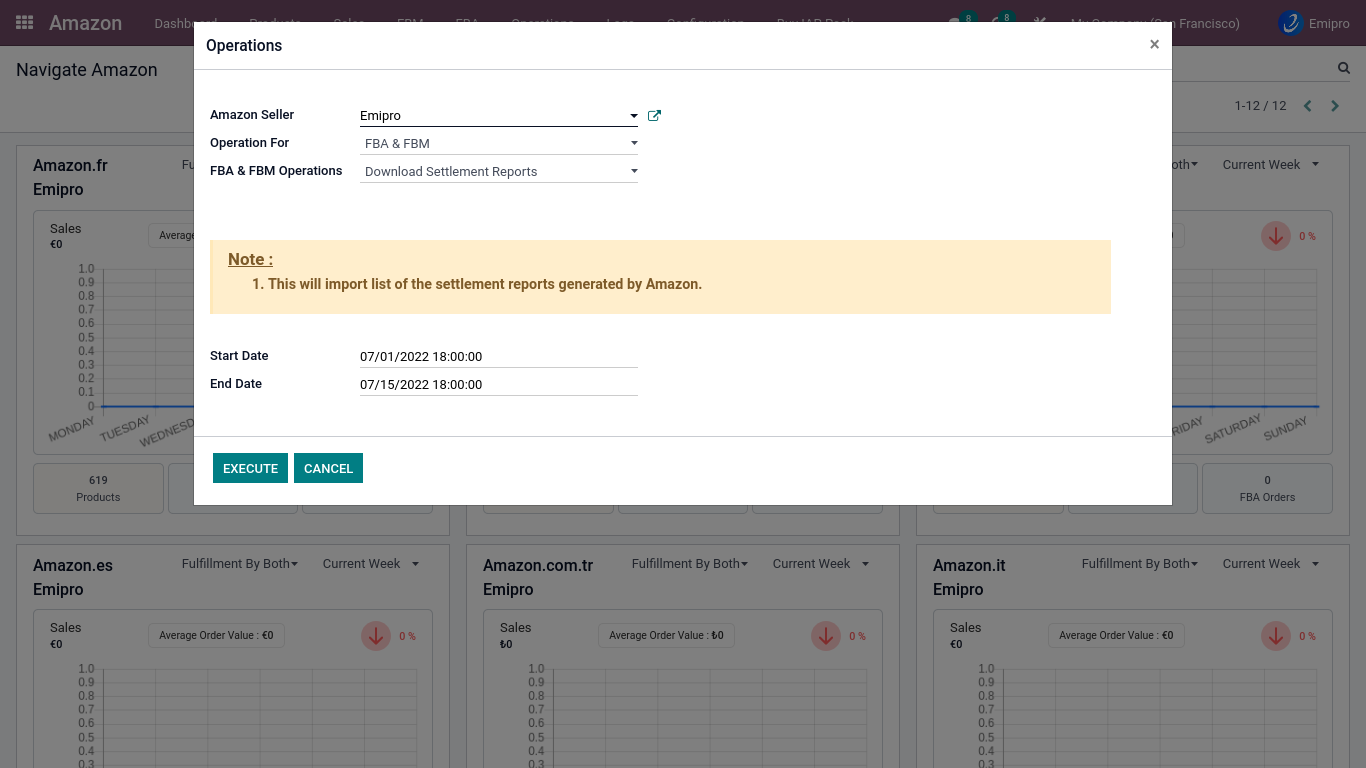
1.Manually through Operations:
Settlement reports are generated regularly by Amazon at the seller central account, and the seller can download them from Odoo.
- Step-1: Go to Amazon ↣ Operations.
- Step-2: Select the respective Amazon Seller
- Step-3: Select FBA FBM Operation
- Step-4: Select FBA FBM Operation for Download Settlement Report
- Step-5: Here the user needs to set a date range.
- Step-6: Click on the Execute button
If the user does not specify the date range then the system by default will request a report for the past 90 days.
The user can see all of your settlement reports from the menu Amazon ↣ Sales ↣ Invoices Settlement ↣ Settlement Reports. The user can see all the settlement reports marketplace-wise.
- Once Amazon generates and returns a settlement report to Odoo, it will be in the Done stage. The done stage indicates that the report has not yet been updated in Odoo.
- After clicking on the Process statement button, any unprocessed statement will automatically create the Amazon/bank statement in Odoo. All the lines will be imported in Odoo and the stage will be set to Imported.
- After all, lines are imported, if there are any missing fees to be configured then a new tab Configure Missing Fees will be visible.
- In the Imported state Reconcile Button will be visible when a user clicks on the Reconcile button,
- The system will Reconcile statement lines. Here, the important thing to note is if all the statement lines are not reconciled with proper accounts, the Amazon bank statement will not be able to be closed.
- If any lines in the settlement report have not been reconciled due to missing fees, then the user can configure those missing fees from this screen itself.
2.Automatically through scheduler:
The user can set a scheduler in the system to download and process settlement reports automatically. The user can set the scheduler by navigating to Amazon ↣ Configuration ↣ Sellers ↣ FBA FBM Schedulers.
*Sometimes seller may receive Fatal or cancel status of this reports.
Fatal status: Seller can get Fatal status for two reasons.
- The seller has made the same request too many times in a row.
- There is no data available for the date range specified.
Cancel status: When Seller already has data in your Odoo environment, the connector will cancel any duplicate reports.
FBM Operations
Here the user can get detailed information about different FBM operations. Such as importing FBM unshipped/shipped orders, Canceling FBM orders in Amazon Seller Central, and how to update shipping information in Seller Central.
TABLE OF CONTENTS
- Export stock
- FBM Export shipment info/Update order status
- FBM Cancel Order
- FBM Shipped Order Process
- FBM Unshipped Orders
Export or Update Product Stock in Amazon
Consider the below-mentioned configuration-related export/update product stock.
- Fix Stock Type: Here customers have the option to send stock based on Fix quantity or based on the percentage of the total quantity.
- Fix Stock Value: The user can enter stock value. (Fix stock means the system will always update stock as per the configured fixed stock value with stock type from Odoo to Amazon, but the system will not export more than the available quantity in Odoo)
There are 3 ways to update stock from Odoo to Amazon:
- Individual product wise
- Operations
- Scheduler
1.Individual product wise :
The user can select specific products from the Amazon product list and click on the Update Stock in Amazon option. As the product over here is associated with a single marketplace, it will update the stock for that concerned marketplace only.
- Step-1: Go to Amazon ↣ Products ↣ Products Variants ↣
- Step-2: Select specific products that the user wants to update the stock
- Step-3: Click on the Action button
- Step-4: Click on the Update Stock in Amaon
2.Bulk product with marketplace
- Step-1: Go to Amazon ↣ Operations *.
- Step-2: Select the respective Amazon Seller
- Step-3: Select FBM Operation for Export Stock
- Step-4: Select Marketplace. Here the user can select multiple marketplaces.
- With this feature, The user can bulk update stock across multiple marketplaces.
- This applies only to the FBM Seller
- The system will export product stock based on the stock movements that have occurred after the last stock update date.
- It will export stock based on the stock movements that have occurred in the last 30 days if the user is exporting stock for the first time.
3.With help of scheduler :

- Configure scheduler to export stock from Odoo to Amazon. This cron job will update stock for that selected seller.
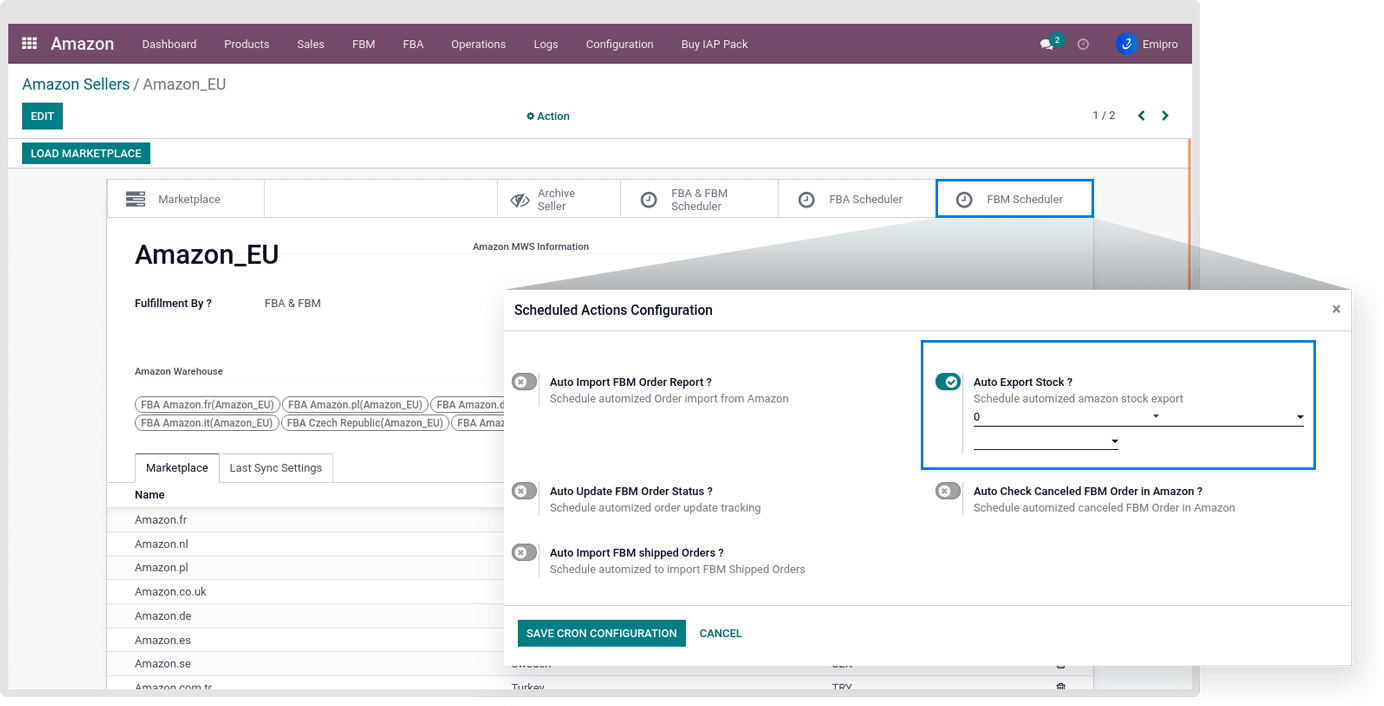
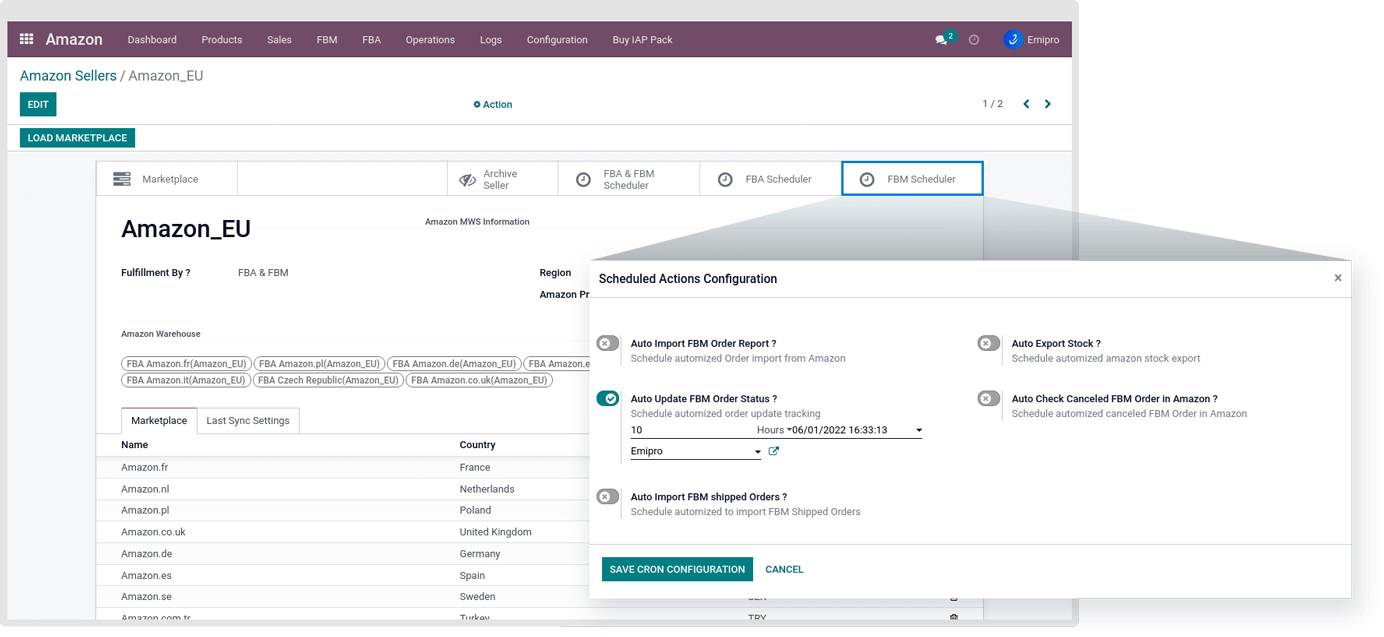
- Go to Configurations ↣ Sellers ↣ FBM Scheduler.
- Here The users can set the time interval based on their need
- The system will export product stock based on the stock movements that have occurred after the last stock update date.
- It will export stock based on the stock movements that have occurred in the last 30 days if the user is exporting stock for the first time.
Export shipping details with tracking number in Amazon
Once the unshipped orders are imported into Odoo, The user can update the tracking number for each delivery order.
- If The user has only a single tracking number then the user can configure it in the carrier tracking reference field which is provided by default in Odoo.
- If the user has multiple tracking numbers then the user can use Odoo packaging features. Pack the package and add the reference to the package.
- For all information exported through the connector in Amazon, the system will generate the Feed Submission History.
- To check feed submission history go to logs » feed submission history
- The system will also automatically check the feed results via the scheduler. The User can also get feed results manually by clicking on the button Get feed result. After exporting the information the user needs to wait for 120 seconds to get feed results.
- If for some reason the feed submission fails, the order status will not update automatically in Amazon. In this case, contact Inwizards Support.
There are 2 ways to update tracking numbers:
Manually Through Operations
- The user can also update the tracking number for all the marketplaces manually at any point in time using this feature
- The user can perform this task from below
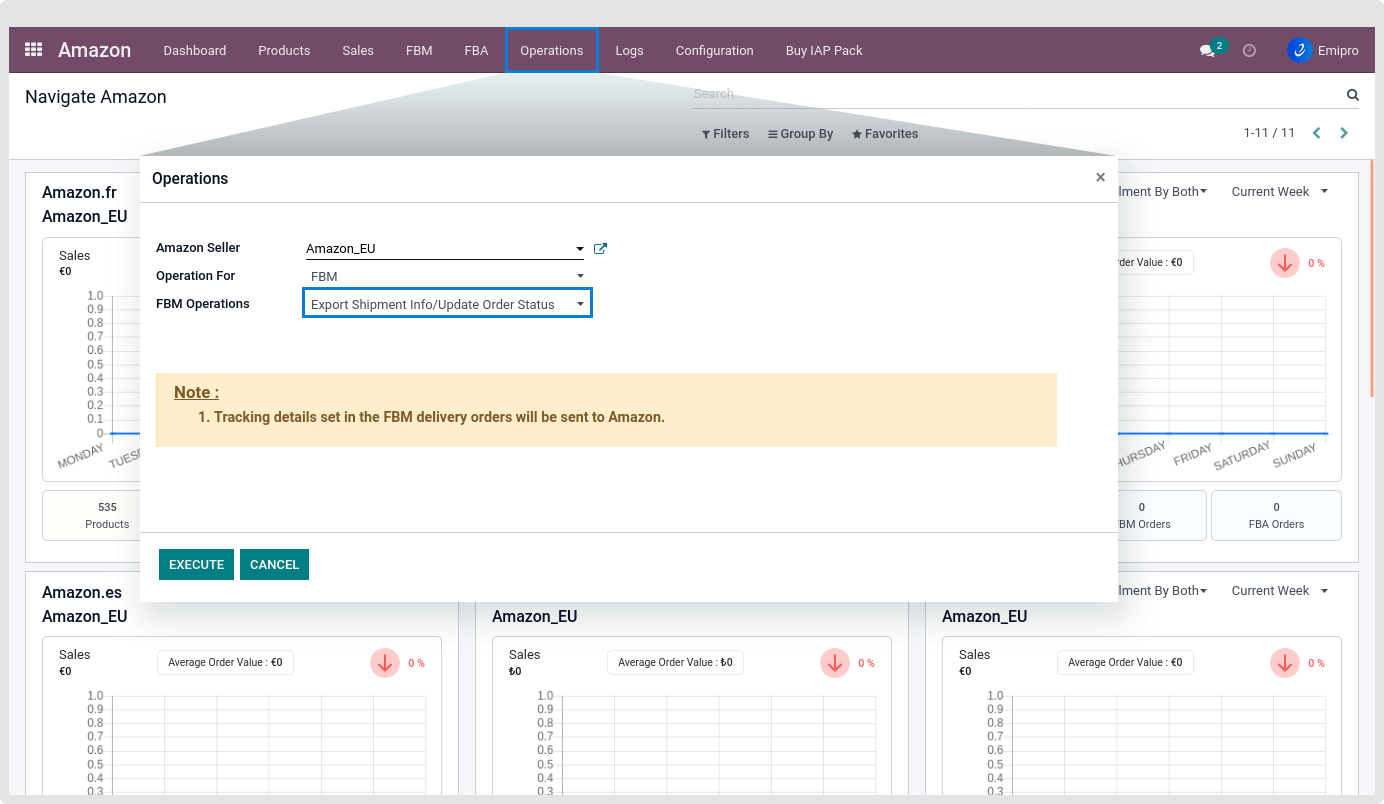
- Step-1: Go to Amazon ↣ Operations
- Step-2: Select the Amazon Seller
- Step-3: Select operations as FBM
- Step-4: Select FBM operation as Export Shipment Info/Update Order Status
- The user will even need to mention the marketplace in which the user wishes to operate.
- In an update, the order status will select the delivery date as the shipment date.
Automatically Through Scheduler
The user can configure this automated job from Amazon configuration. This scheduler will set a specific interval for updating order status and tracking number from your sales orders from Odoo to Amazon. The user can set different schedulers for different sellers.
Delivery/Shipping Method
As per FBM FBA shipping methods. Amazon offers the following shipping service level categories.
- Standard
- Free Economy
- Priority
- Scheduled delivery
- Next day
- Scheduled
- Expedited
- Same day
- Second day
- When orders are imported from Amazon to the connector, any of the above shipping service level categories are associated with the orders.
- As per Amazon shipping service level category. Amazon offers the following service-level categories for outbound orders.
- Standard
- Expedited
- Priority
1.Configuration of Delivery/shipping Method
- The user can configure Their delivery/shipping methods as per the below-mentioned steps.
- Go to Inventory app ↣ Configuration ↣ Shipping methods
- Click on the Create button
Shipping Method Name: The user can enter the name of the shipping method here. For reference, it can be anything.
Amazon Carrier Code: Amazon provides a list of different carrier codes that also have been provided in the connector, If the shipping provider code is not in the list then the user can select “Other”.
Amazon Shipping Method(FBM, FBA): As mentioned above, Amazon supports different shipping methods along with orders.
Here The user can select the shipping method for the orders when orders are imported from the Amazon system will select delivery/shipping method according to the configured Amazon Shipping Method(FBM, FBA)
Shipment Service Level Category (Outbound Orders): Here The user can select the shipment service level category for the outbound orders. In the process of exporting orders from Odoo to Amazon, the configured service level categories are exported.
FBM Shipping Method: If the user selects Amazon Carrier Code with the option of Other from the drop-down the user should configure the shipping method name. If the FBM Shipping Method contains Other carriers, the system will export this code and if they are available, but not configured, the system will export the delivery carrier name from Odoo to Amazon.
Please refer to the below-mentioned cases which are helpful for the configuration of delivery/shipping methods.
Case-01: Delivery method with Amazon carrier code
Condition 01 : Amazon shipping method(FBM,FBA) : Set as Standard Result: When the order is imported, the system will set the carrier because the Amazon shipping method(FBM, FBA) is set.
- In this case if the user has multiple delivery/shipping methods with Amazon shipping method(FBM, FBA) as Standard the system will select any one delivery/shipping method from among them.
Condition 02 : Amazon shipping method(FBM,FBA) :Not Set Result: When the order is imported, the system will not set the carrier because the Amazon shipping method(FBM, FBA) is not set.
- In this case the user has to manually select the delivery carrier.
Case-03: Delivery method with Amazon carrier code as “Other” and FBM shipping method
Condition 01 : If Amazon carrier code : Set as “Other” , FBM shipping method : Set
- When the order status is updated in Amazon Seller Central, the system will send the tracking number with FBM shipping method
- For ex. The system sends tracking no.2548922 and the FBM shipping method as a “UPS Express delivery”
Condition 02 : If Amazon carrier code : Set as “Other” , FBM shipping method : Not Set
When the order status is updated in Amazon Seller Central, the system will send the tracking number with delivery/shipping method name.
2.How to set manually delivery carrier
After processing the FBM unshipped orders you have to ship them to the customer address with the user’s shipping provider.
The user can select the carrier by manual process.
- Step-1: Go to Amazon ↣Sales ↣ FBM ↣ Orders or Quotations
- Step-2: Select any order
- Step-3 Click on the delivery picking a smart button
The user will see the below screen
If the Amazon shipping method is configured with the delivery/shipping method so system will automatically select the delivery method accordingly.
If the Amazon shipping method is not configured with the delivery/shipping method the user has to set it manually.
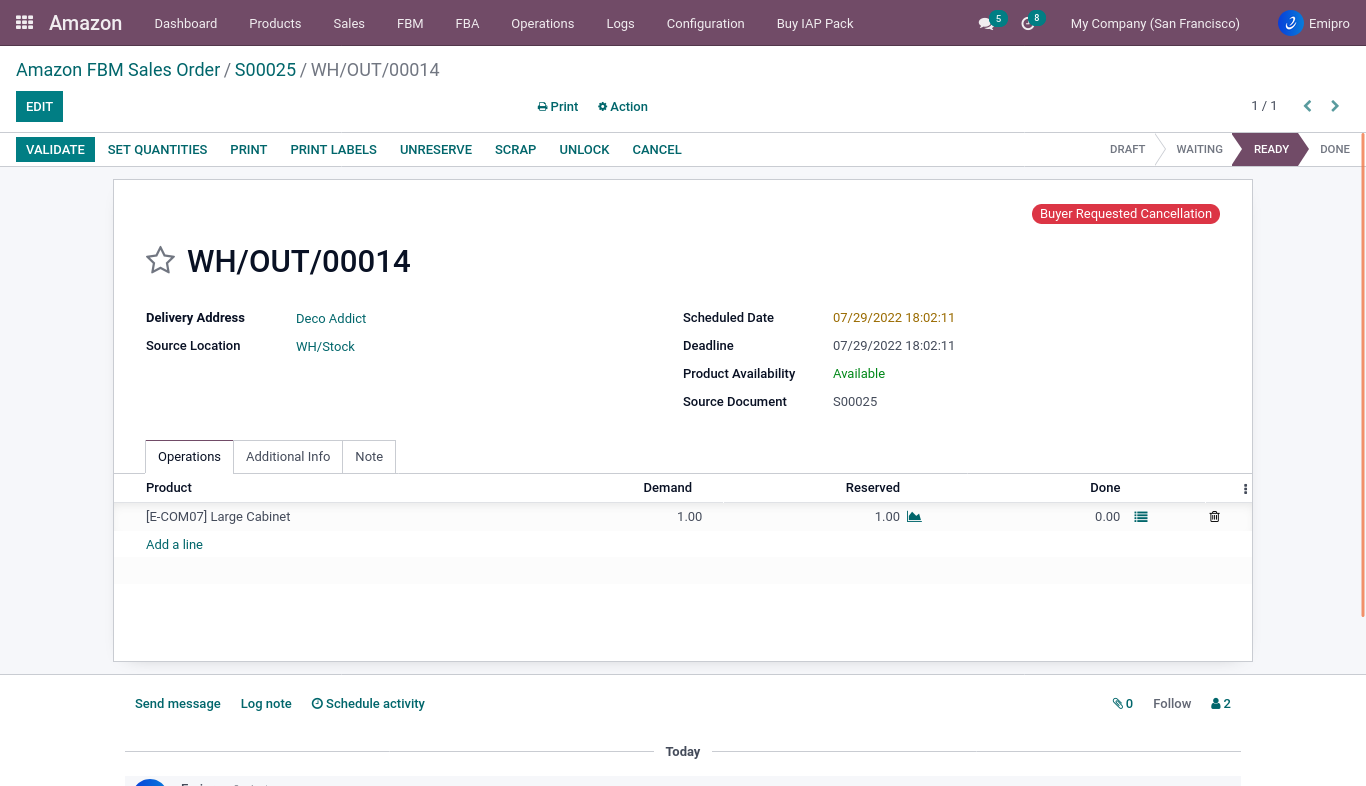
FBM Cancel Orders
The user can cancel any Amazon orders directly from Odoo and can also import FBM-canceled orders from Amazon to Odoo.
1. Cancel order from odoo to Amazon
To cancel the orders first the user needs to cancel the delivery picking for a specific sales order and then the user will be able to cancel the order.
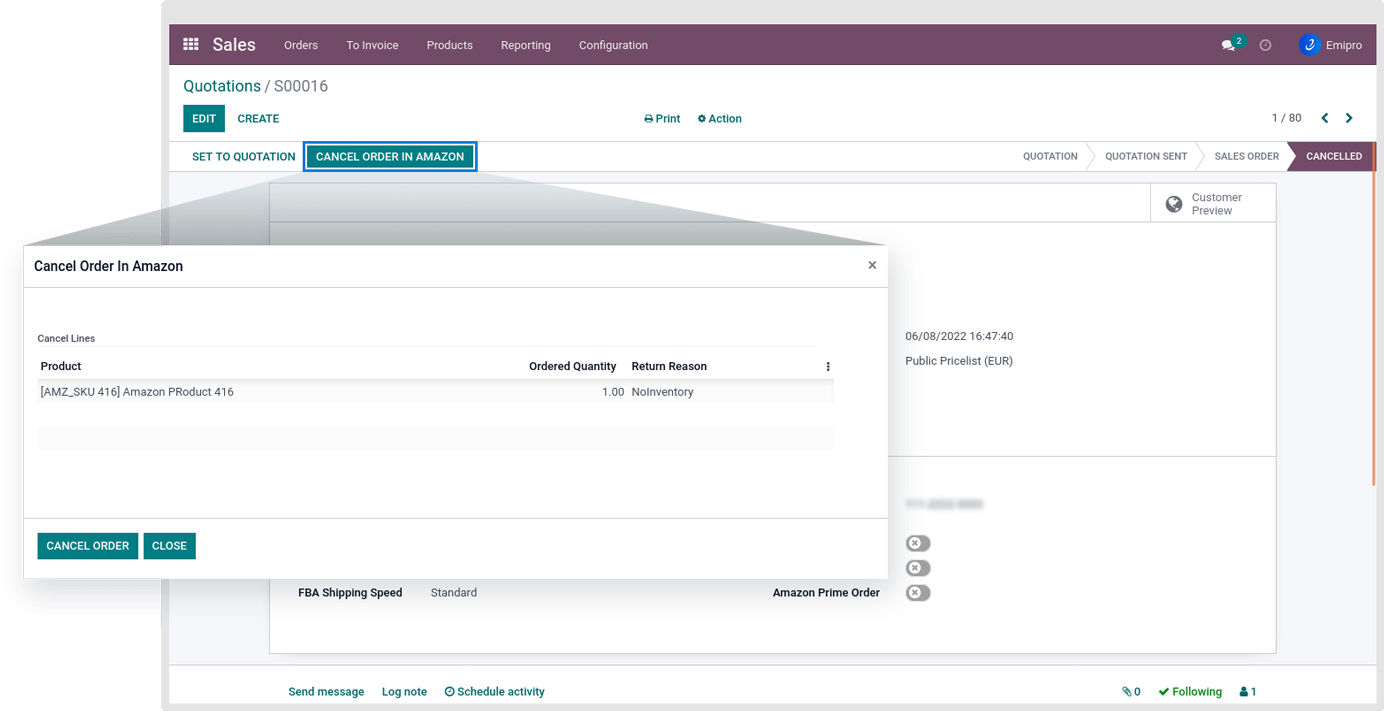
- Step-1: Go to Amazon↣ Sales ↣ FBM ↣ Orders.
- Step-2: Select the order the user wants to cancel and there user will be able to see the option Cancel In Amazon
- The user will only be able to see the option cancel on Amazon only if the user has canceled the delivery picking related to the order.
-
Step-3: By clicking on Cancel In Amazon, a pop-up will open and The user will be asked to select a specific return reason.
2. Cancel order from Amazon to odoo
The user can even cancel the order from Amazon and it will be updated in Odoo as well while importing orders.
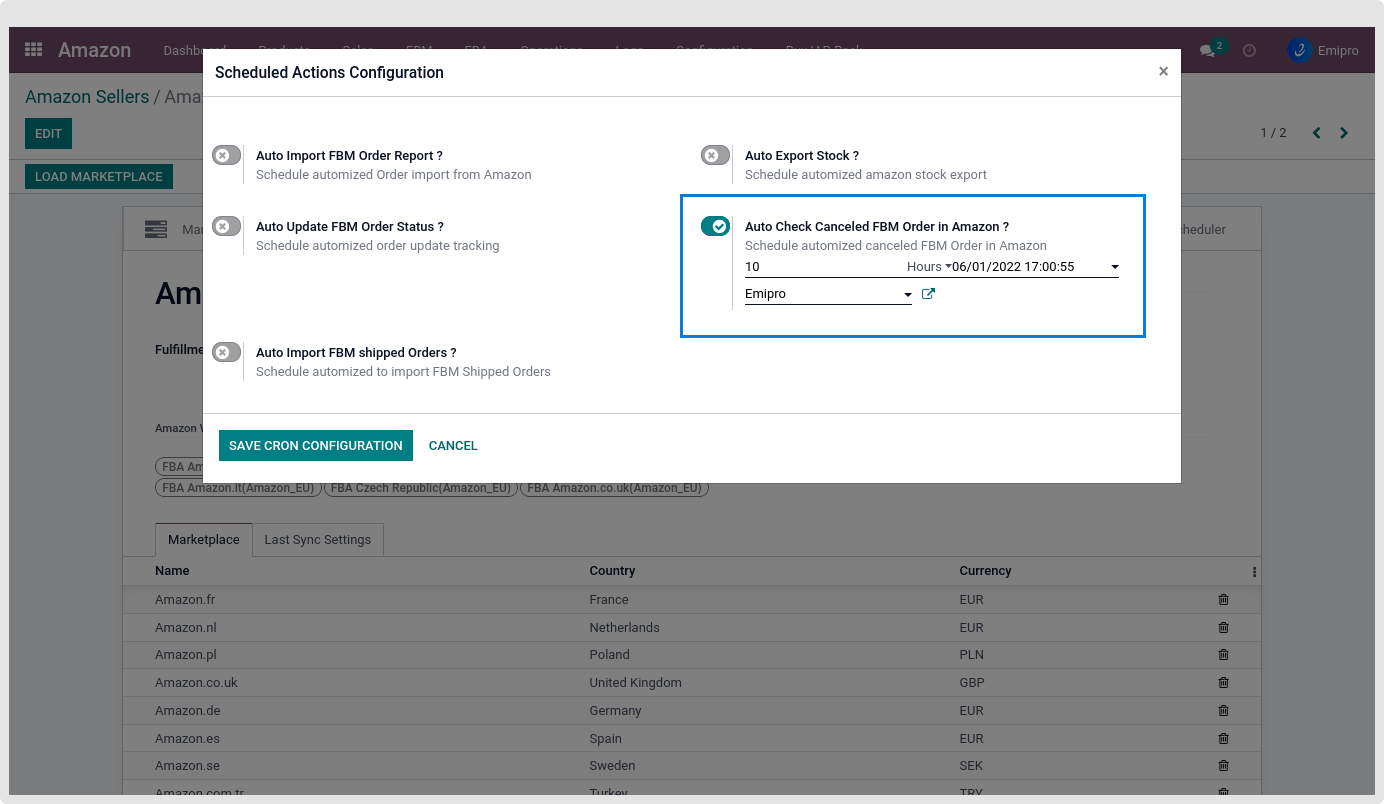
When an order is canceled in Amazon, the system will cancel the order in Odoo as well. The system can fetch FBM cancel orders from Amazon to Odoo in 2 ways:
A. AUTOMATICALLY THROUGH SCHEDULER
Go to Amazon ↣ Configurations ↣ Sellers ↣ FBM scheduler.
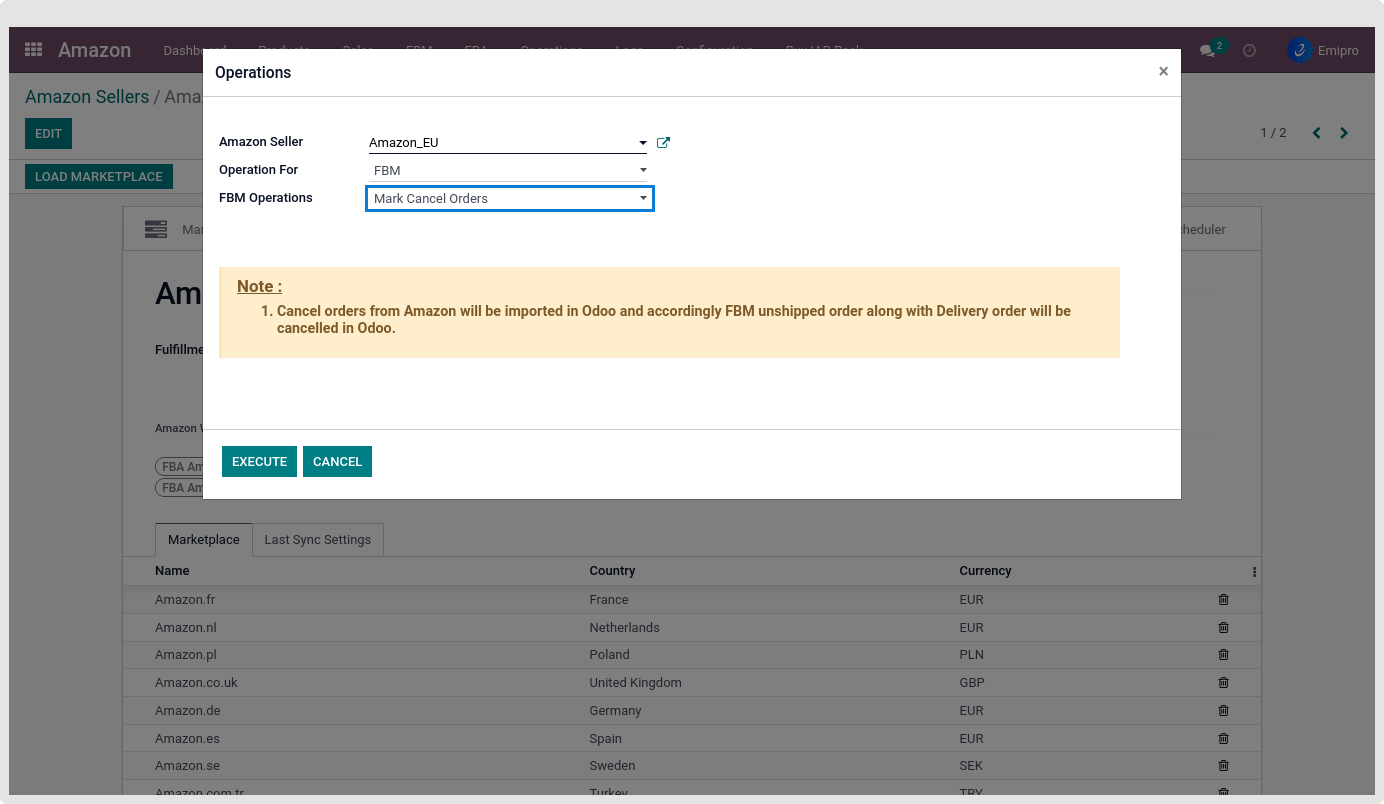
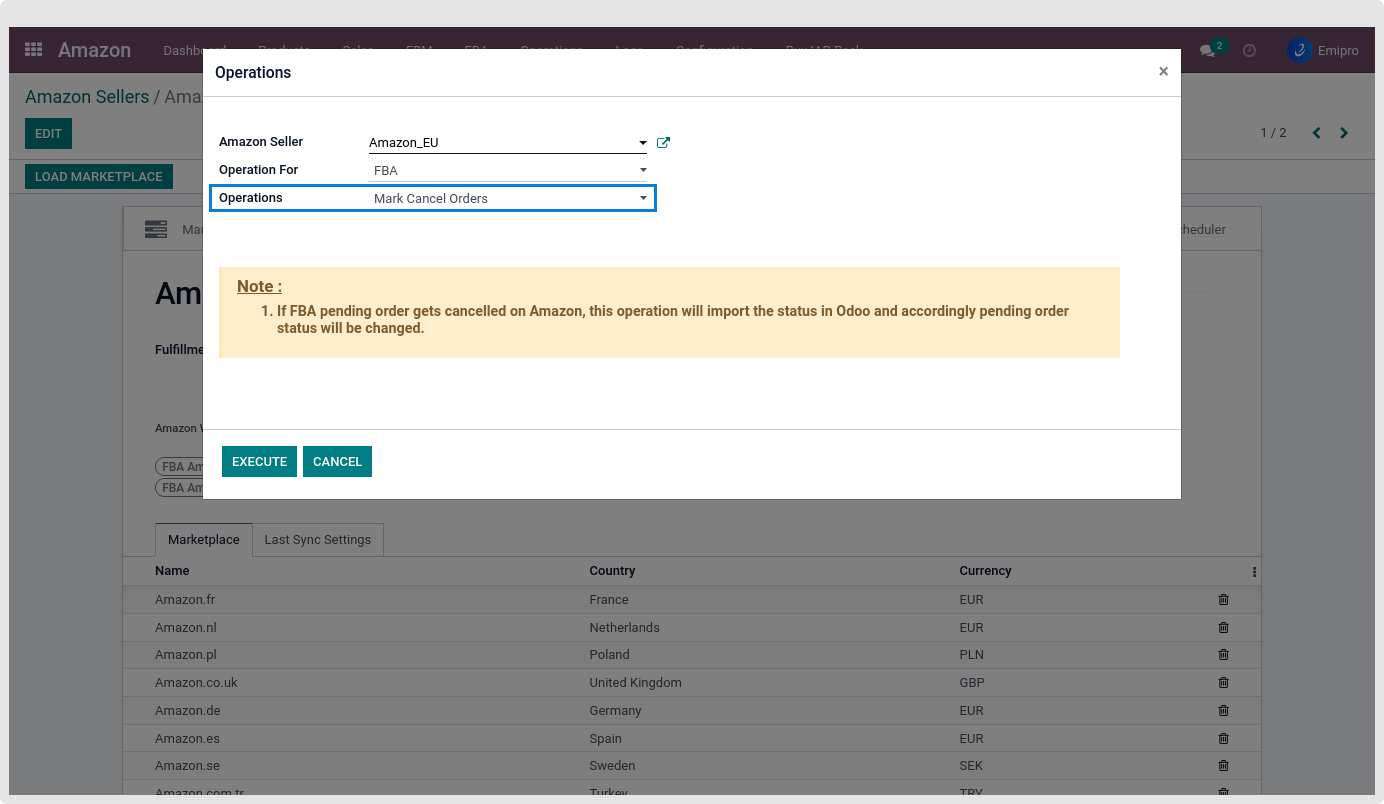
MANUALLY THROUGH OPERATIONS
- Step-1: Go to Amazon ↣ Operations
- Step-2: Select respective Amazon seller
- Step-3: Operations for FBM
- Step-4: FBM operation Mark Cancel Orders
- Step-5: Click on Execute button
Import FBM shipped orders
- When the user requests FBM shipped orders to Amazon, the system sends a request to the Amazon server for the shipped order to be imported.
- After requesting the FBM shipped orders reports system creates an order data queue which is automatically processed after a while, and the queue will disappear from the list view after being processed by the back-end.
- In addition, The user can configure the Analytical Account and Tags with the marketplaces. When orders are imported from Amazon to odoo, the system will link Analytical Accounts and Tags with sales orders and their invoices.
- The system will create validate invoices based on auto workflow configuration.
- The system always confirms sales orders while importing shipped orders(The system does not consider auto workflow for the sales quotation confirmation)
- When importing shipments, the system will create stock moves from the warehouse.
- If the orders contain Kit Products, the system will create stock moves for components.
- If an order contains Non-Tracking Products and stock is not available in the warehouse so system will create a force transfer and the stock value will go negative.
- If an order contains Tracking Products and stock is not available in the warehouse, so system will create stock moves in the Waiting Availability state. Once stock is available the system will dispatch automatically.
Manually Through Operations:
- Step-1: Go to Amazon ↣ Operations.
- Step-2: Select the respective Amazon Seller
- Step-3: Select FBM Operation
- Step-4: Select FBM Operation for Import FBM Shipped Orders
- Step-5: Select Marketplace
- Step-6: Click on the Execute button
Automatically Through Scheduler:
- This can be set from Amazon ↣ Configuration ↣ Sellers ↣ FBM Scheduler.
- If the user wants to fetch FBM shipped orders from Amazon to Odoo automatically at specific intervals then the user can create a scheduler using this option. The scheduler requests FBM order data queues from Amazon and processes them.
FBM Unshipped Orders
- FBM unshipped orders mean order shipment is pending.
- When the user requests FBM unshipped orders reports to Amazon, the system sends a request to the Amazon server for the unshipped orders to be imported.
- After getting the report, the user can manually process the order queues if the report is imported by manual process.
- In addition, the user can configure the Analytical Account and Tags with the marketplaces. When orders are imported from Amazon to odoo, the system will link Analytical Account and Tags with sales orders and their invoices.
- System will confirm order, and create validate invoices based on autoworkflow configuration.
- If the orders contain Kit Products, the system will create a delivery transfer for components.
- If the orders contain Manufactured Products, the system will create a transfer or Manufacture Order based on route configuration.
There are two ways to import FBM Unshipped sales orders from Amazon to Odoo.
1. Manually through Operations
The user can manually import unshipped orders by following the below path.
- Step-1: Go to Amazon ↣ Operations.
- Stpe-2: Select the respective Amazon Seller
- Step-3: Select FBM Operation
- Step-4: Select FBM Operation for Import Unshipped Orders
- Step-5: Click on the Execute button
As soon as the user clicks on the Execute button, the user will see a new screen with the Process Orders button, and the order queues will be in the Draft stage at that time. *Then if there is any mismatch then the queue will be in the partial process stage and if there is no mismatch then queues will be deleted at the same moment.
For viewing the Unship order list Navigate to FBM menu ↣ Sale Order Report
2. Automatically Through Scheduler
- Go to Amazon ↣ Configuration ↣ Sellers ↣ FBM Scheduler.
- If the user wants to fetch FBM unshipped orders from Amazon to Odoo automatically at specific intervals then the user can create a scheduler using this option to request an FBM order report from Amazon.
- By default, the system will import only unshipped orders of last 30 days.
FBM Missing Unshipped Orders scheduler

- Missing unshipped orders means which orders due to any reason not imported while requesting unshipped orders.
- When the user requests FBM missing unshipped orders to Amazon, the system sends a request to Amazon the find the missing unshipped order to be imported.
- After requesting the FBM missing unshipped orders reports system created an order data queue which automatically processed after a while, and the queue will disappear from the list view after being processed by the system.
- A missing unshipped order process is similar to the FBM unshipped orders.
FBA Operations
- Here the user can get detailed information about the FBA operations of the Amazon connector. Such as importing FBA pending and shipped orders, importing FBA live stock from Seller Central, marking cancel orders in odoo from Seller Central, how to import inbound shipments, and how a user can prepare an inbound shipment plan from odoo itself.
TABLE OF CONTENTS
- FBA Live Inventory Report
- FBA Pending Cancel Orders
- FBA Shipment Report
- FBA Customer Returns
- FBA Stock Adjustments
- FBA Removal Orders
- Outbound Shipment Orders
- Inbound Shipment
- Inbound Shipment Plan
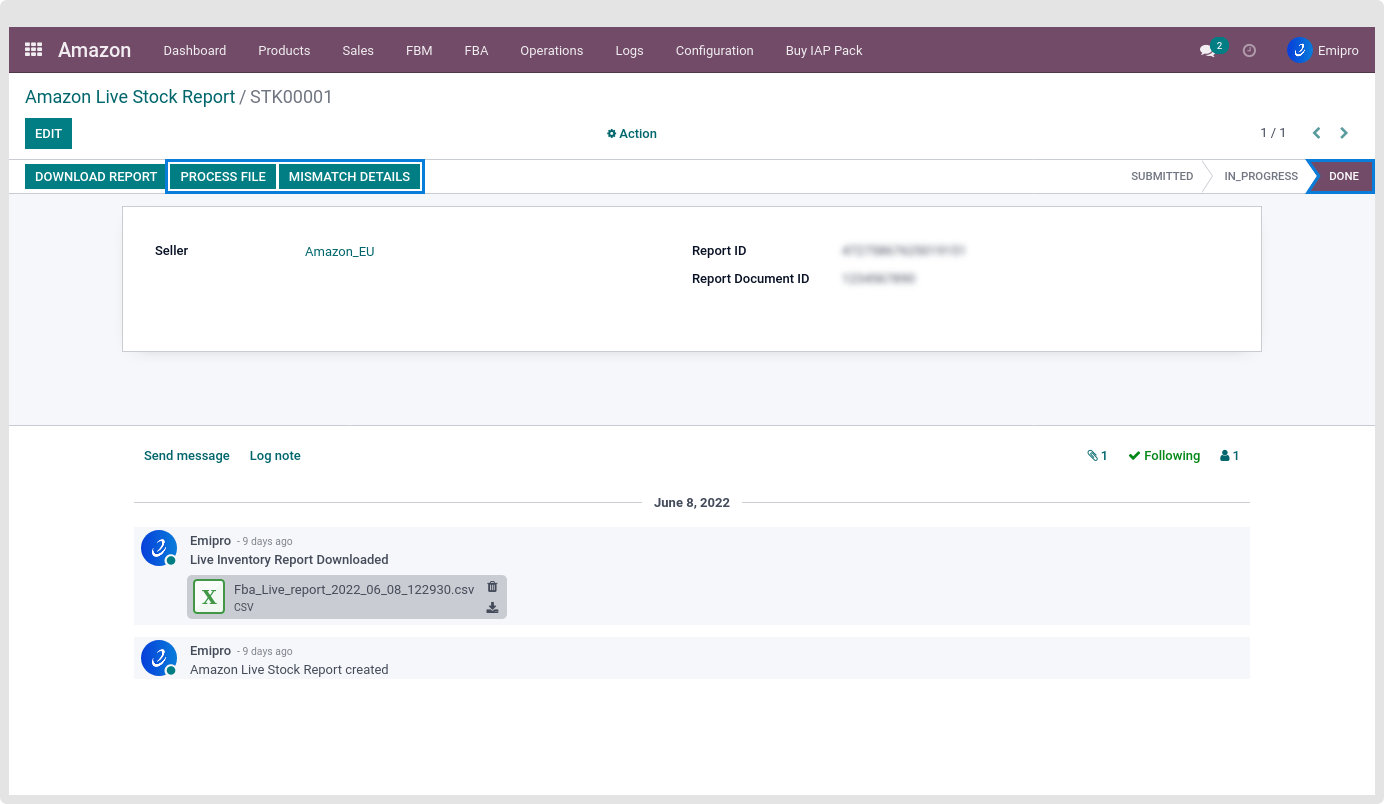
FBA Live Inventory Report
Amazon FBA connector provides features to get livestock and upgrade sellable/non-sellable inventory in Odoo. The system will create validate inventory adjustments based on this report.
- Before processing the FBA live inventory report the user has to ensure the FBA Inventory configuration which is mentioned in the FBA Seller configuration.
- The user can do this process using two ways:
Manually through Operations
- Step-1: Go to Amazon ↣ Operations
- Step-2: Select the Amazon Seller and
- Step-3: Select Operations for FBA
- Step-4: Select Operations as Import FBA Inventory.
- Step-5: Click on button Execute
Same as shipment and customer return reports, users can request a report and wait for 10 or 20 seconds to click on the check status button. If the report is not ready then the status shown is In Progress and when the report is ready then the status shown is Done.

- If the status is Done then the user can click on Get report
- After getting this report user can click on Process file and process report.
- Here, the system will create two different inventories for sellable and unsellable product stock.
- Also user can download the report in an Excel sheet by clicking on Download Report
Go to FBA ↣ Inventort Report ↣ Select Any Report
If the selected report has been processed so user can see the smart button top on the right side with Stock inventory.
The quantity of FBA inventory in your ODOO system will be updated based on the total amount of AFN-fulfillable-quantity that the seller has in their live inventory report.
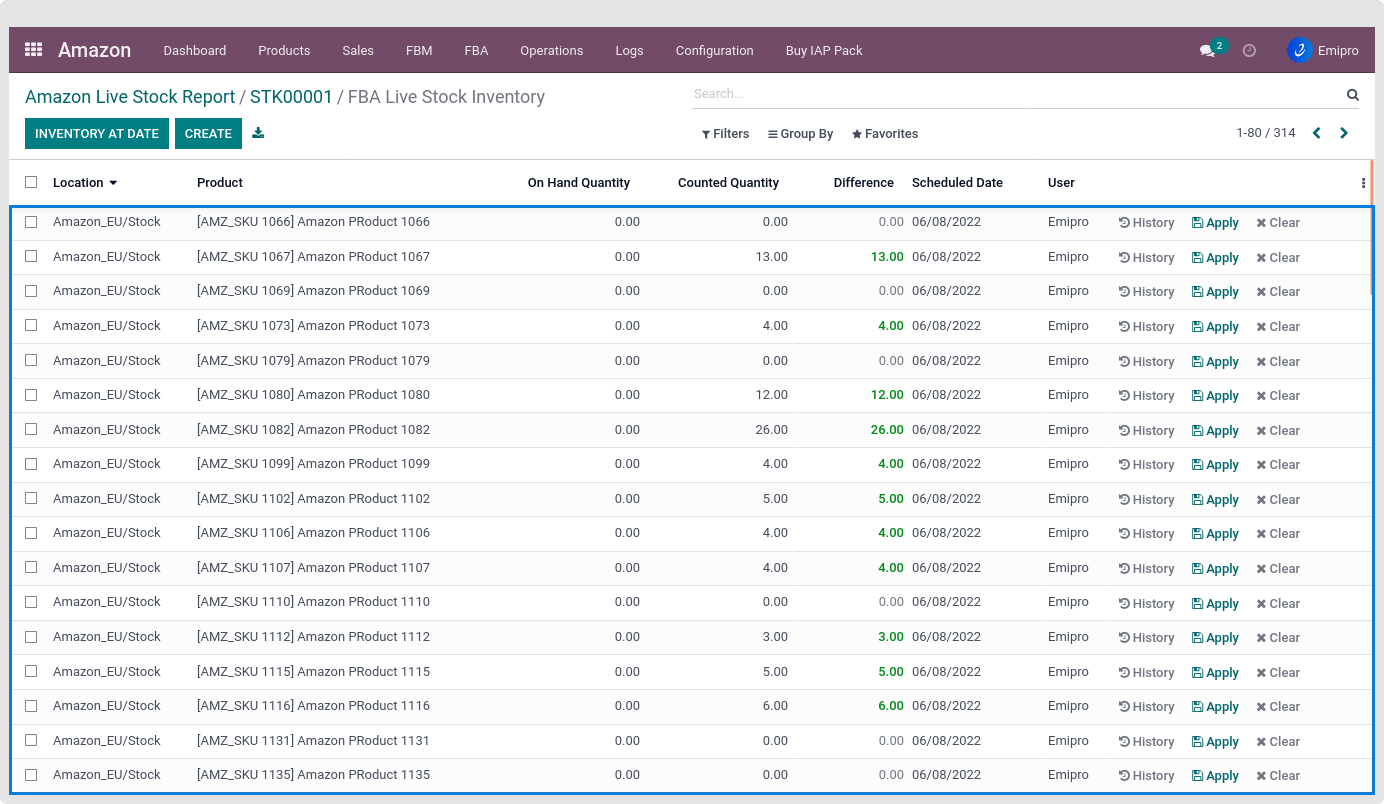
- If a customer wants to add a reserved quantity from the FBA live inventory report to Odoo FBA inventory quantity, they need to enable the option “Is Reserved Quantity to be included in the FBA Live Inventory Report?” in the settings section.
- It is not possible to add information about the lot/ serial number in the Odoo system through the FBA inventory report. The seller needs to manage this manually.
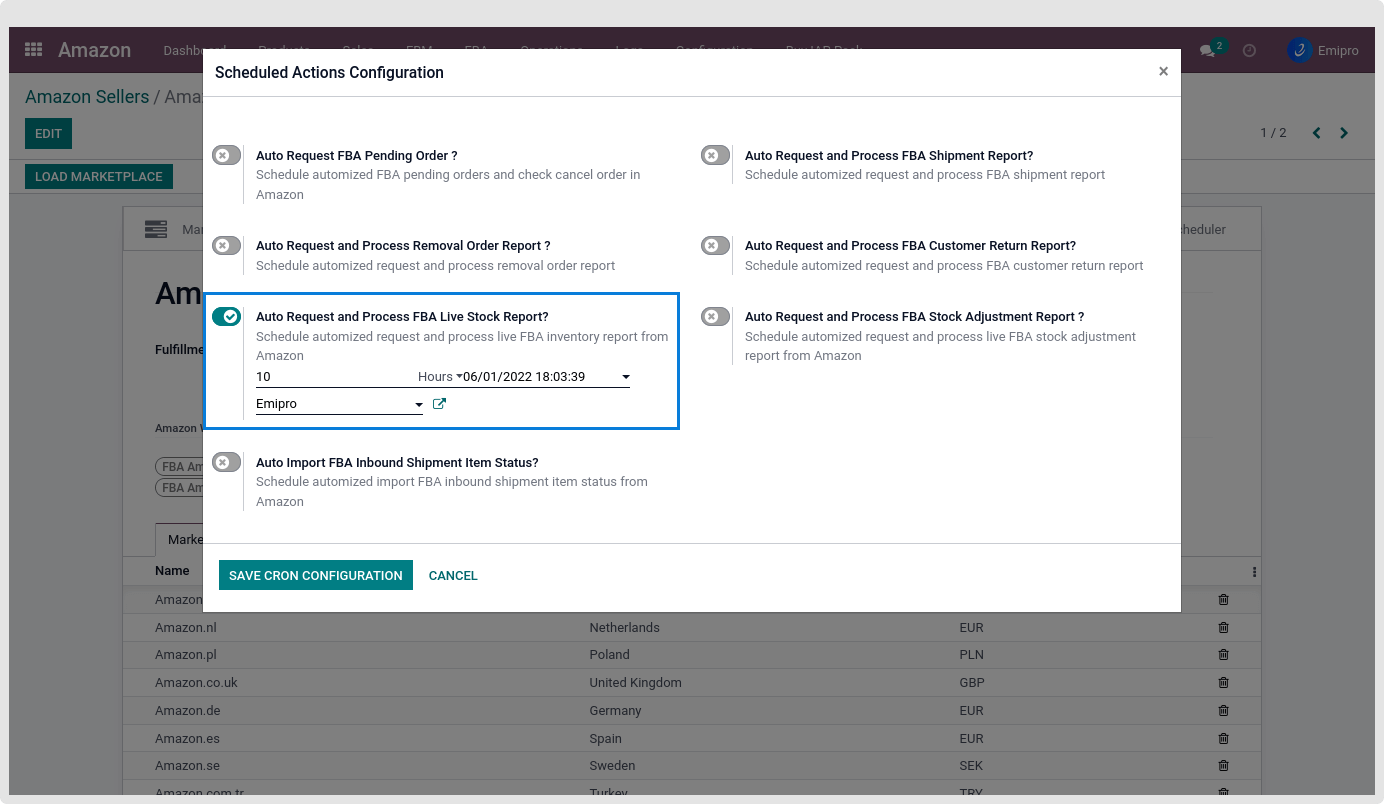
Automatically through Scheduler
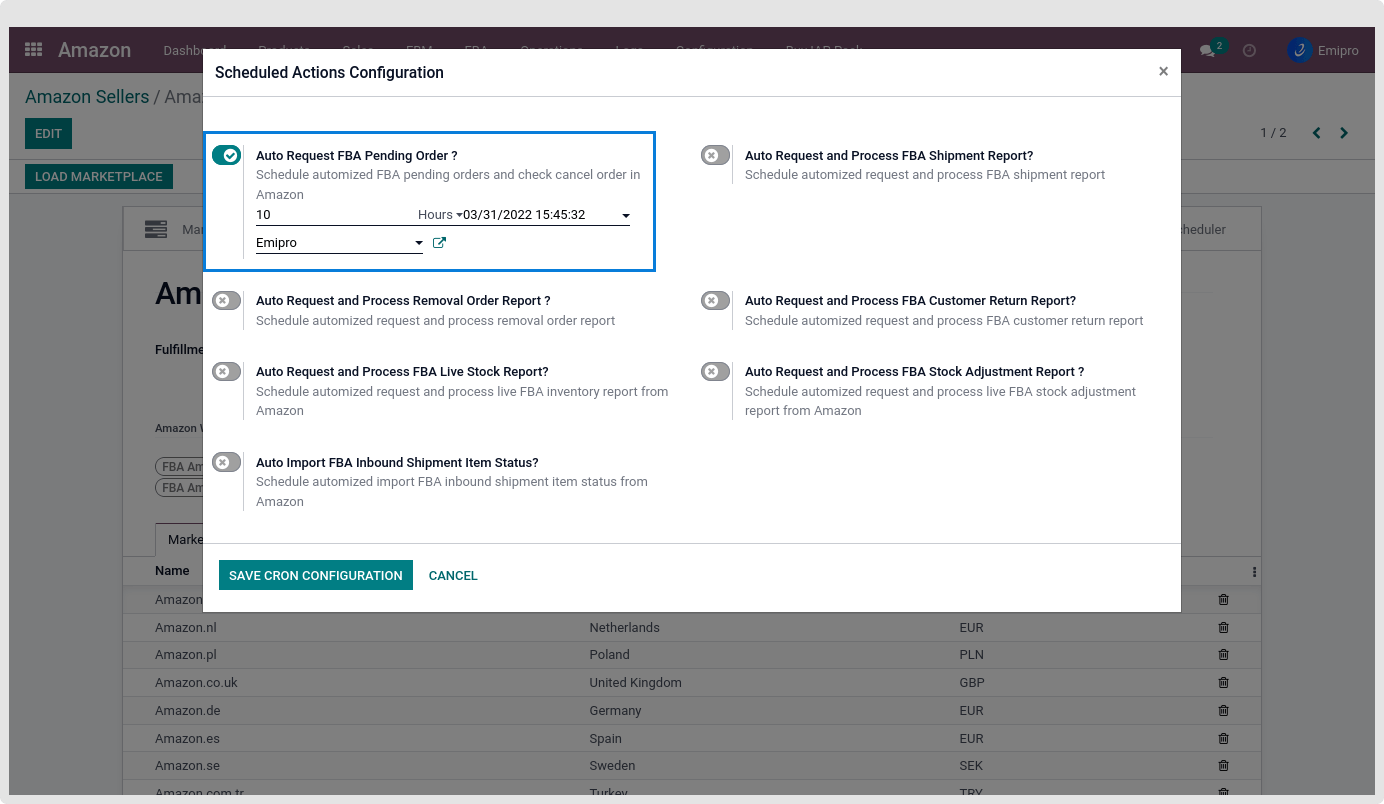
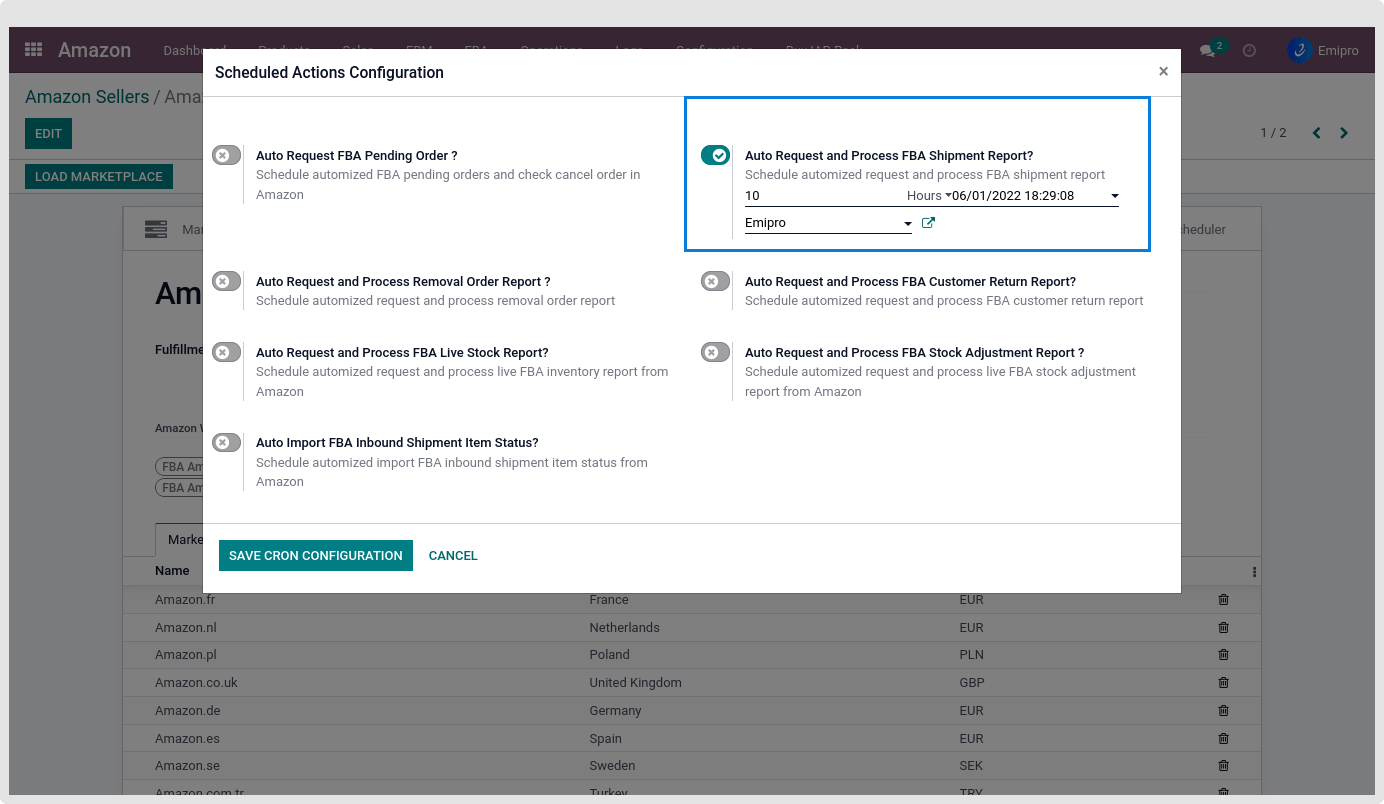
User can configure the scheduler to request and process FBA live inventory report from Amazon ↣ Configuration ↣ Sellers ↣ FBA Scheduler.
FBA Pending Cancel Orders
1. Import Pending Orders
What is Pending Orders?
- Pending order means those orders which are placed by the customer, payment verified by Amazon but shipment is pending by Amazon.
- In Pending orders, Amazon does not provide any details related to customer and product price. Amazon only provides order references, order dates, products, and quantities.
- This feature is useful to those sellers who want to reserve stock in quotation state for advance purchase reordering process.
- Configurations to be ensured before importing FBA Pending orders
Allow to Create New Product if not found in Odoo ?
- When Orders are imported from Amazon and if they don’t find a Product in Odoo, then it will automatically create a new Odoo Product and Amazon Product. It will also create a mapping between Odoo Products and Amazon Products. Check this field for this operation.
- This can be done from Amazon ↣ Configuration ↣ Settings ↣ Products and Other Configurations.
Note
A System will set partners and create order sequences based on seller configuration.
Pending order must be in draft state and order amount value should be 0. Users can not edit or modify orders manually.
Users can process Pending Orders using two methods.
1.Manually through Operations
- Step-1: Go to Amazon ↣ Operations.
- Step-2: Select the respective Amazon Seller
- Step-3: Select Operation for FBA
- Step-4: Select Operations as Import Unshipped Orders
- Step-5: Click on the Excute button
- Step-6: Select Marketplace: the user can select multiple marketplaces.
- Updated After features the user needs to choose the date from when the user wants to Import the pending Order.
- It will import the pending order from the date the user has chosen until the current date.
2.Automatically through Scheduler
The user can configure a scheduler by navigating to Amazon ↣ Configuration ↣ Seller ↣ FBA Scheduler.
FBA Cancel Order in Amazon
- In the case of Amazon Pending orders, it can be possible that the order is canceled by Amazon or a customer.
- In the connector there is a feature to check the pending order status.
- If it is canceled by Amazon then the system will cancel the order in Odoo too.
- If the user has manually confirmed orders then the system will not cancel the order in Odoo.
Users can process Cancel orders using two methods.
1.Manually through Operations
- Step-1: Go to Amazon ↣ Operations.
- Step-2: Select the respective Amazon Seller
- Step-3: Select Operation for FBA
- Step-4: Select Operations as Mark cancel orders
- Step-5: Click on the Execute button
2. Automatically through Scheduler
The user can configure a scheduler by navigating to Amazon ↣ Configuration ↣ Sellers ↣ FBA Scheduler.
FBA Shipment Report
Amazon Shipment Report provides comprehensive details of Orders that are Shipped by Amazon FBA (Fulfilment By Amazon) including price, quantity, tracking numbers, and shipping info.
The user can download a Shipment Report from Amazon either automatically or manually for specific date periods. The system will request, download, and process it and change the status of your FBA Orders (If any pending FBA orders) and update tracking information in Orders respectively.
Configuration to be ensured before processing shipment report:
refer to FBA seller configurations
Tax configurations of Odoo:
While importing orders, the system will apply tax based on your product and fiscal position configuration.
Product:
- At the time of processing the shipment report If the product is not found in Odoo and the user has configured auto-create product true in Amazon Settings, then the system will create a new product automatically and create orders.
Amazon FBA Order Prefix:
- Before processing orders check the configuration of the prefix and default sequence of Odoo from Amazon ↣ Configurations ↣ Settings ↣ Amazon Seller. The user will be able to locate it under the FBA Orders section.
- Once the user processes the shipment report, the user will be able to see FBA orders under Amazon ↣ Sales ↣ FBA ↣ Orders.
How the Shipment Report is Processed in the System
Order:
- While processing the report, the first system will check whether any pending order is available. If it is available then the system will delete the pending order and create a new order. No duplicate orders will be created during this process.
Stock Move:
- After creating order in odoo, the system will create stock moves for orders and do stock moves based on the availability of stock in the respective stock locations.
- The state of the stock moves will depend on Odoo’s default workflow when the stock is not available.
Warehouse:
- In the shipment report the user gets details of the marketplace and fulfillment center. While processing the order system will search the marketplace and warehouse in odoo based on the fulfilment centre code.
- If it is found then the system will select warehouse or FBA warehouse (Based on marketplace configuration).
Tax calculation:
- In this connector, there is a functionality to detect fiscal positions based on fulfillment warehouse country. For this user needs to ensure that their fiscal positions are configured properly in Accounting ↣ Configuration ↣ Fiscal Position.
- Whenever an order is imported, the system checks if it is an Amazon order. If not, it will use the default fiscal position setting of Odoo.
Below are the steps showing how the fiscal position is applied to the Amazon orders.
- Find the fiscal position where both the origin country and country are set.
- Find the fiscal position only for the country.
- Find the fiscal position where the origin country and the country group are set.
- Find the fiscal position only for the country group.
- Find the fiscal position only for the origin country.
Note
- The first fiscal position that was acquired in the above steps will be applied to the sale order.
- The origin country is the country set in the warehouse.
- Based on the delivery address, the country and country group is searched.
Request and Process Shipment Report
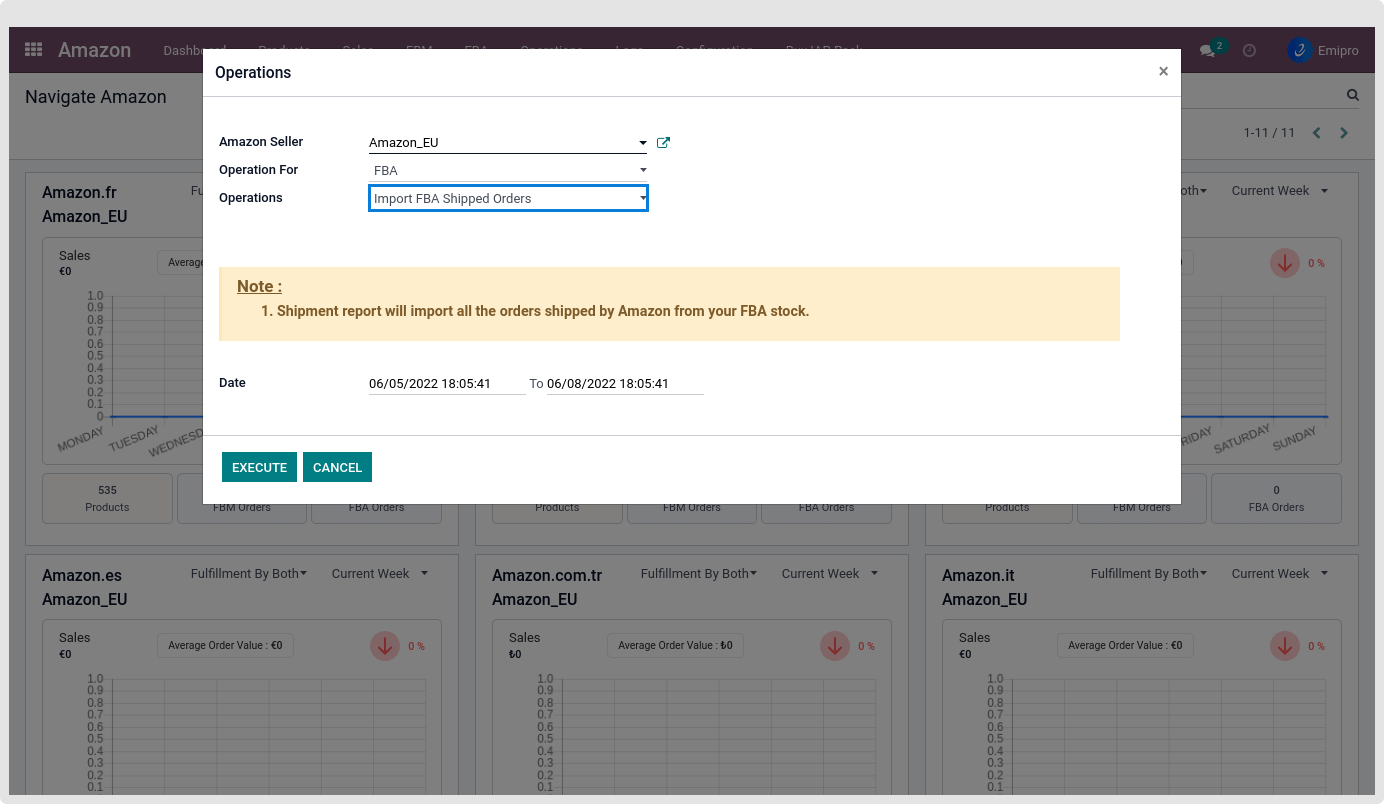
There are 2 ways to request and process shipment reports in the system:
Manually through Operations:
- Step-1:Go to Amazon ↣ Operations.
- Step-2:Select the respectiveAmazon Seller
- Step-3: Select FBA Operation
- Step-4:Select Operation for Import FBA shipped orders
- The system will select the start date and end date. The end date is the current date and the start date is the difference between the Current Date and default Shipment Request Report Days. By default, the user can configure Shipment Request Report days in Amazon Seller. Default days to request a report are set for 3 days in the connector.
- Click on the Excute button
The user can view all the generated Shipment reports from Amazon ↣ FBA ↣ Orders Returns ↣ Shipment Reports.
Process to be followed:
- When the user clicks on the Execute button the user can see the Check Status button will be visible on screen.
- It will take a few seconds to process their request on the Amazon server
- Now, click on the Check Status button, if the report is still not done from the Amazon side then the status will be In Progress.
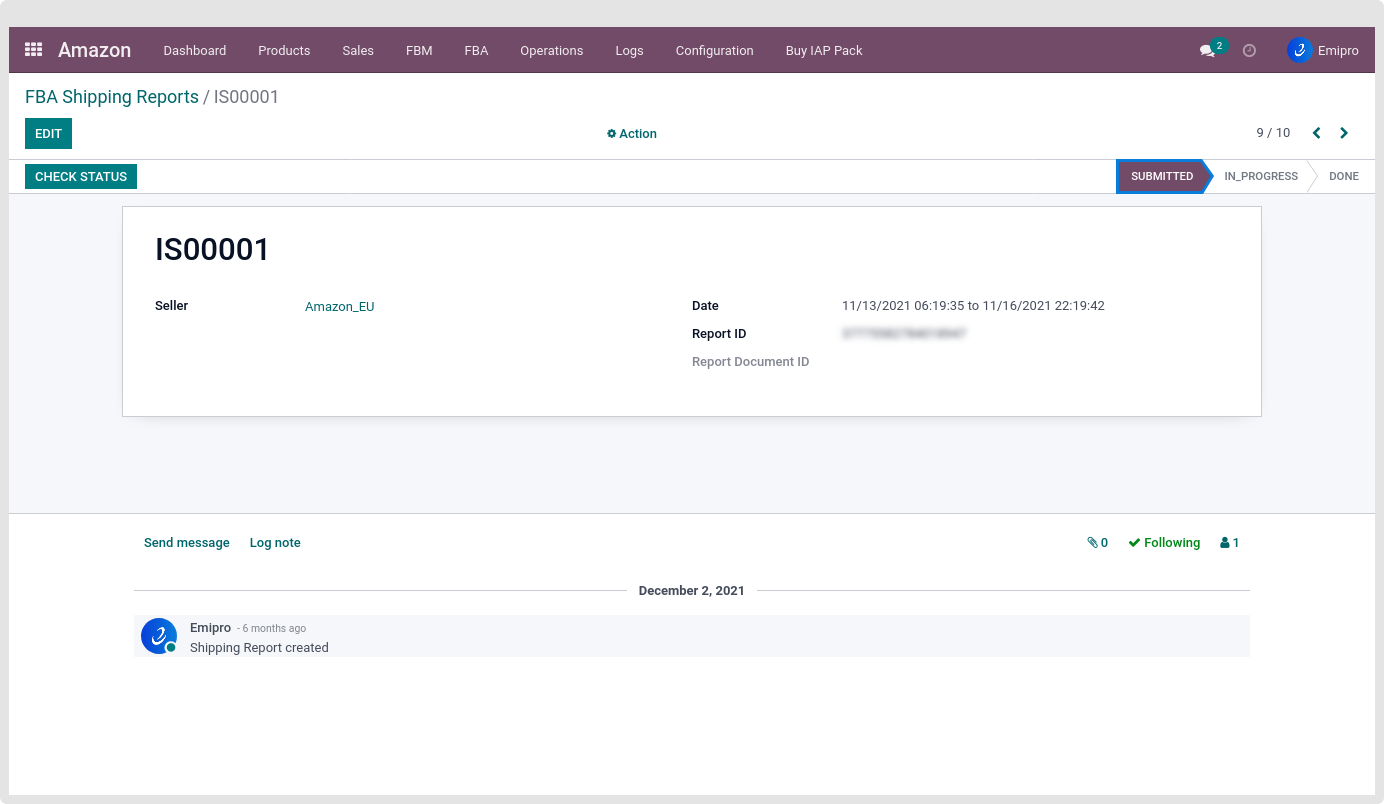
- Once the report is available the status will be changed to Done and the Get Report button will be visible.
- Click on Get Report to import report in Odoo.
- After clicking on Get Report, two buttons will be visible. Download Report and Process File.
- The user can download that report by clicking on the Download Report but report data is encrypted.
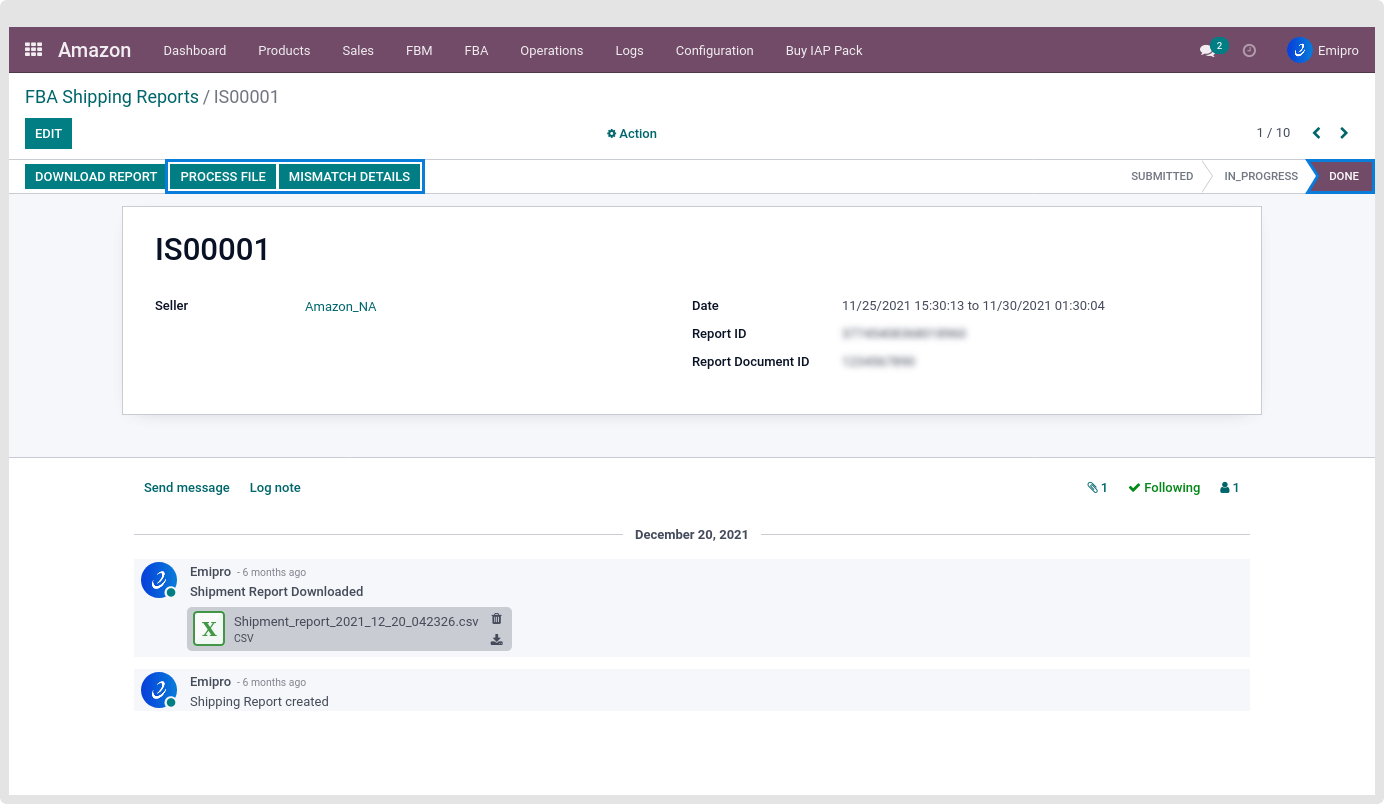
- Just click on Process File to process the file.
After Processing the report, the system will create orders, process delivery orders, create invoices, and validate invoices based on Auto workflow configuration.
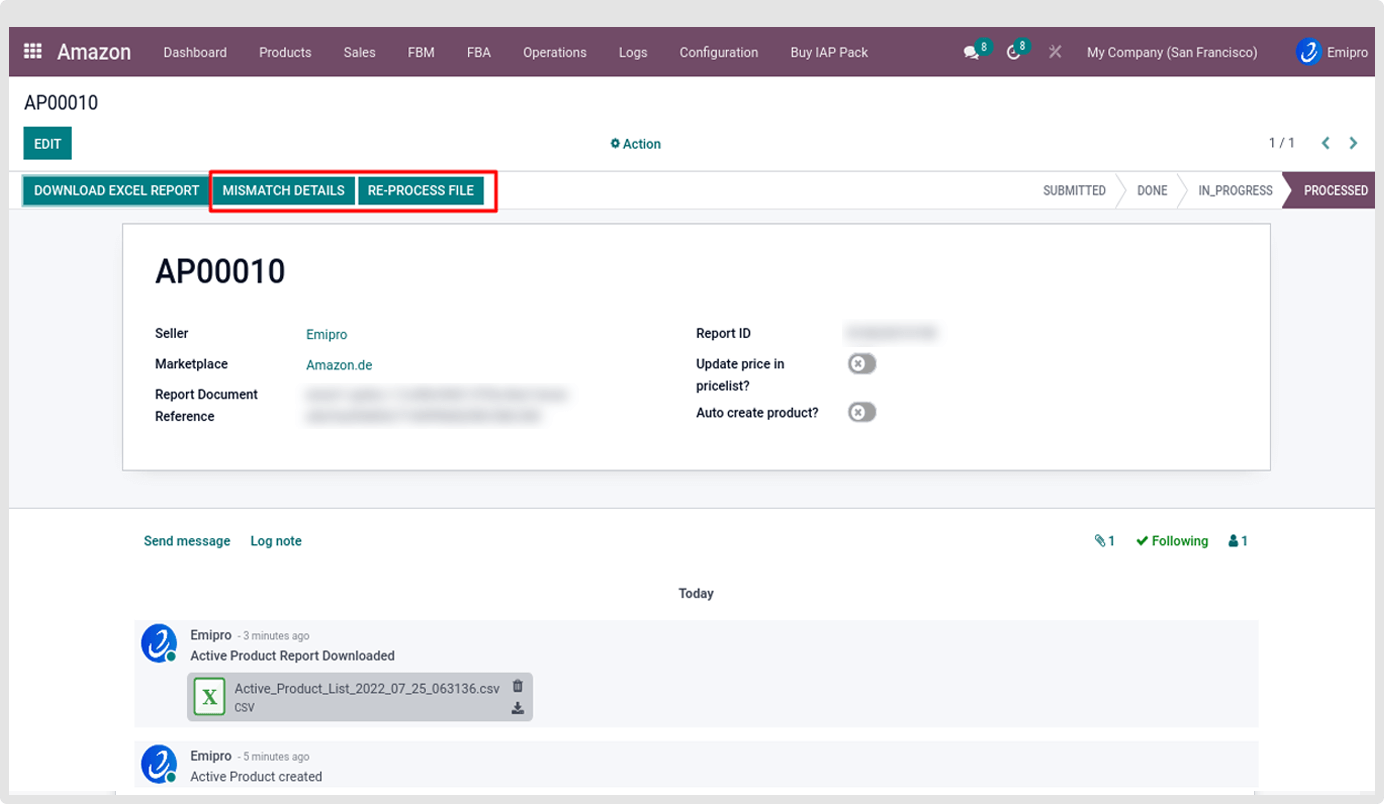
Now, the system will show two buttons Reprocess file and Mismatch details.
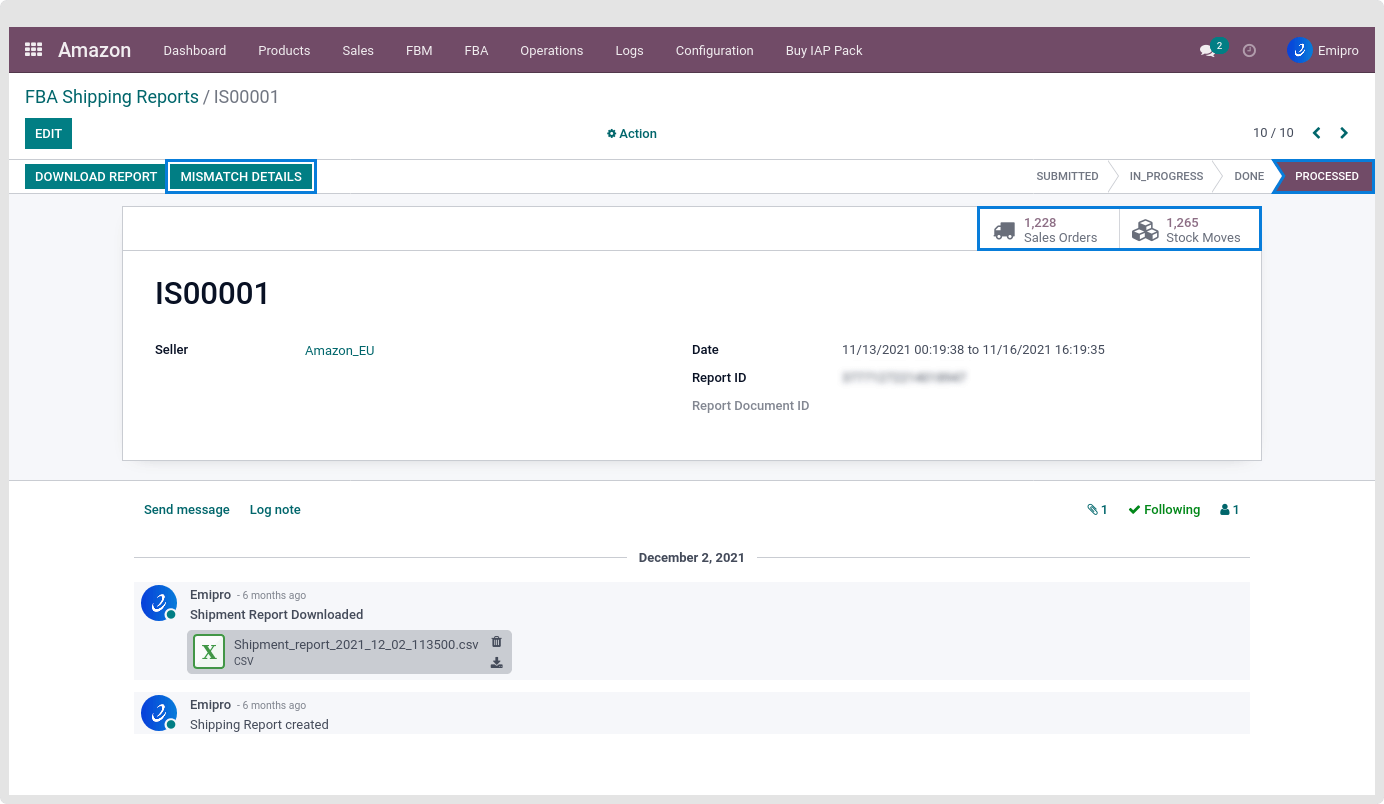
Reprocess File: User can reprocess file if products are missing in Odoo. After creating products just reprocess the file to fetch the orders for those products.
- Mismatch details:User can see mismatch details and correct them like products not found in Odoo.
- Top right side the user can see the Two smart buttons as Sales Orders and Stock moves with the help of those buttons the user can redirect to the FBA sales orders.
TIP
If the seller has enabled the VCS feature then the system will not create invoices while processing shipment reports. Instead, Invoices will be created when the user imports a VCS report from Amazon.
Automatically through scheduler:
- The user can configure a scheduler under the menu Amazon ↣ Configuration ↣ Sellers ↣ FBA scheduler.
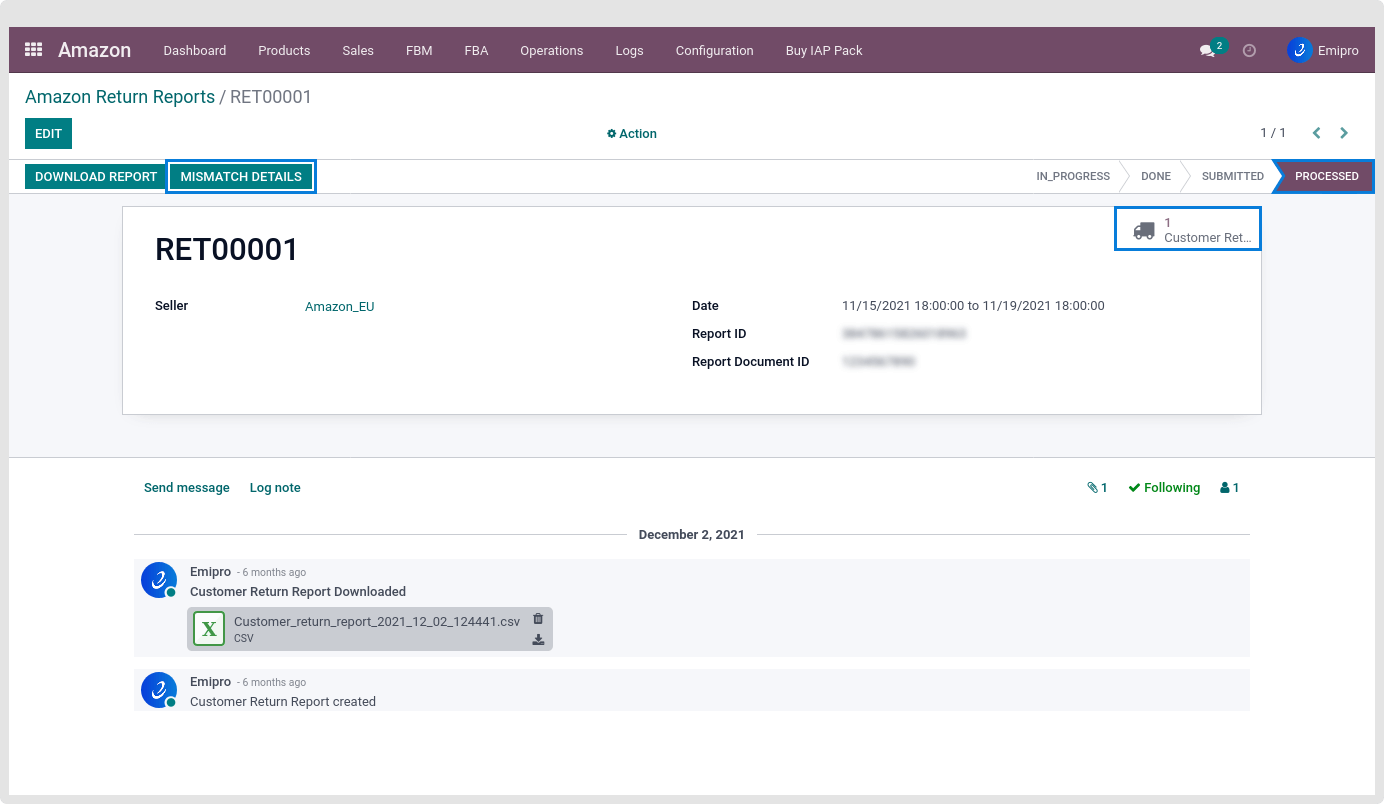
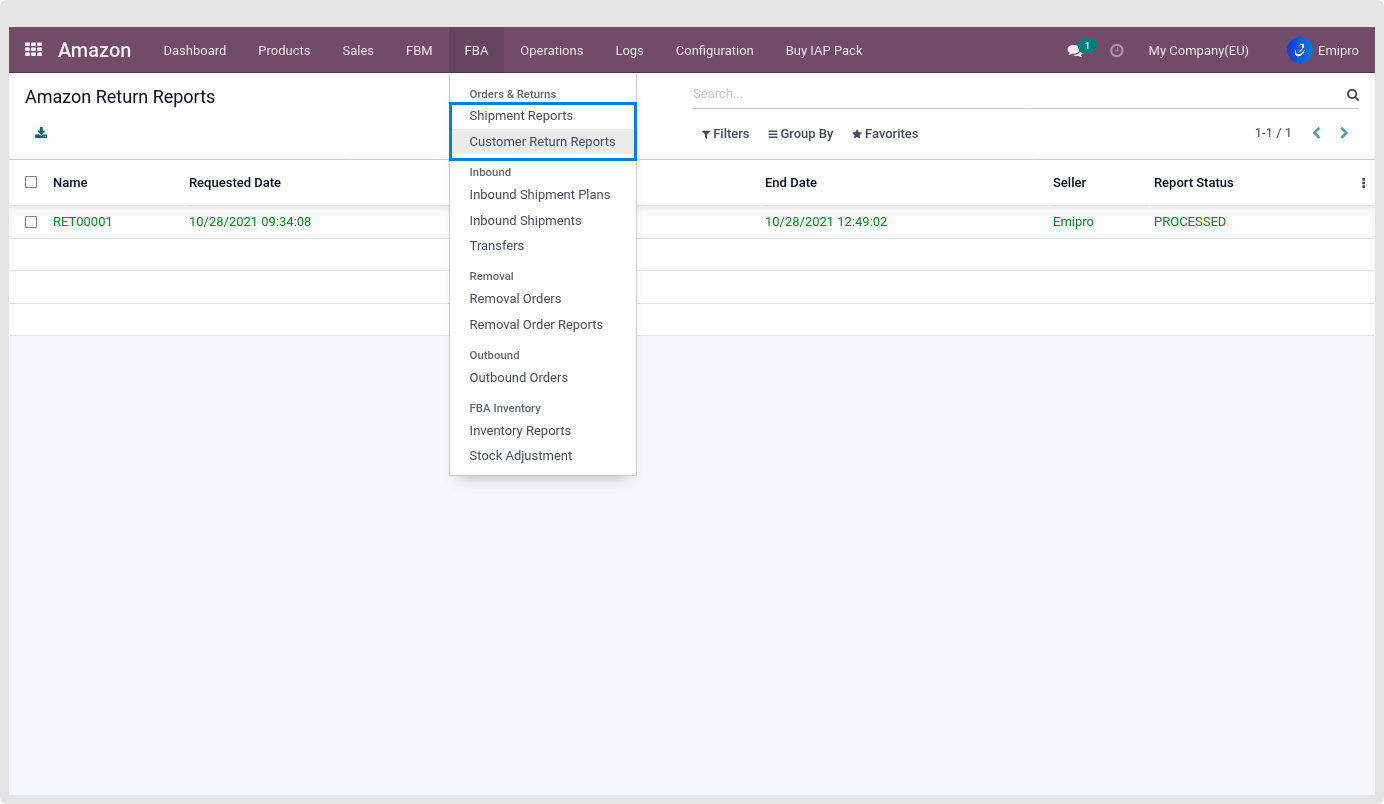
FBA Customer Returns
- This feature is used to Import FBA Customer Returns from Seller Central and process those Return Reports in Odoo.
- In these reports, the user will also get the return reason for which the product was returned, if the return reason is provided by the customer.
- The user can also identify that the product in the report is either Sellable or Unsellable. Amazon Manages Unsellable Inventory for Unsellable Products.
- When the user processes the return report then the system will search the sales orders and if it is not found, then the system will not create the return stock move.
- If an order is available then the system will create a return stock move the source location will be the customer and the destination location will be set based on the product type it can be Sellable or Unsellable
- If the product is unsellable then you need to go to the unsellable location and if the product is sellable then it will be returned to the Amazon warehouse. The system will not create any credit notes in the return process.
With the help of this connector, you can even manage Unsellable Location in Odoo
- To configure Unsellable Location, you need to go to the menu Amazon ↣ Configuration ↣ Settings and Go to Amazon Marketplace configuration page under Orders and Returns.
Tip
The connector by default creates one Unsellable Location. You can set different Unsellable Locations for each Marketplace.
Request and Process Customer's Return Report
There are two ways to Process Customer Return Reports:
Manually Through Operations:
- Step-1: Go to Amazon ↣ Operations.
- Step-2: Select the respective Amazon Seller
- Step-3: Select FBA Operation
- Step-4: Select Operations for Import Customer Returns Orders
- Step-5: Click on the Excute button

- By default, the system will choose the last three days in the date range.
Process to Follow
- Once the user selects the date and Amazon seller the user needs to click on the Execute, Shipment state will be Submitted, and the Check Status button will be visible.
- The user must wait for 10 or 20 seconds and click on Check Status.
- If the report is still in process at the Amazon side then the report state will change from the Submitted state -> InProgress state.
- Once the process is completed from the Amazon side then the status will be moved from the Submitted state -> Done.
- Once the report is processed, the user will be able to see the Get Report button.
- The user clicks on Get Report to import the Report in Odoo. After the user clicks on Get Report, He/she will be able to see two buttons, Download Report Process File.
The user can download the report by clicking on the Download Report.
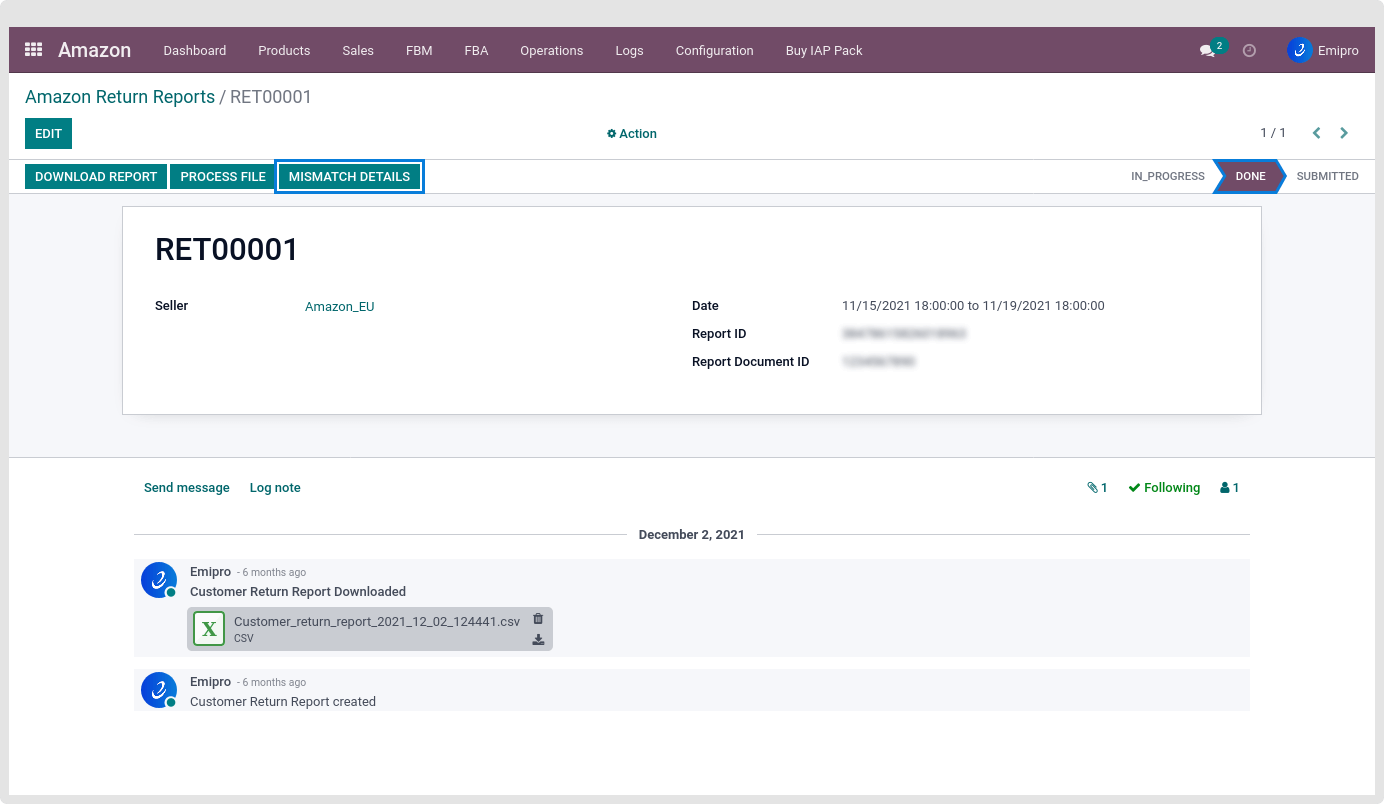
To process the Return Report file The user needs to click on Process File and Create FBA Customer return stock moves in Odoo.
After Successfully processing the Return report, The user can see return stock moves. Now, the user will be able to see two buttons Reprocess file and Mismatch details.
Reprocess File: The user can reprocess the file if products are missing and after creating the missing products the user just needs to re-process the file.
Mismatch details: User can see mismatch details and correct them like Order not available in ERP.
The User can see all the FBA return reports under the Amazon ↣ FBA ↣ Orders Return ↣ Customer Return Reports.
Automatically through scheduler:
The user can use the scheduler to process the customer returns.
- The user can Configure a Scheduler that will Request, download, and process Customer Return Reports automatically from Amazon FBA.
- To set the scheduler Go to Amazon ↣ Configuration ↣ Sellers ↣ FBA Scheduler.
- The return orders stock moves are listed under the Amazon ↣ Sales ↣ FBA ↣ Returns Moves.
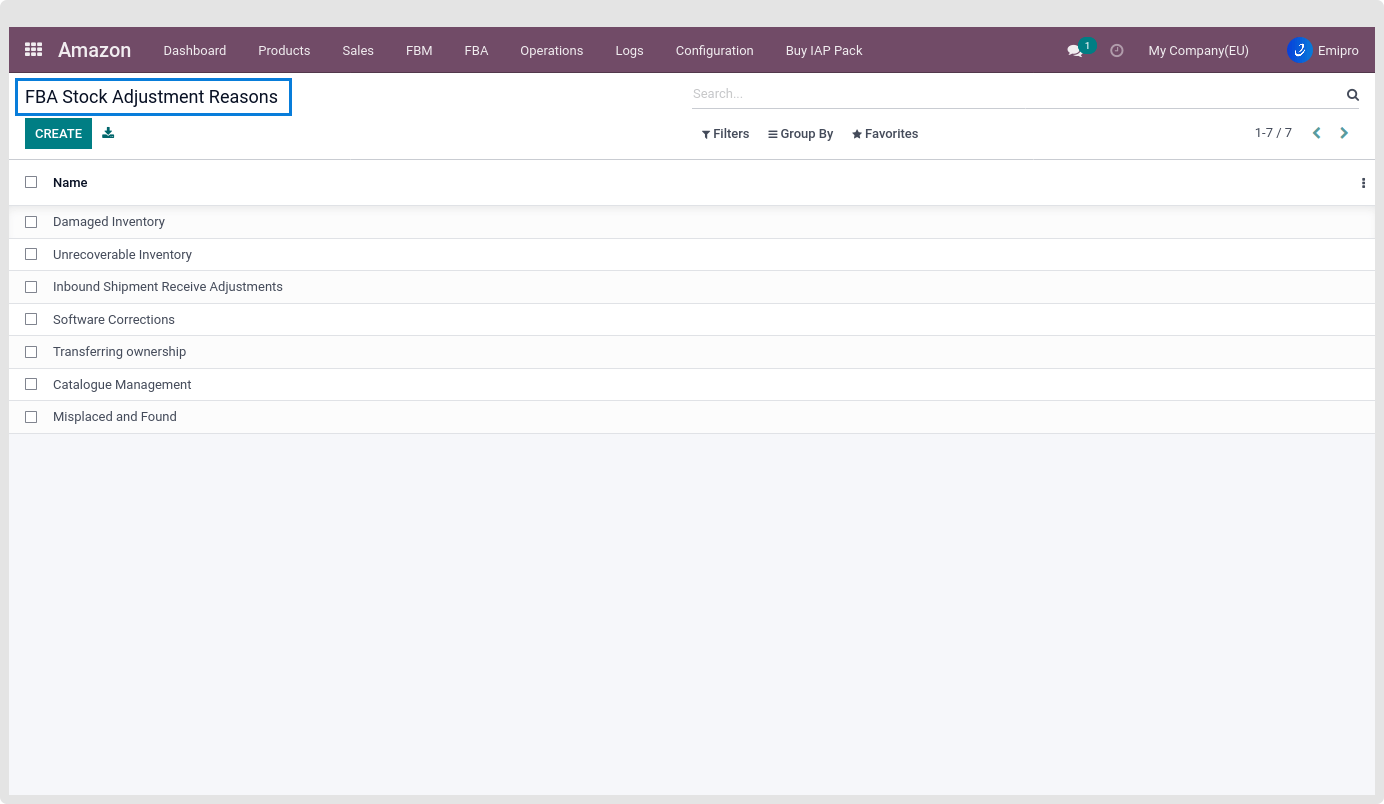
FBA Stock Adjustment
In many cases, the stock in Amazon fulfillment center faces some problems and it cannot be used further until it is replaced.
Amazon prepares reports for those on FBA inventory adjustments and updates the latest usable stock in it. So, based on this, the user can carry out stock movements accordingly in Odoo.
Group of reasons for FBA inventory adjustment
- Misplaced and Found inventory: Products which are misplaced by Amazon or the products which were misplaced by Amazon and found by Amazon.
- Damage inventory: Products that are damaged by Amazon and then transferred to the unsellable location.
- Unrecoverable inventory: Products that are either damaged by Amazon or which are lost by Amazon in these cases the seller can claim reimbursement.
- Inbound shipment received adjustments: During the inbound shipment receiving process if there is any issue related to miscount or product not scanned.
- Software corrections: Software correction of inventory tracking discrepancies in Amazon.
- Transferring ownership: In this case, Amazon has reimbursed the products that were lost. Now, if it is found later, then Amazon will change ownership for that product in holding an account.
- Catalog Management: The two products with separate identifiers are found as the same in our catalog with Amazon, they will delete one of them and move inventory to another product.
Configurations for Stock Adjustment Reason:
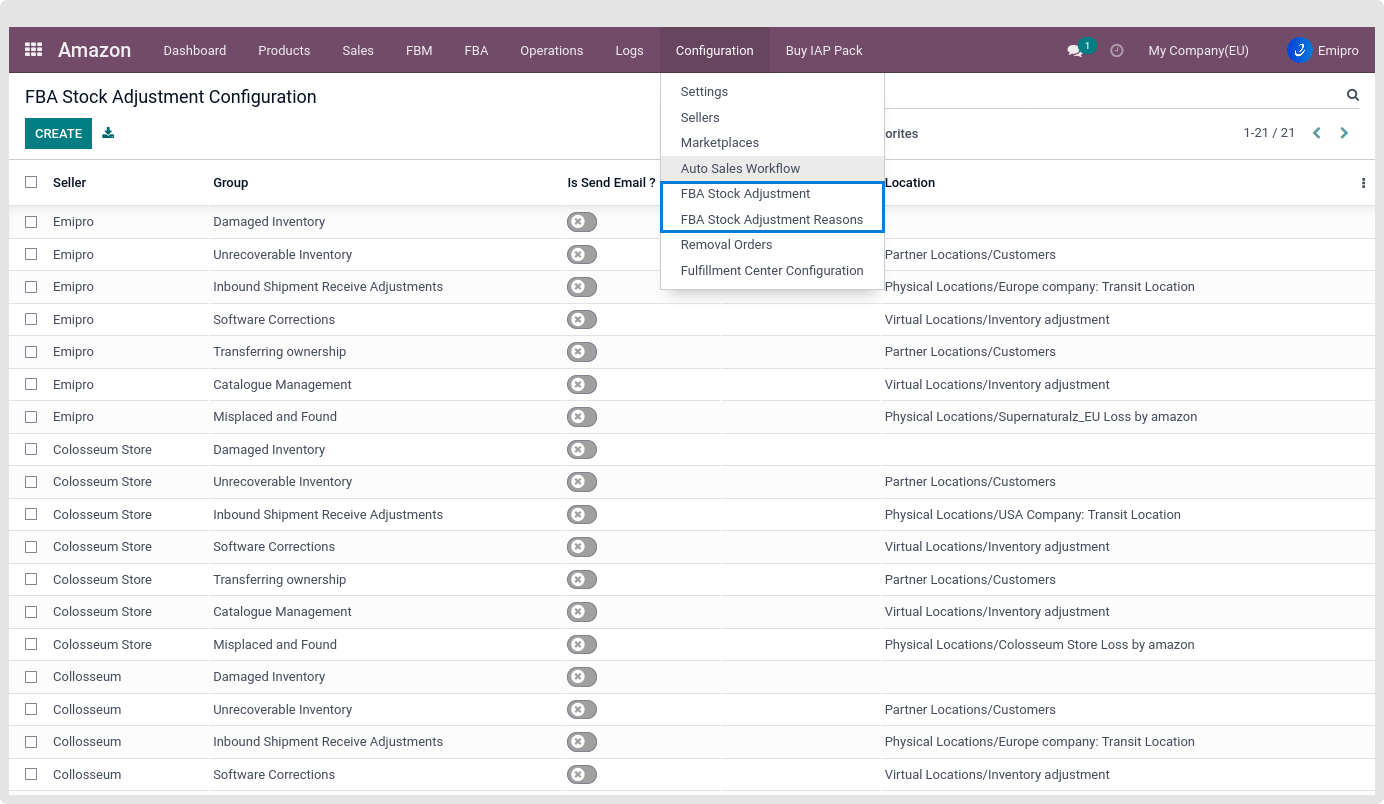
All the groups mentioned above have different codes provided by Amazon as shown in the screenshot below. The user will be able to locate the reason under the Amazon ↣ Configuration ↣ FBA Stock Adjustment Reasons.
Configurations for Stock Adjustment:
- The user can configure Amazon Stock Adjustment in Odoo
- Go to Amazon ↣ Configuration ↣ FBA Stock Adjustment.
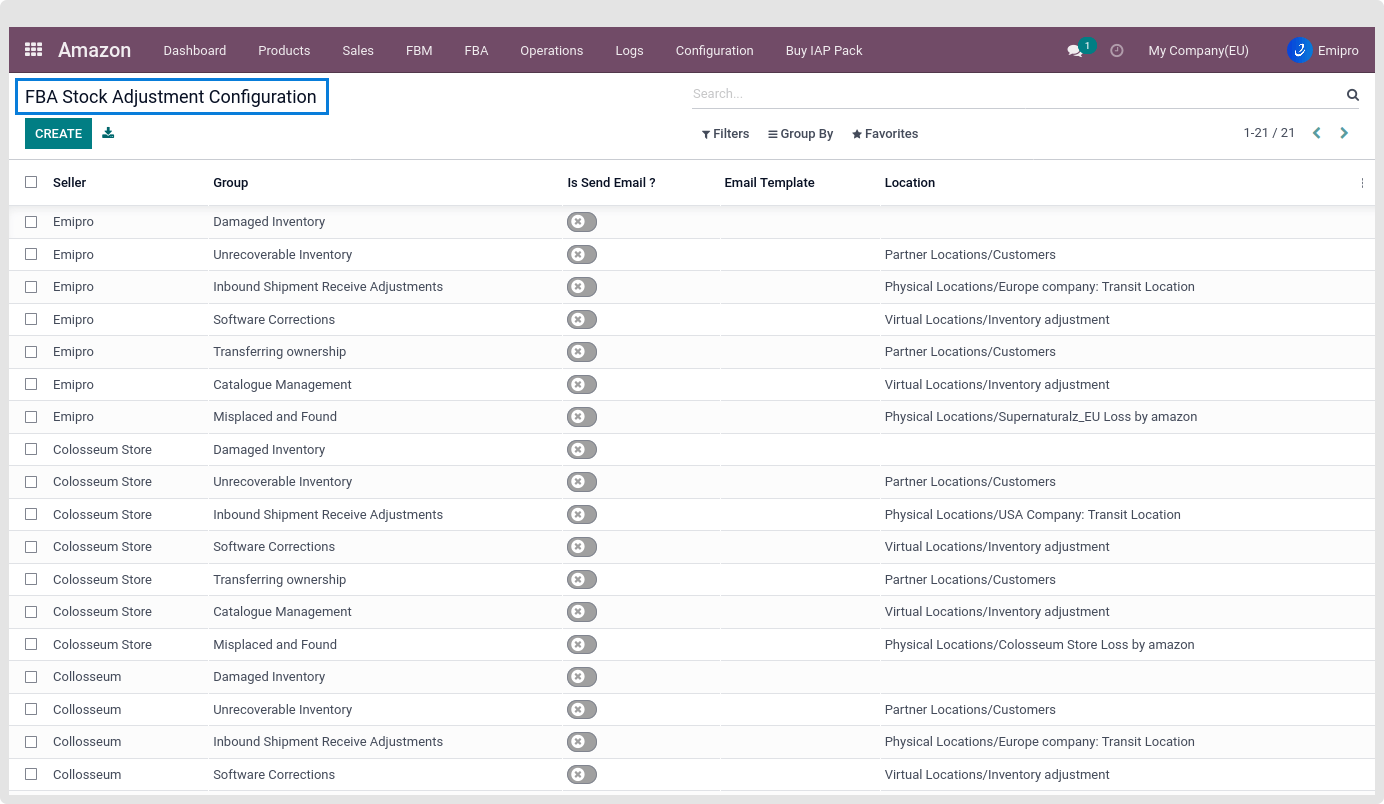
Group: Select any one reason from the drop-down menu for which the stock adjustment needs to be made in the Amazon FBA Inventory.
- Location: Select the location of your warehouse from the drop-down menu the user had configured in Odoo where the user wants to record this type of transaction.
- Is Send Email?: The system will send emails to configured users for any transactions taken place for Stock Adjustment in Amazon FBA Inventory. The user can select the Email Template from the drop-down menu or you can create a new template for this type of transaction.
Request and Process Stock Adjustment
Once the Stock Adjustment Configuration is done, we will fetch the stock adjustment report from Amazon. There are two ways to fetch their Amazon stock adjustment in Odoo.
Manually through Operations
- Step-1: Go to Amazon ↣ Operations.
- Step-2: Select the respective Amazon Seller
- Step-3: Select FBA Operation
- Step-4: Select Operations for Import FBA Stock Adjustment
- Step-5: The user can select the data range.
- Step-6: Click on the Excute button
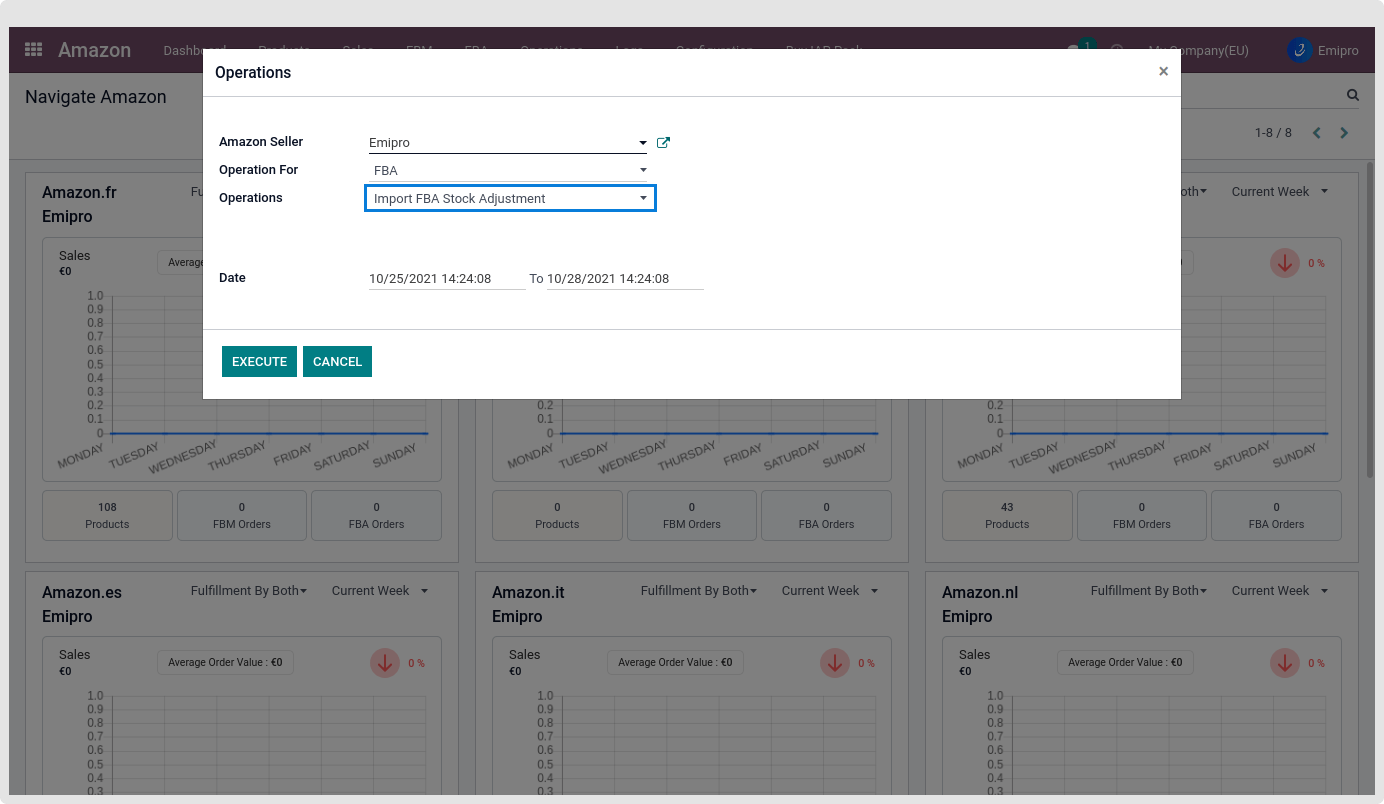
Once, the user requests a stock adjustment report from Amazon,
It will be visible under the tab Amazon ↣ FBA ↣ FBA Inventory ↣ Stock Adjustment. The user will also find all the previously created reports.
Now, the user needs to process the fetched reports from Amazon. Click on any of the listed reports. The user will see the button to process the Inventory Adjustments as shown below. The user can also see the real-time status of adjustments in the Amazon FBA Inventory.
Note
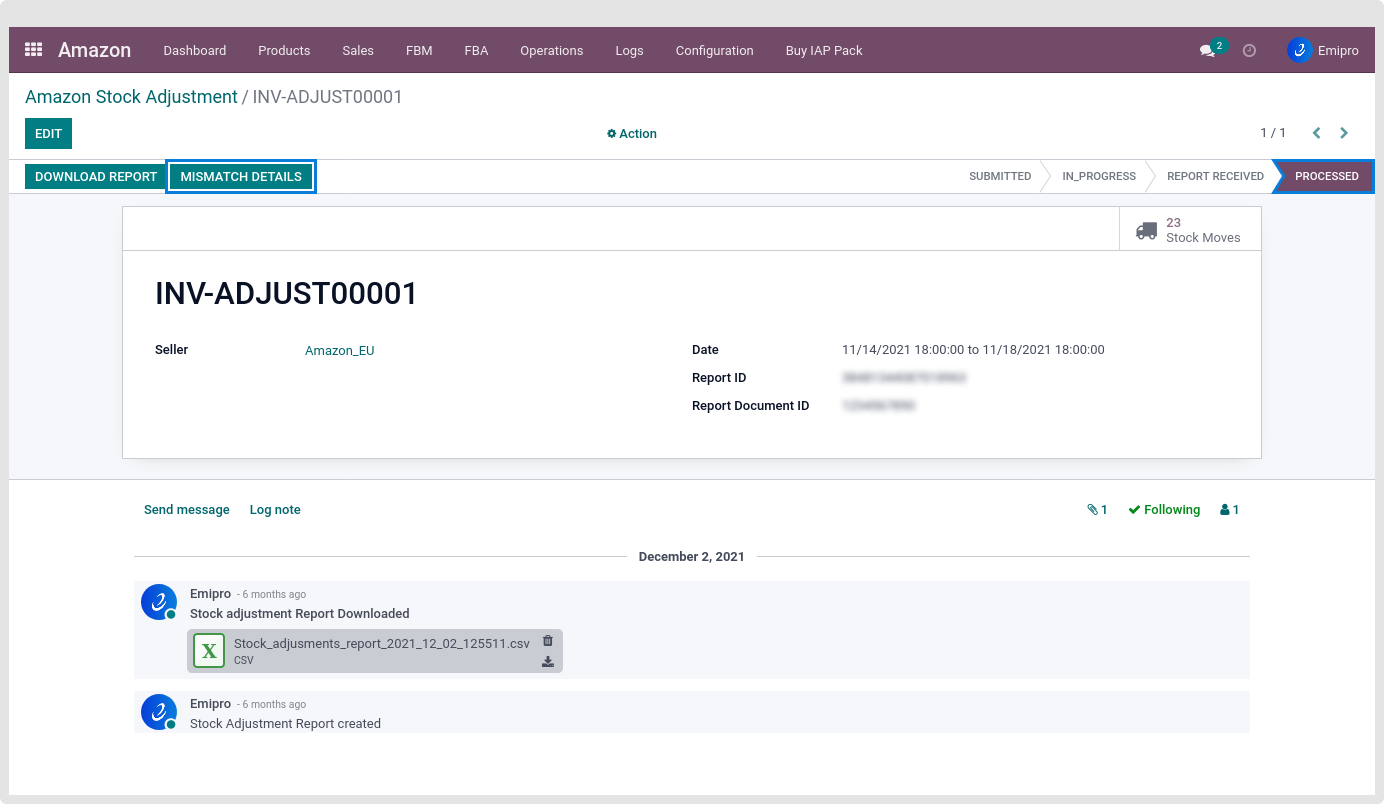
The outstanding amounts from/to Amazon for stock adjustments in the FBA Inventory will be mentioned in the settlement report provided by Amazon at a certain time interval.
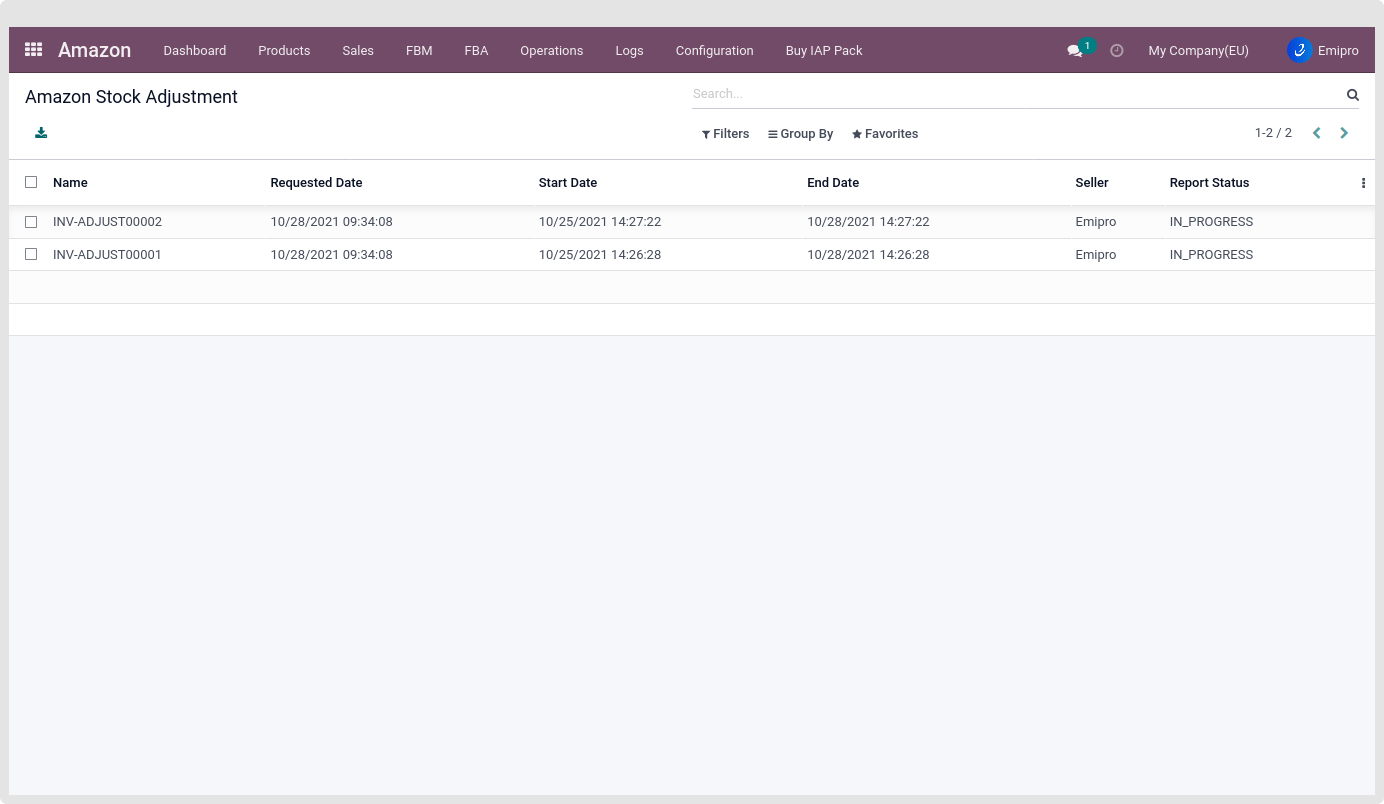
Automatically through Scheduler:
Go to Amazon ↣ Configuration ↣ Sellers ↣ FBA Scheduler.
FBA Removal Order Process
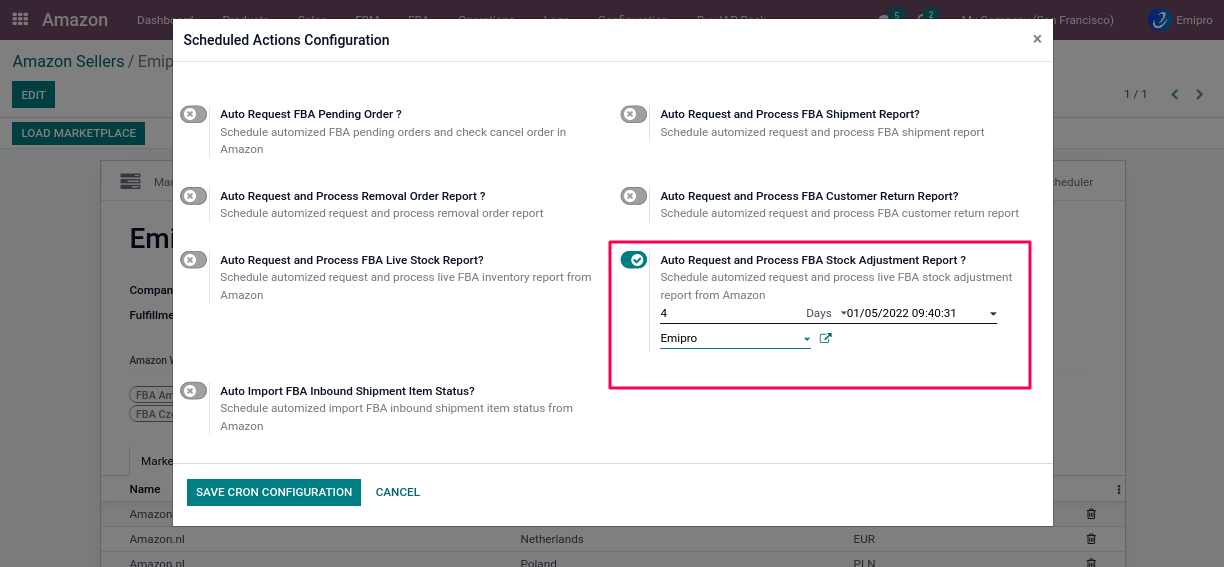
- There can be a scenario where some of the stock becomes unsellable due to unavoidable circumstances in which it cannot be restored back to its original state.
- In this case, The user can either remove the stock from the Amazon FBA warehouse or dispose of it.
There are three types of removal orders
- Return
- Disposal
- Liquidation
1.Return:
- In the removal order process, the user can create removal orders to get back the product from the Amazon warehouse to the Merchant warehouse.
- User can return two types of products: Sellable and Unsellable products.
- If the product is **unsellable, then the system will transfer from Amazon’s unsellable location to the Merchant warehouse, scrap location.
- If the product is **sellable, then the system will transfer from the Amazon stock location to the Merchant warehouse stock location.
NOTE
The system will select a Merchant warehouse based on configuration and also select a location based on routes.
2.Disposal:
- In this case, Amazon will dispose of products and in the Odoo system, it will create an internal transfer from Amazon sellable/unsellable location to Inventory Loss.
- If the product is **sellable, then the system will transfer from Amazon stock location to Inventory Loss.
- If the product is **unsellable, then the system will transfer from Amazon’s unsellable location to Inventory Loss.
3.Liquidation:
In this case, Amazon will liquidate the products, and the connector will create an internal transfer from Amazon’s sellable/unsellable location to the Customers’ location.
Create Removal Order from Odoo
The user can request the FBA removal orders in two ways, one is Manually and the other is using the scheduler.
NOTE
- This report contains all the removal orders, including the items in each removal order, placed during any given time period.
- This can be used to help reconcile the total number of items requested to be removed from an Amazon fulfillment center with the actual number of items > removed, along with the status of each item in the removal order.
Manually through Operations:
- Step-1: Go to Amazon ↣ Operations.
- Step-2: Select the respective Amazon Seller
- Step-3: Select FBA Operation
- Step-4: Select Operations for Import FBA Removal Orders
- Step-5: The user needs to select the data range.
- Step-6: Click on the Excute button
Automatically through Scheduler:
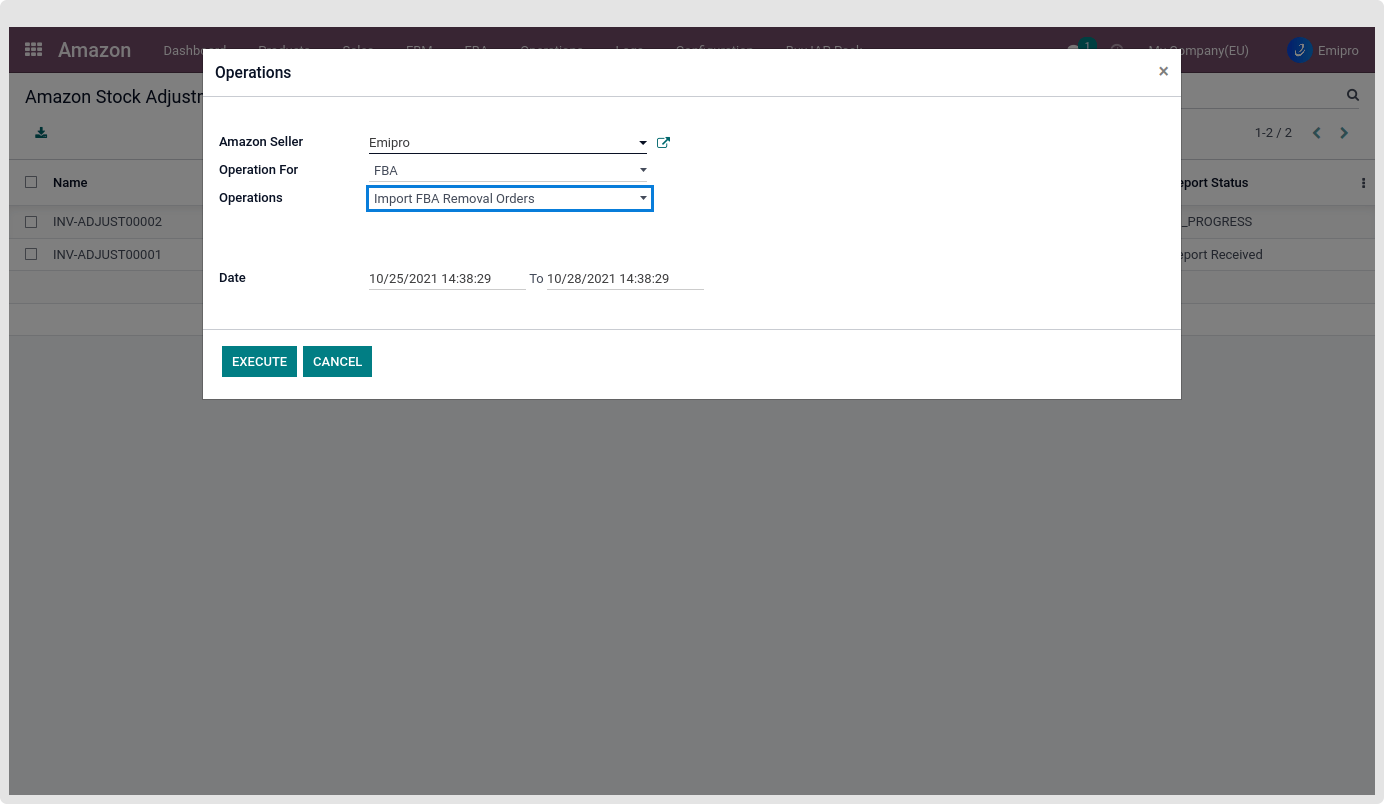
The user needs go to Amazon ↣ Configuration ↣ Sellers ↣ FBA Scheduler.
Create Removal Order from Odoo
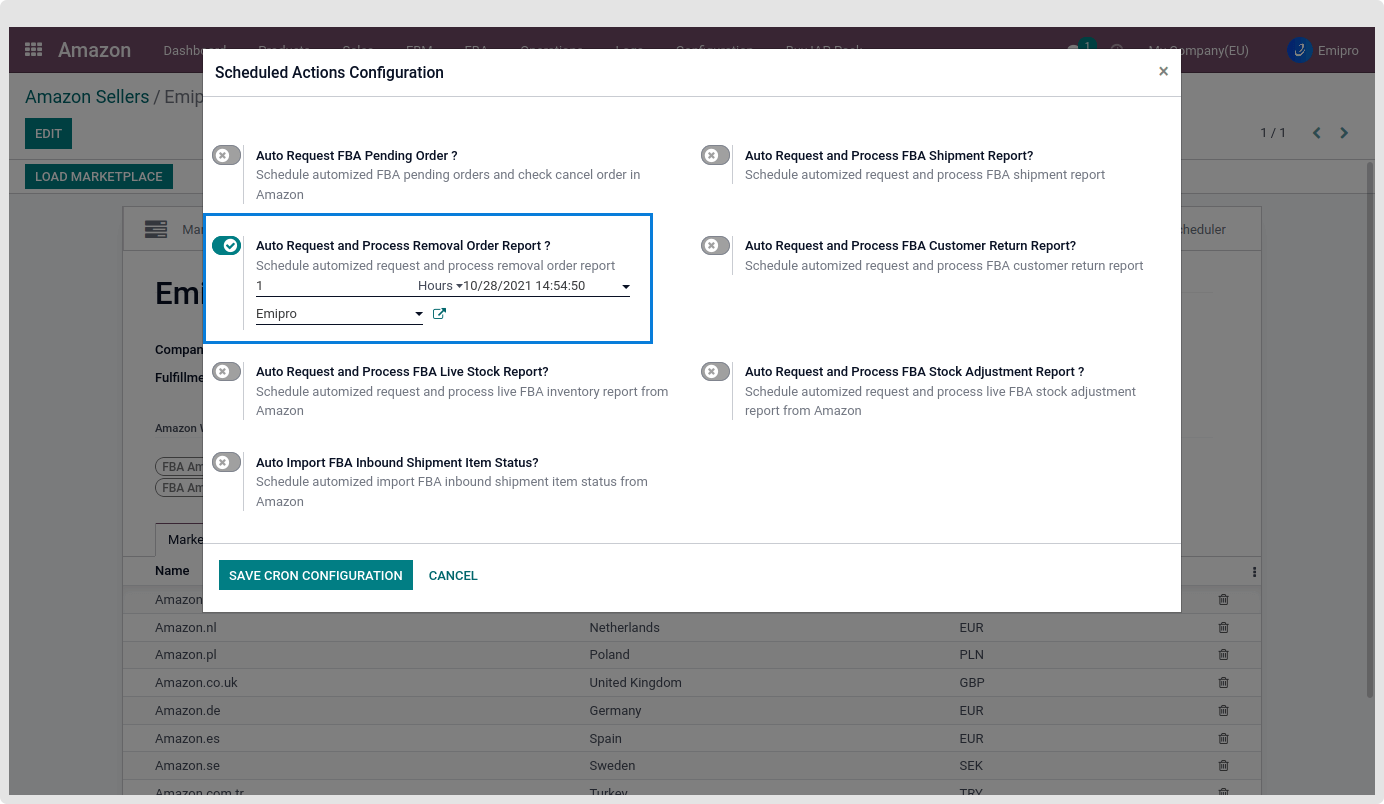
- The user can create a removal order by
- Go to Amazon ↣ FBA ↣ Removal Orders ↣ Create Removal Order Plan.
- Here The user can specify removal order Marketplace.
After performing the above action, The user will be redirected to the removal order form view, where the user can enter the following details:
- Marketplace: Choose the Marketplace for which the user would like to create a removal order.
- Destination Warehouse: By default, the system will select Removal Warehouse based on instance configuration.
- Removal Disposition: The user can choose either to return the product or to dispose of the product.
- Shipping Address: If removal disposition is returned, then the shipping address is required. Users can create removal orders manually or import using a CSV file.
- When the removal order is created by the user, the system will automatically create a removal order on Amazon and change the state to the removal plan approved.
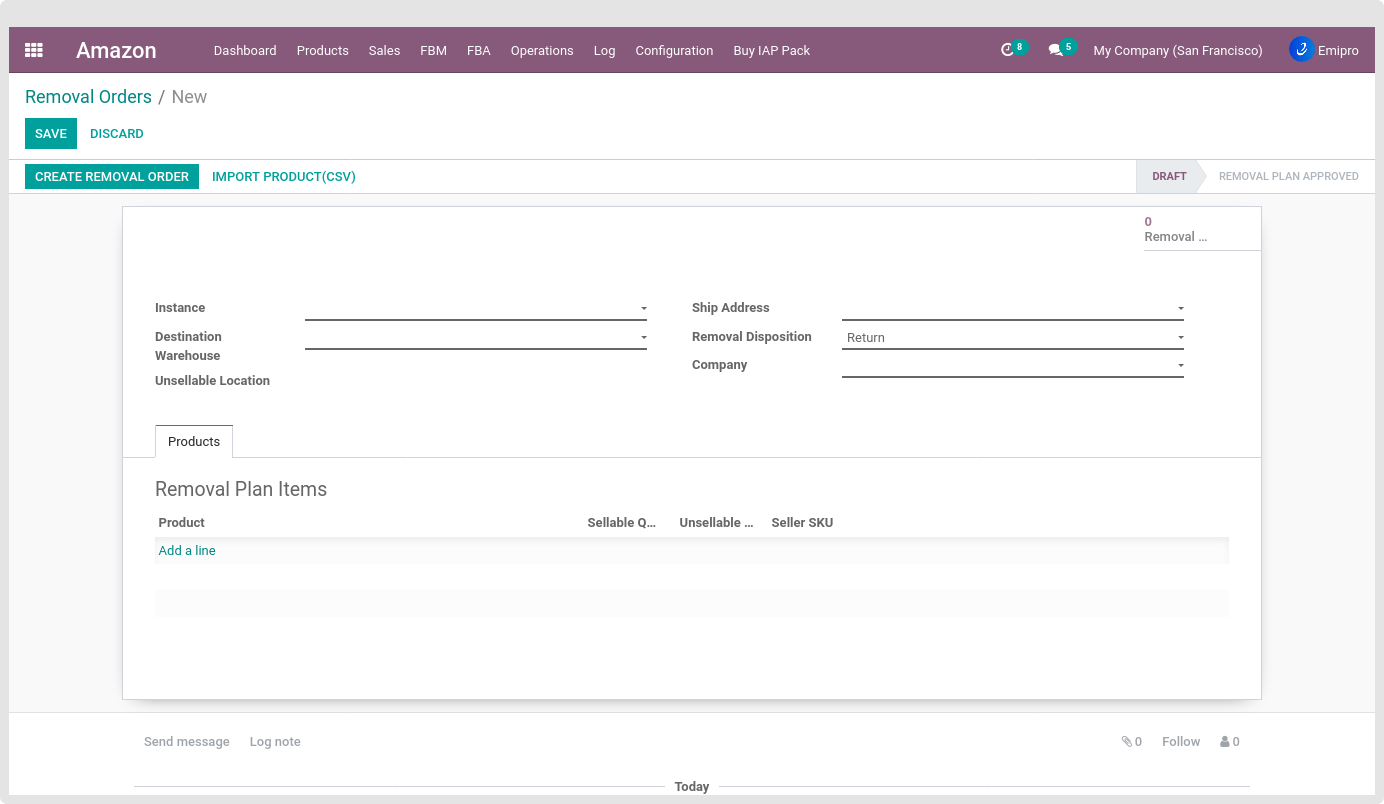
When the Removal Order is in the Draft Stage, Amazon will decide to process it further. Once the order is processed, the user can see the status of the products covered in the Removal Order by clicking on the button generated at the top right as shown below.
Here the status will change to Removal Plan Approved if the Removal Order is processed successfully by Amazon.
Process Removal Order Report
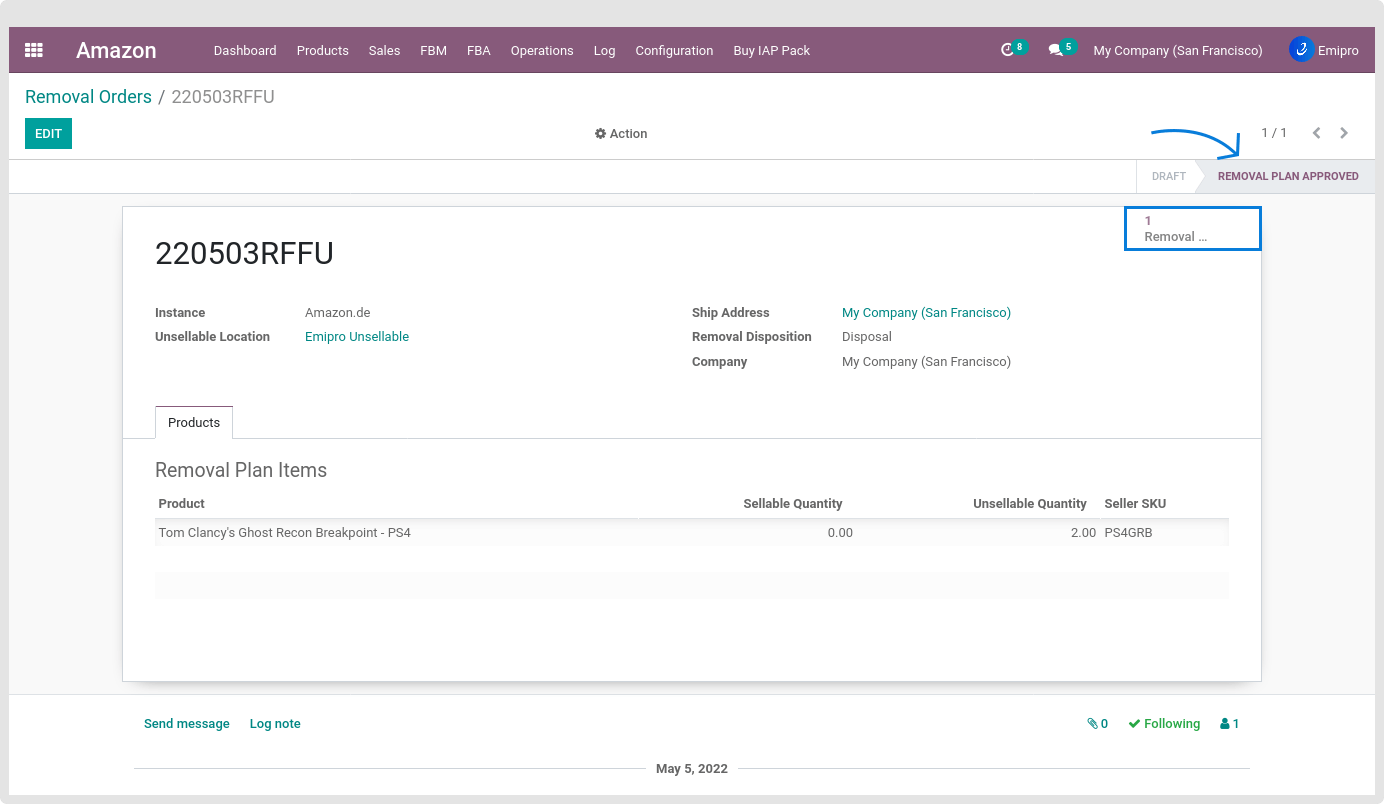
During this process, the system will process the removal order report. There are three states of the Removal process i.e. Completed, Pending, and Cancelled.
- If the status is Cancelled, then the system will cancel all those related moves of products from the Amazon FBA warehouse to the seller’s warehouse.
- If the status is Completed, then the system will transfer picking in Odoo otherwise the system will just skip the lines.
- If the status is Pending, then there are 3 possibilities:
- If it finds the shipped quantity, then the system will create a transfer picking.
- If it finds the canceled quantity, then the system will cancel the stock moves for those products.
- If it finds the in-progress quantity, then the system will create a backorder for partially shipped products.
The user can view the removal orders report by going to Amazon ↣ FBA ↣ Removal ↣ Removal Orders Report.
In the report, if we have a removal order reference that does not exist in Odoo but where auto-created by Amazon, then the system will create those removal orders and process it further just as the user processed earlier orders that were created manually.
Scheduler Configuration
What is a scheduler and its usage ?
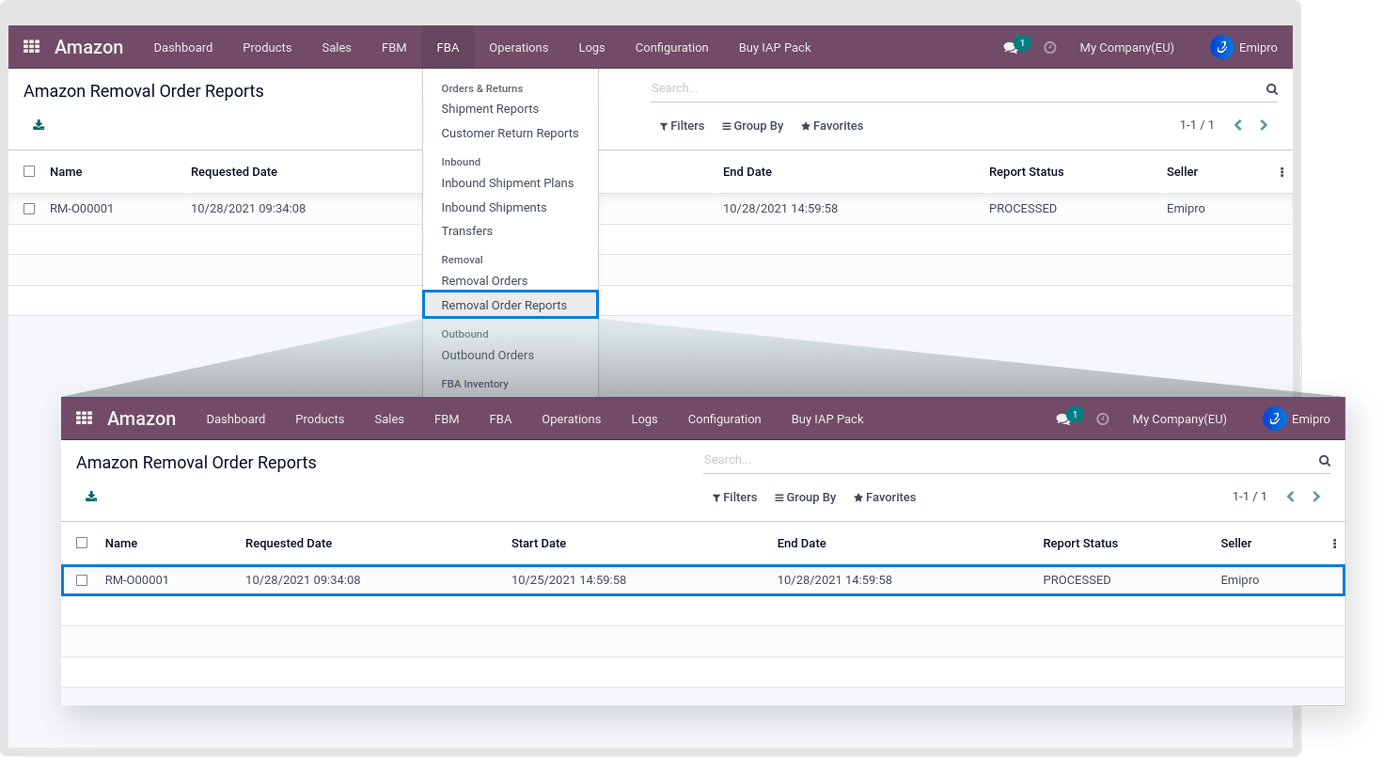
With the help of the scheduler, the operation will automatically be performed by the time intervals configured by the system.
- It can be hours, days, or months.
- The user needs to configure the scheduler Seller-wise
- Go to Amazon ↣ Configuration ↣ Sellers
Archive Seller

- The user can see in the following screen the Archive seller button
- Click on the Archive seller button
- With the help of this feature, the user can archive or unarchive their seller.
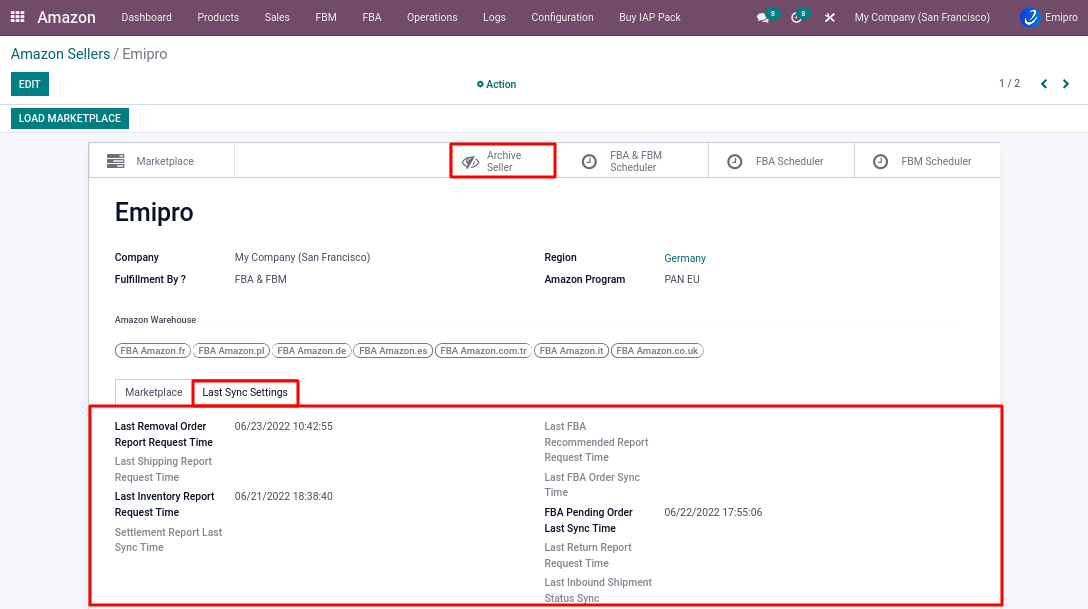

Note
By clicking on Confirm, the system will perform the following operations-
- Archive the seller’s Account
- Archive the FBA Warehouse associated with the selected Seller Account
- Archive Schedulers activated for the selected Seller Account
- Archive Marketplaces connected to the selected Seller Account
- Remove Fulfillment Centers connected to the selected Seller Account
- Remove Amazon Products mapping connected to the selected Seller Account
FBM Schedulers
The user can set the following schedulers with the help of this connector to automate their transactions.
- Step-1: Go to Amazon ↣ Configuration ↣ Sellers.
- Step-2: Click on the Seller
- Step-3: Click on the FBM Scheduler button
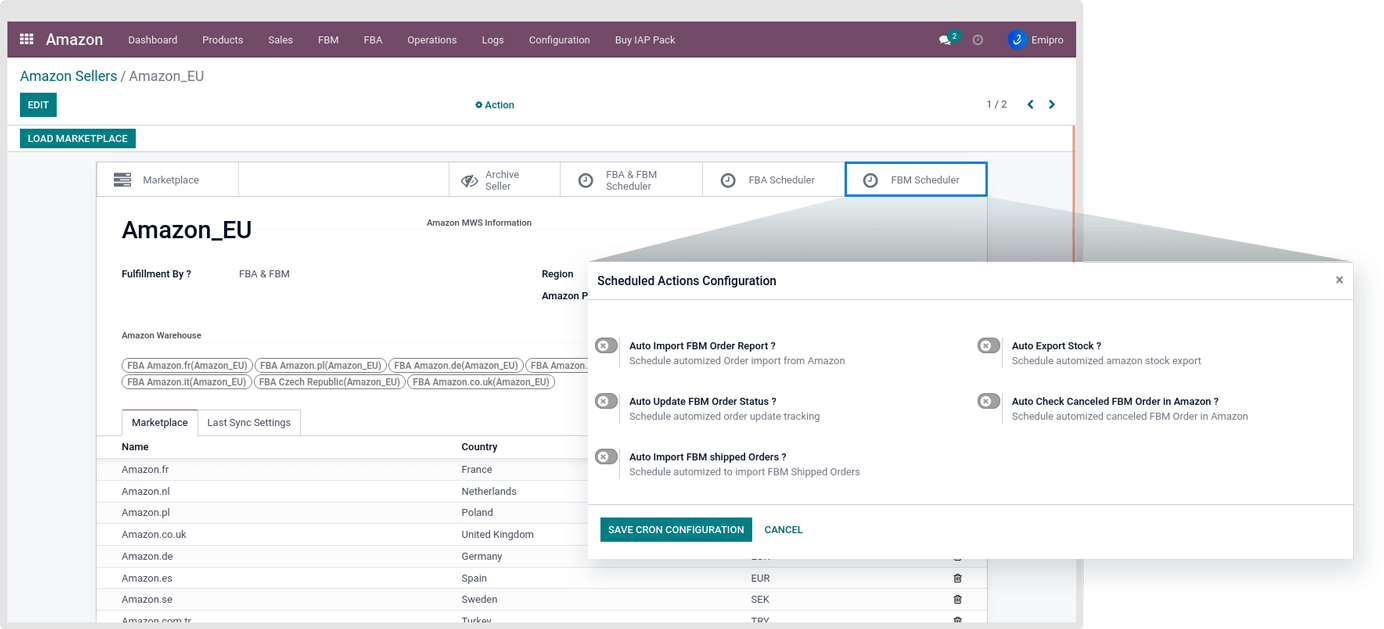
To set the scheduler, the user will be required to enter 3 values:
- Time:The user can set the interval in Hours Dayswhich means the scheduler will run after a selected time interval.
- Execution date time: Here the user can set the execution date and time from which the scheduler will operate. To avoid conflict among cron jobs of the scheduler, It is advisable to keep a few minutes difference among all schedulers.
- User:The user has to select the user through which he/she wants the task to be carried out. Make sure that the user selected for this task has the rights to the same.
Auto Import FBM Order Report
- This scheduler will import FBM Unshipped Orders reports and process them from Amazon to Odoo.
- Scheduler’s ideal time interval:
- FBM: Import Amazon orders: 12 Hours
- FBM: Process Amazon Orders: 30 minutes
Auto Export Stock
- This scheduler will export the FBM products stocks to Amazon from the configured warehouses.
- Stocks exported from the Odoo warehouse to Amazon.
Auto Update FBM Order Status
- This scheduler will update the Tracking numbers and order status for the FBM orders on Amazon which are shipped by the Merchant.
- Update tracking number and order status in Odoo to Amazon.
Auto Check Canceled FBM Order in Amazon
- Cancelled FBM orders** will be imported and processed from Amazon to Odoo using this scheduler.
Auto Import FBM shipped Orders
- This scheduler will import and process FBM orders from Amazon into Odoo.
- Scheduler’s ideal time interval:
- FBM: Import FBM Shipped Orders: 1 Hour
- the user can view all the schedulers in the following section.
FBA Schedulers
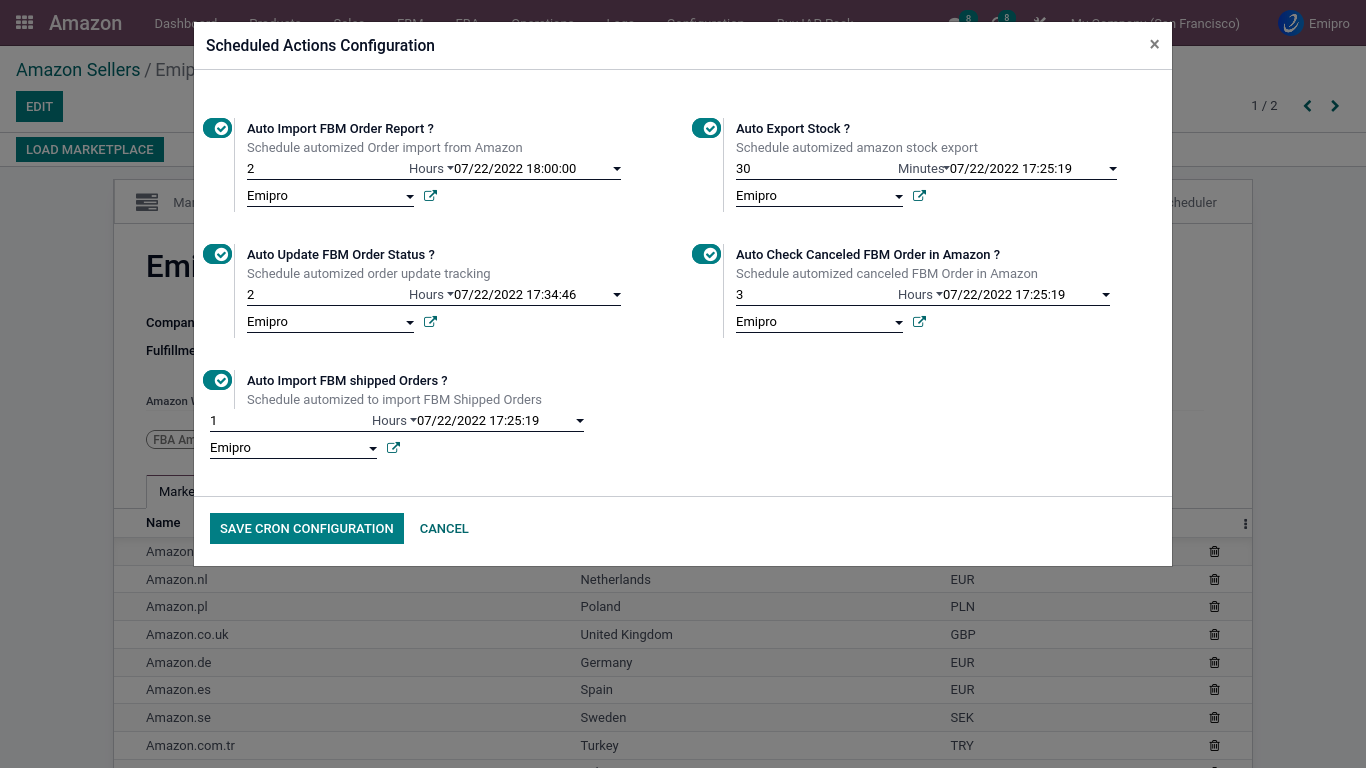
The Amazon connector will perform all the below-mentioned FBA processes automatically based on the intervals set by users for each process.
- Step-1: Navigate to Amazon ↣ Configuration ↣ Sellers.
- Step-2: Click on the Seller
- step-3: Click on the FBA Scheduler button
To set the scheduler, the user will be required to enter 3 values:
- Time:The user can set the interval in Hours Dayswhich means the scheduler will run after a selected time interval.
- Execution date and time: Here the user can set the execution time and date of when the scheduler will begin.
- User:The user has to select the user through which he/she wants the task to be carried out. Make sure that the user selected for this task has the rights to the same.
Auto Request FBA Pending Order
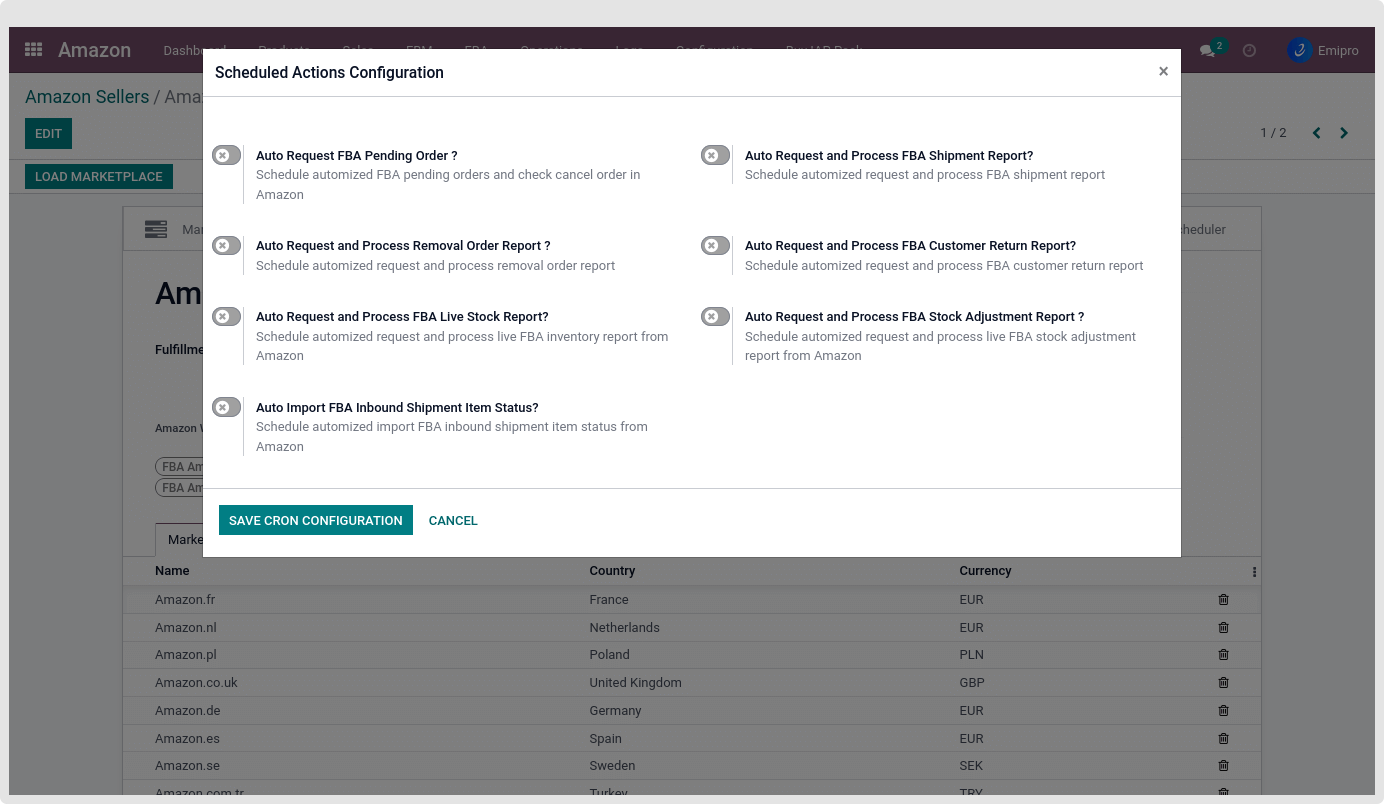
- This scheduler automates the process of FBA pending orders and checks canceled orders on Amazon.
Auto Request and Process FBA Shipment Report
- This scheduler automates the request and process of the FBA shipment report. Partially processed reports need to be processed manually. The scheduler will not process partially processed schedulers.
- Scheduler’s ideal interval time:
- FBA: Import Amazon FBA Shipment Report: 12 hours
- FBA: Process Amazon FBA Shipment Report: 30 minutes.
Auto Request and Process Removal Order Report
- This scheduler automates the request and process of the removal order report.
Auto Request and Process FBA Customer Return Report
- This scheduler automates the request and process of the FBA customer return report.
Auto Request and Process FBA Live Stock Report
- This scheduler automates the request and process of the live FBA inventory report from Amazon.
Auto Request and Process FBA Stock Adjustment Report
- This scheduler automates the request and process of the live FBA stock adjustment report from Amazon.
Auto Import FBA Inbound Shipment Item Status
- This scheduler automates the process of importing FBA inbound shipment item status from Amazon.
The system will check the status of all inbound shipments that have not yet been completely closed by Amazon. According to the setup for status days, if the shipment is closed by Amazon, the system will check the status with Amazon.